

 55Likes
 LinkBack URL
 About LinkBacks
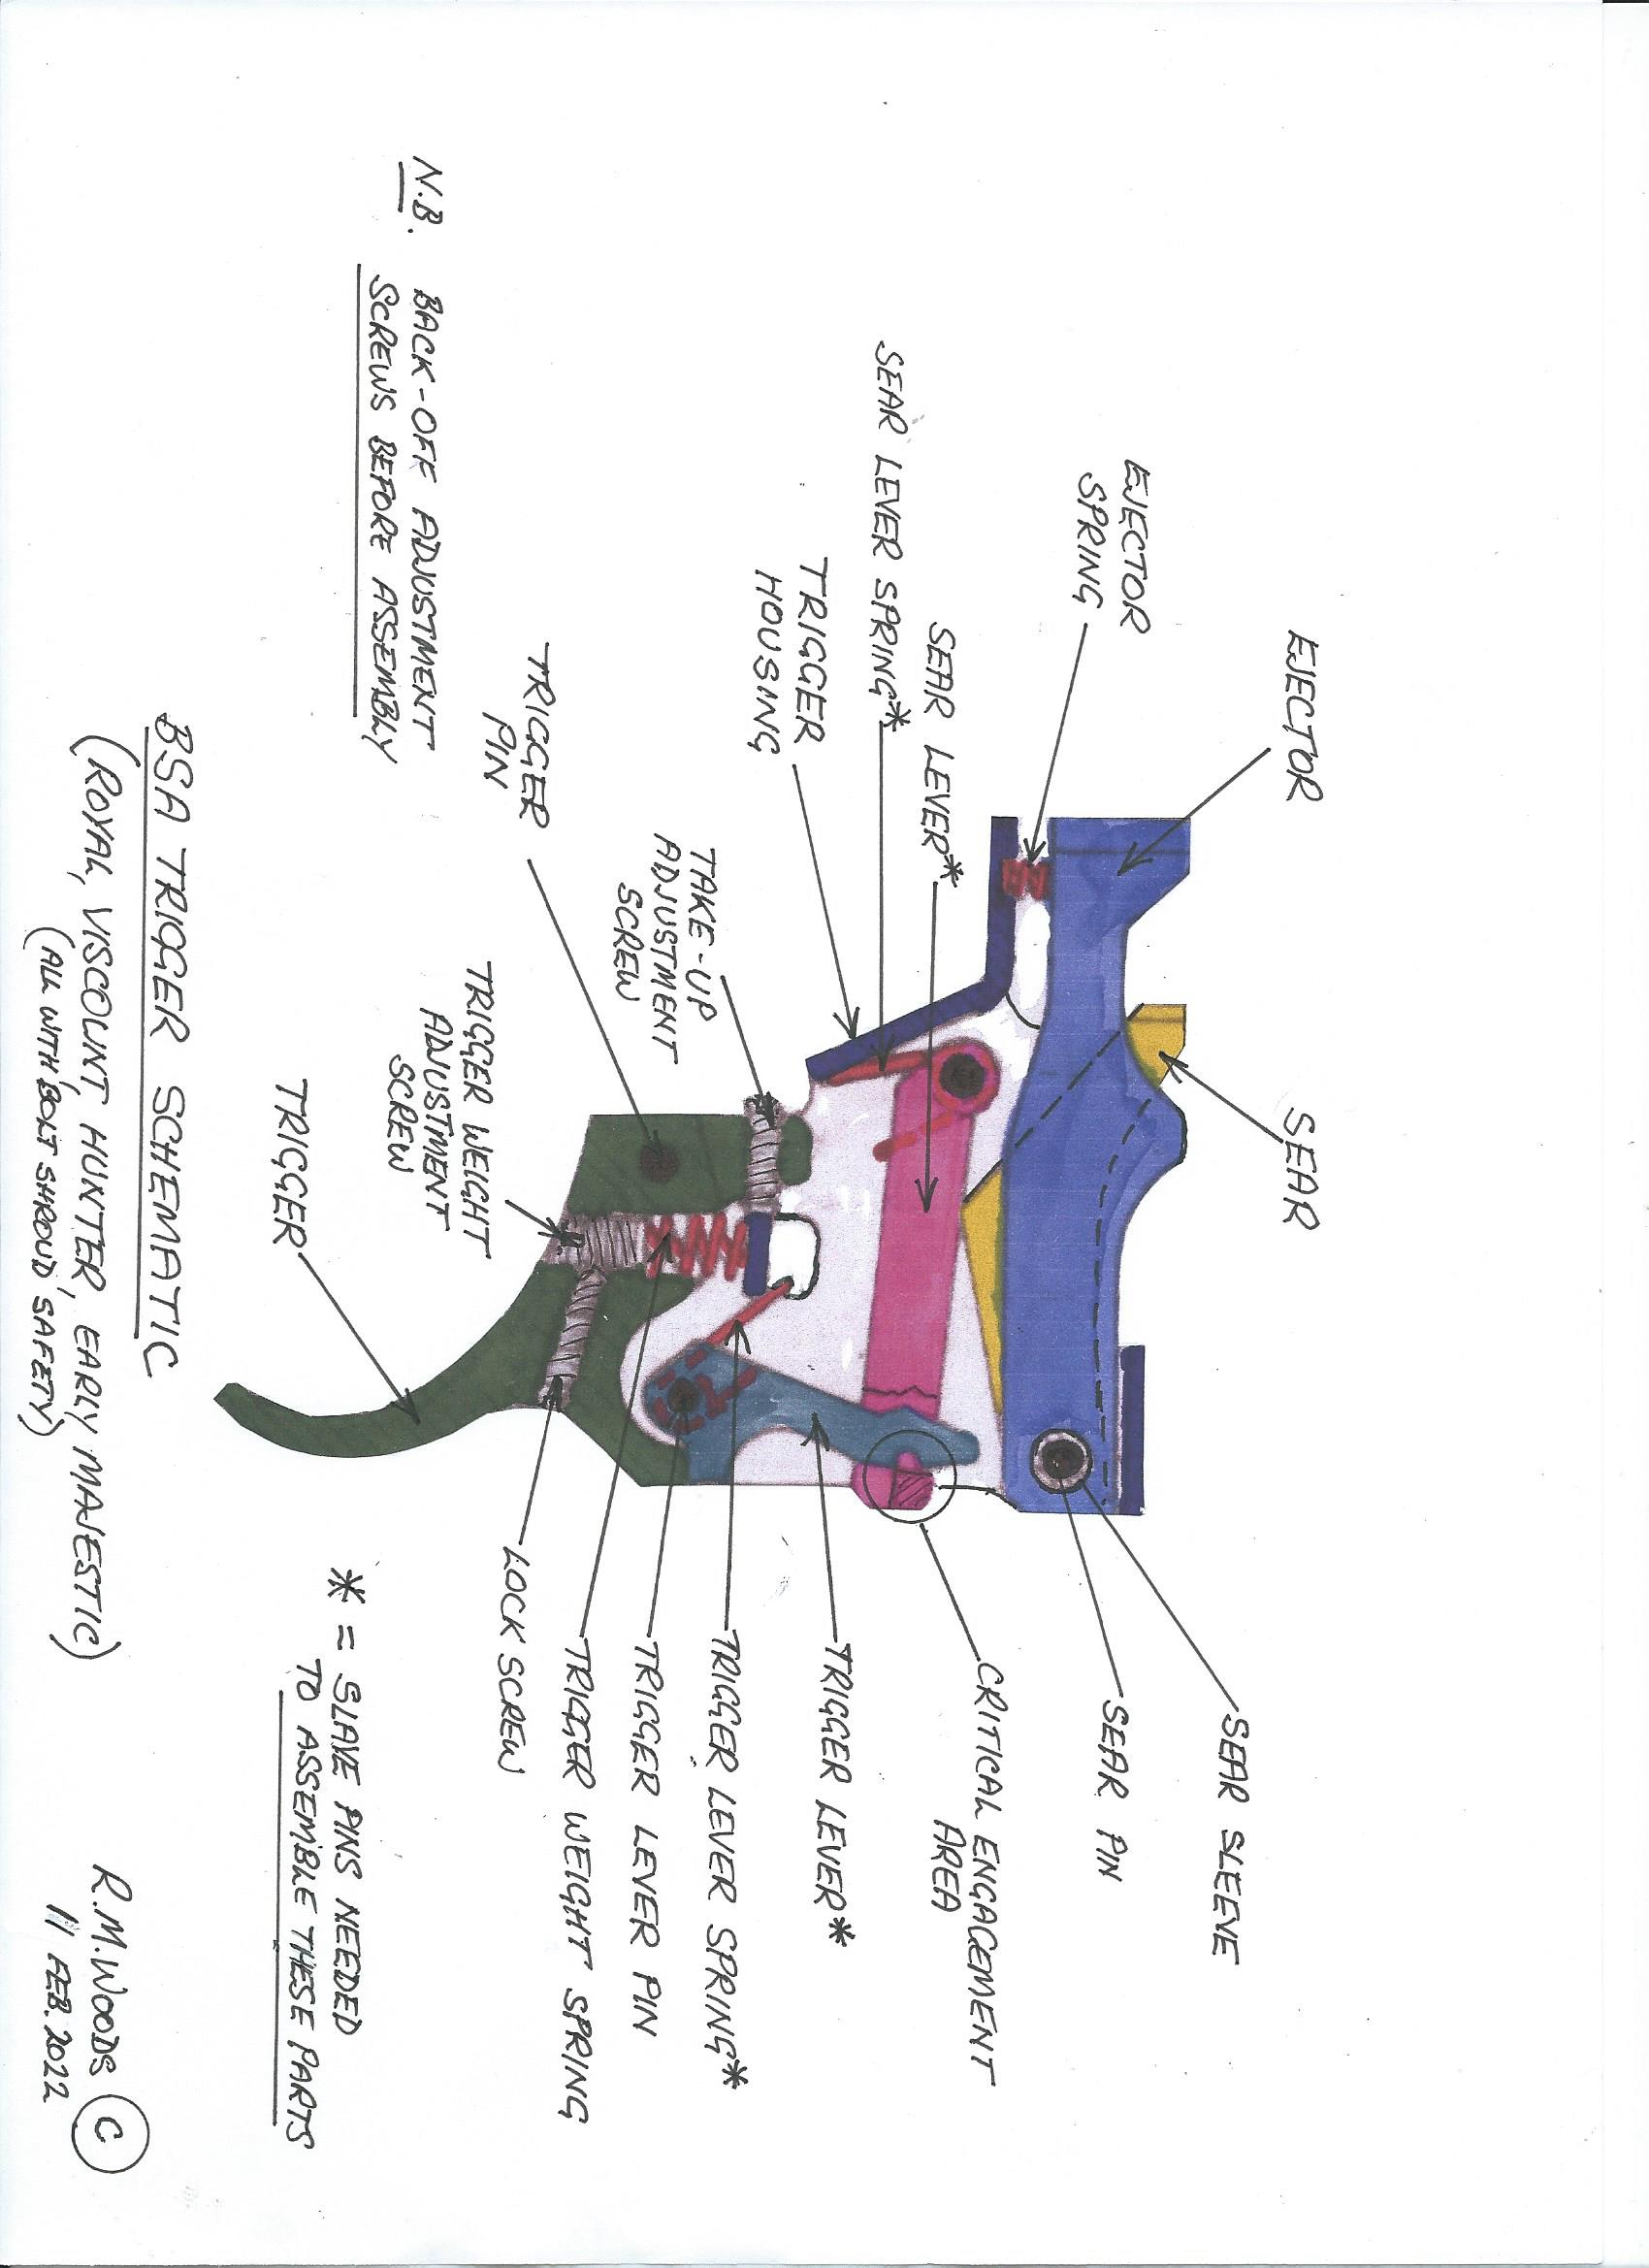
One of the triggers I cut my teeth on when I started professional gunsmithing more than 50 years ago was the 3-lever BSA trigger as found on the Royal, Viscount, Hunter, and early Majestic rifles, all of which feature the safety on the bolt shroud. Now a lot of these older (and high quality) BSA's are becoming popular for custom rifles and I am getting more and more enquiries on these old triggers so I though I would do a sketch to better explain how they work and how to adjust them. By modern standards they are fairly complex for a roll-away sear system, having 4 major components as compared to 2 in most modern triggers. As can be seen on the attached sketch pressure on the trigger (lever 1) moves the trigger lever (lever 2) to release the sear lever (lever 3) which allows the sear to drop, releasing the striker. The critical engagement area is the outer ends of the trigger lever and sear lever where they meet. The two engaging surfaces should have a smooth polish but be dead flat (no curves or rounded edges) with sharp edges. Stoning the surfaces to alter the angles is fraught with danger without specialised knowledge. The rigger can be adjusted for weight of pull, one or two pressures, and sear engagement. The trigger weight adjustment should not be adjusted until the lock screw at the rear of the trigger is slackened off, then small adjustments made to the weight screw, checking frequently by dry firing with a good accurate spring gauge. The ideal weight is between 2.5 - 3 pounds (1.2 -1.5 Kg). Once the desired weight is set then tighten the lock screw. The take-up screw can be slackened off to give a small amount of pre-travel (double pressure) for those that prefer it. The ideal setting is when the tail of the trigger just makes contact with sear lever which will also give a safe sear engagement. Over-tightening of the take-up screw will reduce the sear engagement which could cause the rifle to fire prematurely if the safety catch is disengaged. I do recommend that all trigger work is undertaken by skilled and knowledgeable gunsmiths, and hopefully this small contribution will help the younger ones of them become familiar with system. Note that if the mechanism is dissassembled then small slave pins are needed to install the trigger and sear levers with their springs attached. Go carefully and ask for help if needed!
Welcome guest, is this your first visit? Create Account now to join.
Welcome to the NZ Hunting and Shooting Forums.
Search Forums


User Tag List
+ Reply to Thread
Results 1 to 15 of 17
-
11-02-2022, 07:33 PM #1Member

- Join Date
- Nov 2014
- Location
- Central Otago
- Posts
- 2,342
BSA 3-lever triggers (Royal, Hunter, etc.)
-
-
11-02-2022, 08:25 PM #2Member
- Join Date
- Nov 2021
- Location
- Waikouaiti
- Posts
- 642
I didnt know my BSA Majestic trigger was adjustable until recently. Dont need to change it though, as its got a nice let off. I have even more respect for these old rifles as I get older and have been through some of the modern offerings. I will take a Majestic fwt over a Tikka T3 any day.
-
12-02-2022, 09:51 AM #3Member

- Join Date
- Apr 2019
- Location
- Silverdale
- Posts
- 1,293
-
12-02-2022, 10:24 AM #4Member

- Join Date
- Jul 2012
- Location
- Invervegas
- Posts
- 5,652
Thanks for posting. Interesting that it carried over into the Majestics . . .
-
12-02-2022, 10:55 AM #5Member
- Join Date
- Apr 2012
- Location
- Kingcountry
- Posts
- 5,057
Thanks for your input, have had an odd trigger apart, surprising what you find in trigger weight spring "modifications"
-
12-02-2022, 01:22 PM #6Member
- Join Date
- Jan 2018
- Location
- kaiapoi
- Posts
- 7,373
and there is a BSA Viscount 7x57 on Retardme on the west coast for not bad money if anyone is inspired by this.
Moa Hunter and BSA270 like this.
-
12-02-2022, 01:37 PM #7Banned
- Join Date
- Mar 2015
- Location
- North Canterbury
- Posts
- 5,462
Well no wonder mine is giving grief. Someone has had a serious play in it's past and not assembled it correctly, with the trigger lever / pawl not positioned to pivot on the trigger lever pin. So instead of being penetrated by the pin it is behind the pin and the spring is gone ??? !. Just have to find a suitable spring and I might have one in a kids miniature clothes peg that is about 25 mm long with a little spring
-
12-02-2022, 01:54 PM #8Member
- Join Date
- Mar 2020
- Location
- Takapuna
- Posts
- 11
Good article thanks.
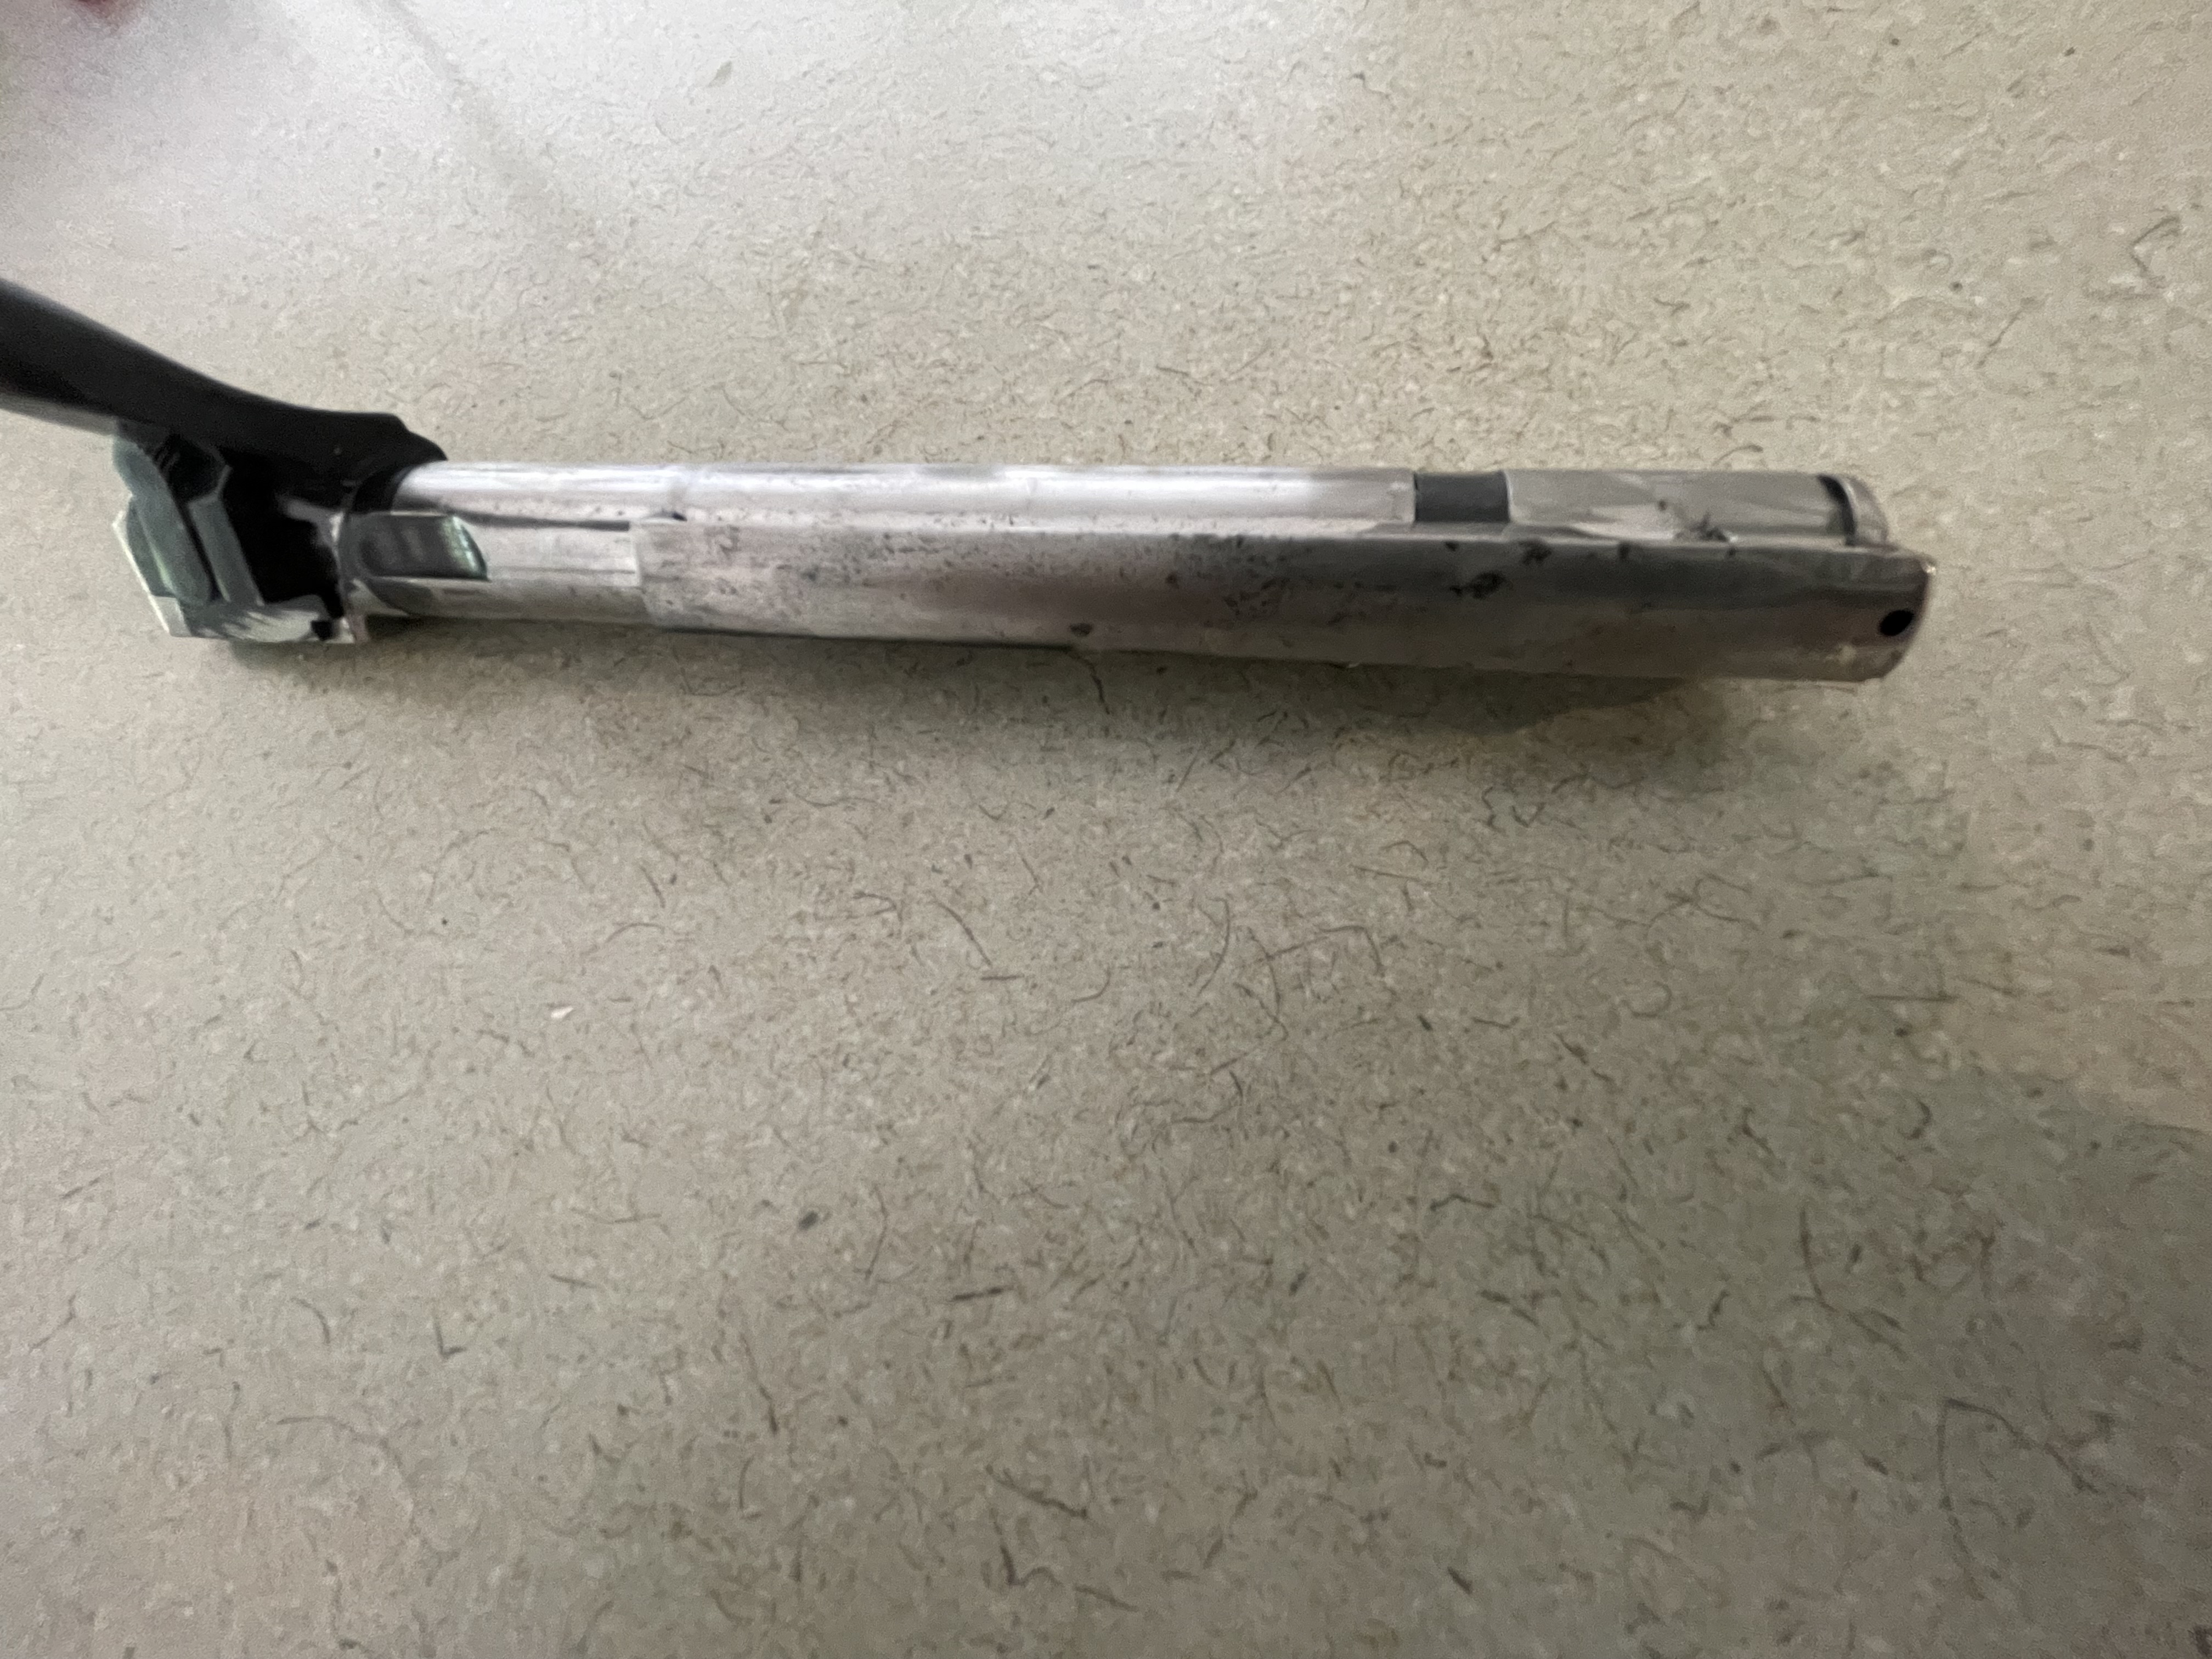
I have an old BSA that I brought back in the 70's it was a 270 and came with a 308 barrel as well. I could never hit anything with the 270 and found out it was past its best by date so I had the 308 barrel put on by a smith in New Plymouth. Unfortunately he shared the end of the extractor off but he did weld it back together and I have shot many deer pigs and goats with. It has to be the most accurate rifle that I ever owned, When short on supplies I could shoot those quacking birds in the head at a 100m no problem at all and you could still eat them.
I no longer take the old girl out because the extractor has a crack in it where it was welded and don't want to risk it failing while on a trip. Would you happen to have a extractor for sale.
I'll try and post a photo of the bolt.
cheers.
-
12-02-2022, 01:55 PM #9Member
- Join Date
- Mar 2020
- Location
- Takapuna
- Posts
- 11
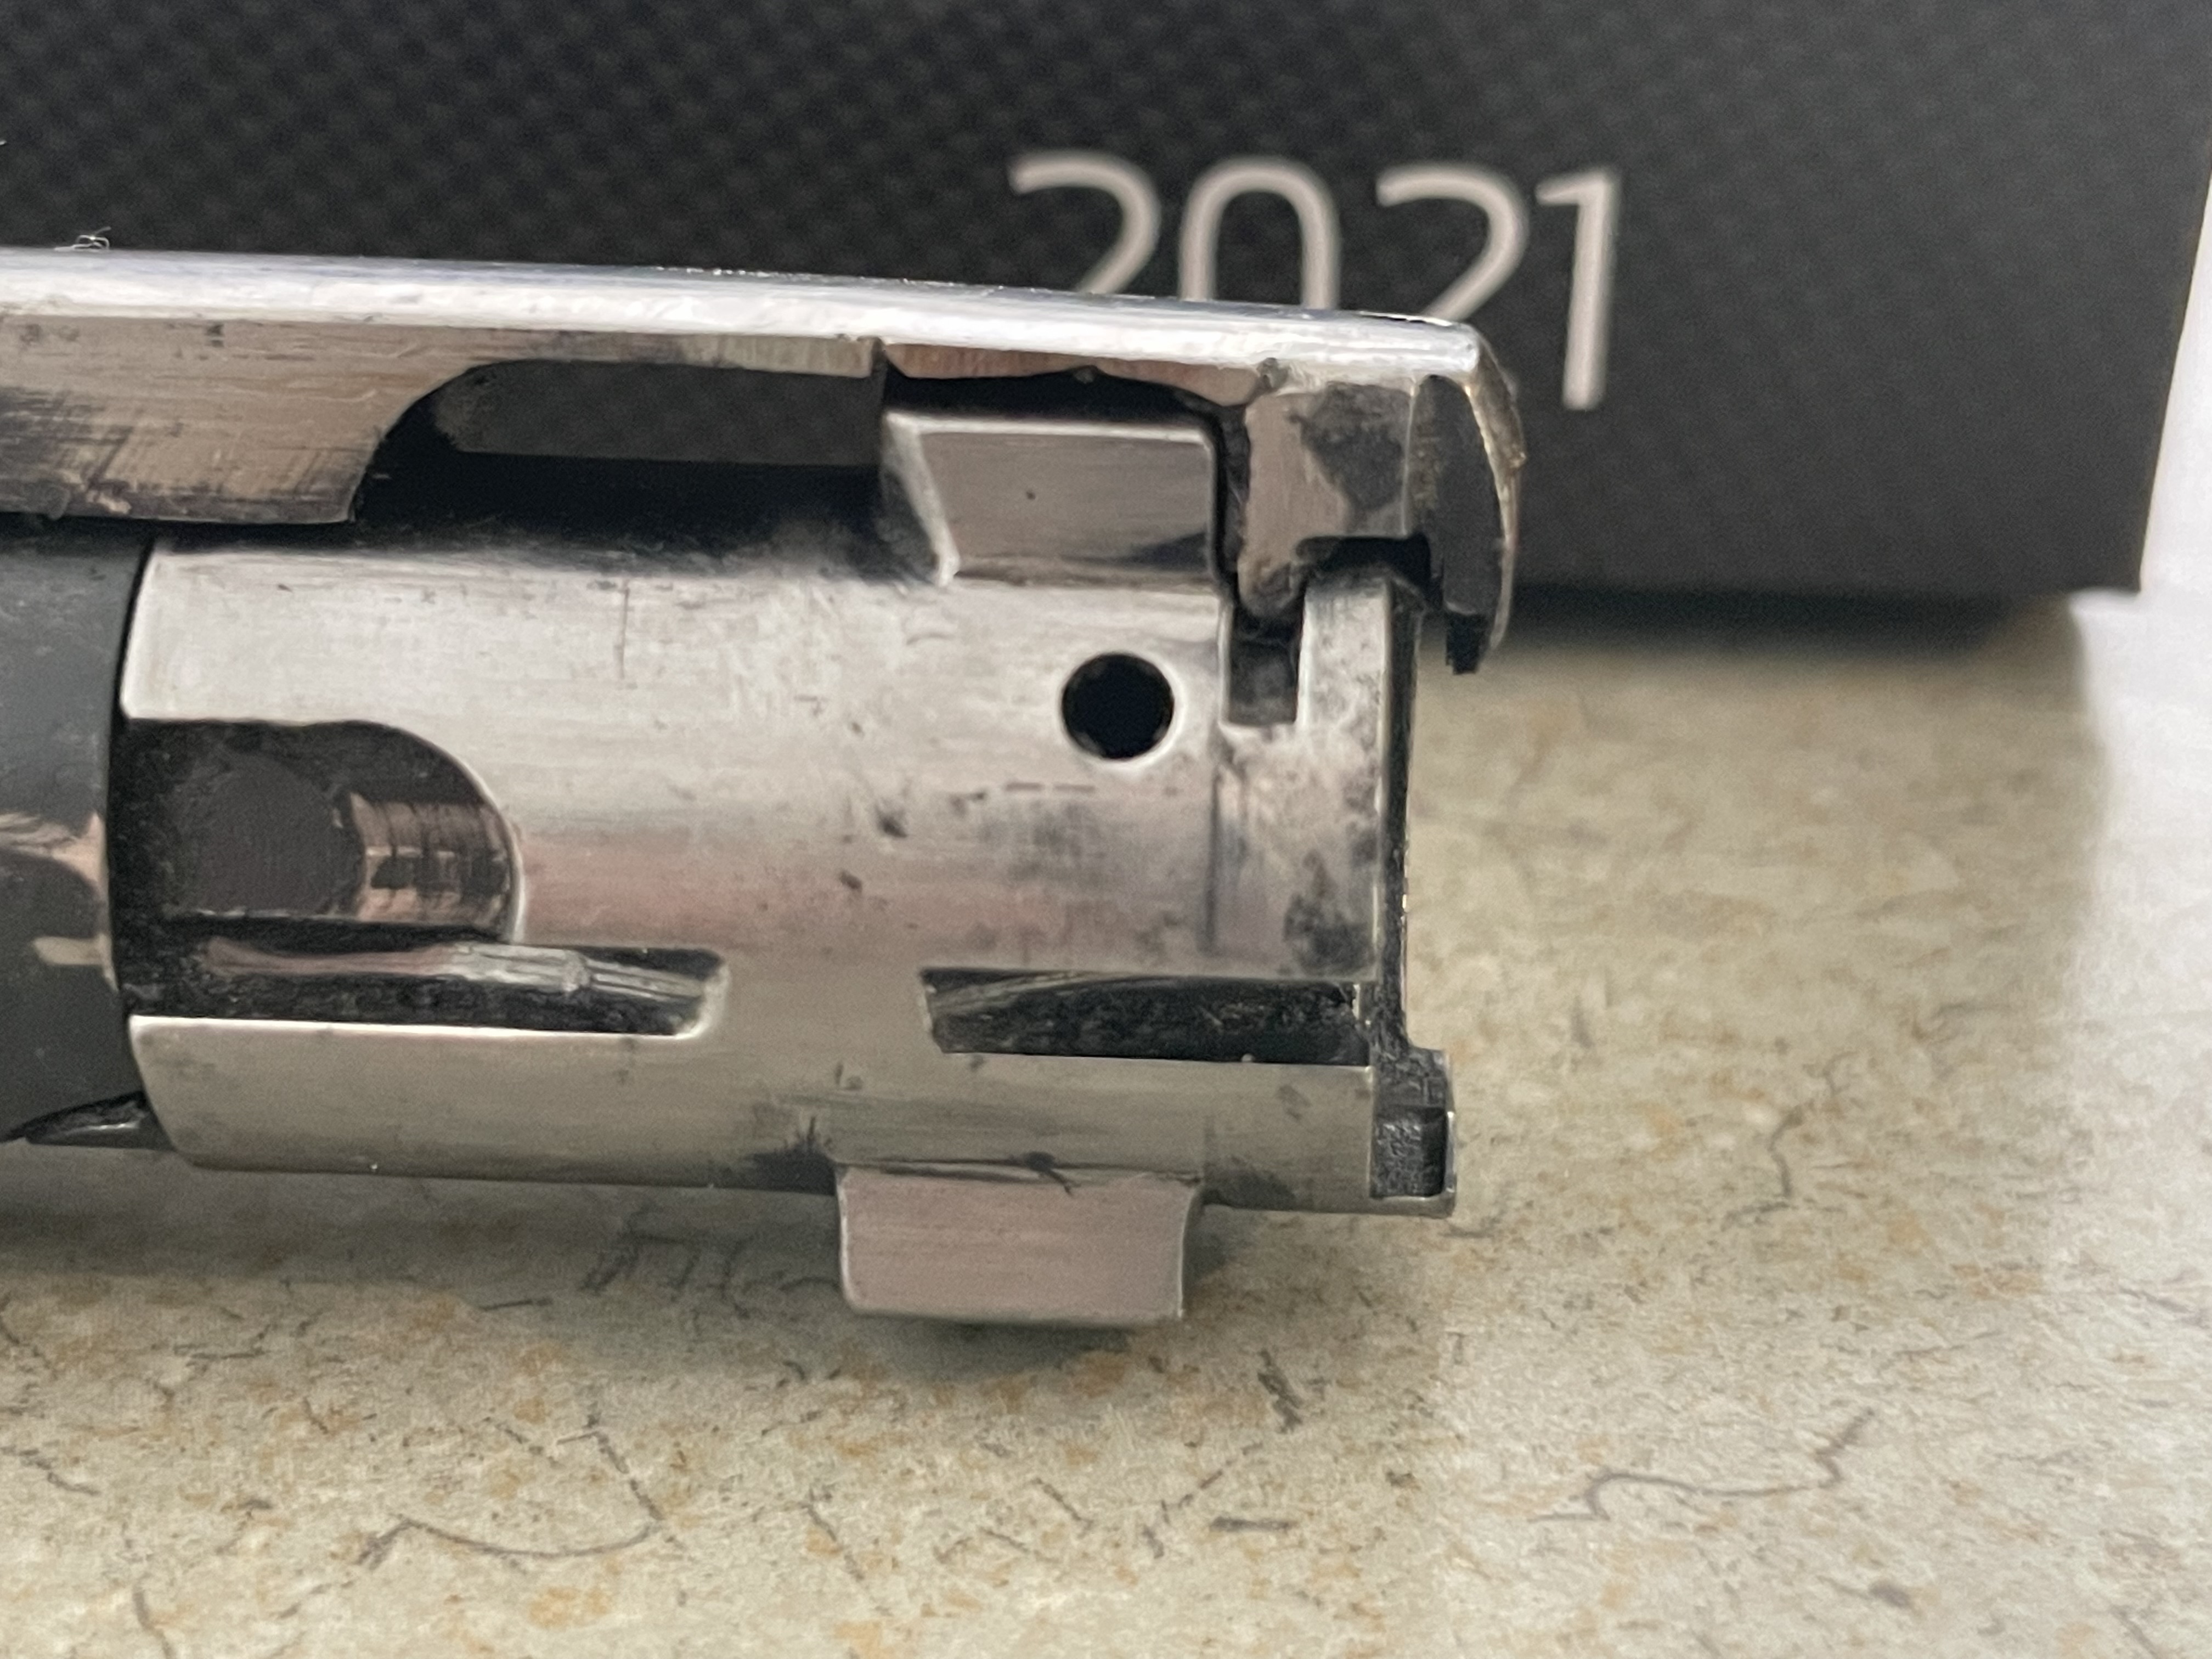
try thisMoa Hunter and Micky Duck like this.
-
12-02-2022, 03:49 PM #10Member
- Join Date
- Nov 2014
- Location
- Central Otago
- Posts
- 2,342
Thats a new trick! He must have tried to unscrew the barrel while the bolt was in place. Unforgiveable!
-
12-02-2022, 03:57 PM #11Member
- Join Date
- Oct 2014
- Location
- Napier
- Posts
- 1,204
I have a few bits and pieces for older BSA rifles here, including a couple of triggers. Just PM me and let me know what you need. Also have a Majestic extractor.
-
12-02-2022, 06:03 PM #12Member
- Join Date
- Jun 2013
- Location
- Middle Earth
- Posts
- 4,541
I know where a replacement extractor lives if you want one.
-
12-02-2022, 06:05 PM #13Member

- Join Date
- Apr 2015
- Location
- Geraldine
- Posts
- 25,448
THAT is why this forum is such a good place,no matter the crap,folks willing to help others out makes life worth living.
good on you blokes...shout yourselves a beer.
-
14-02-2022, 12:19 PM #14Member
- Join Date
- Mar 2020
- Location
- Takapuna
- Posts
- 11
Thanks for the help guys.
Friwi I have sent you a PM.
-
17-02-2022, 07:00 PM #15Member
- Join Date
- Apr 2020
- Location
- Taupo
- Posts
- 162
Wish I had seen this some 50 odd years ago.
The ignorance of youth.
Not much better now I'm afraid.
At least i didn't pull it to pieces . Just removed the trigger tension screw completely.
I think it's well under 2 1/2 lb
 Magic.
  Moa Hunter likes this.


 Reply With Quote
Similar Threads
-
BSA Hunter / Royal / Viscount etc Tenon Thread
By Coelacanth in forum Firearms, Optics and AccessoriesReplies: 9Last Post: 24-10-2018, 08:31 AM -
BSA Royal .30/06
By gundoc in forum Firearms, Optics and AccessoriesReplies: 2Last Post: 20-04-2018, 03:07 PM -
THE ROYAL STAGS OF WINDSOR - £9.95
By wiredkiwis in forum HuntingReplies: 0Last Post: 27-09-2012, 02:08 AM
Tags for this Thread
 Posting Permissions
- You may not post new threads
- You may not post replies
- You may not post attachments
- You may not edit your posts
Welcome to NZ Hunting and Shooting Forums! We see you're new here, or arn't logged in. Create an account, and Login for full access including our FREE BUY and SELL section Register NOW!!
All times are GMT +13. The time now is 09:20 PM.

Bookmarks