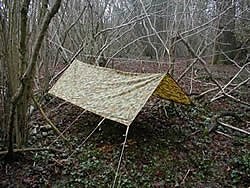
Keen to see pics of your fly rope attachment areas ? How are they re-inforced / strengthened ?
Also keen to hear how you rig them ? Long ridgeline better than tying onto the corners of the ridgeline ?
I know @308 was talking about stretchies ... ?
Welcome guest, is this your first visit? Create Account now to join.
Welcome to the NZ Hunting and Shooting Forums.
Search Forums
User Tag List
+ Reply to Thread
Results 1 to 11 of 11
Thread: Fly corners & rigging
-
07-07-2014, 08:16 PM #1
Fly corners & rigging
Viva la Howa ! R.I.P. Toby | Black rifles matter... | #illegitimate_ute
-
-
07-07-2014, 08:27 PM #2OPCz


- Join Date
- Jun 2012
- Location
- Nor West of Auckland on the true right of the Kaipara River
- Posts
- 34,660
Ebf I just use an army hootchie which has stitched in loop tabs and I tie about 2.5 metres of sturdy string to each loop using a bowline knot.
It takes 43 muscle's to frown and 17 to smile, but only 3 for proper trigger pull.
What more do we need? If we are above ground and breathing the rest is up to us!
Rule 1: Treat every firearm as loaded
Rule 2: Always point firearms in a safe direction
Rule 3: Load a firearm only when ready to fire
Rule 4: Identify your target beyond all doubt
Rule 5: Check your firing zone
Rule 6: Store firearms and ammunition safely
Rule 7: Avoid alcohol and drugs when handling firearms
-
07-07-2014, 08:54 PM #3Member

- Join Date
- Nov 2012
- Location
- BOP
- Posts
- 21,378
Ebf I like the Motel models with hot showers, flushing loo, warm bed and cooking facilities tied down with Z nails!
 Boom, cough,cough,cough
-
07-07-2014, 09:00 PM #4OPCz


- Join Date
- Jun 2012
- Location
- Nor West of Auckland on the true right of the Kaipara River
- Posts
- 34,660
It takes 43 muscle's to frown and 17 to smile, but only 3 for proper trigger pull.
What more do we need? If we are above ground and breathing the rest is up to us!
Rule 1: Treat every firearm as loaded
Rule 2: Always point firearms in a safe direction
Rule 3: Load a firearm only when ready to fire
Rule 4: Identify your target beyond all doubt
Rule 5: Check your firing zone
Rule 6: Store firearms and ammunition safely
Rule 7: Avoid alcohol and drugs when handling firearms
-
07-07-2014, 09:04 PM #5Member

- Join Date
- Nov 2012
- Location
- BOP
- Posts
- 21,378
And my gold card will get me concessions and free travel on the bus FFS!
Boom, cough,cough,cough
-
07-07-2014, 09:13 PM #6
-
07-07-2014, 09:19 PM #7OPCz


- Join Date
- Jun 2012
- Location
- Nor West of Auckland on the true right of the Kaipara River
- Posts
- 34,660
It takes 43 muscle's to frown and 17 to smile, but only 3 for proper trigger pull.
What more do we need? If we are above ground and breathing the rest is up to us!
Rule 1: Treat every firearm as loaded
Rule 2: Always point firearms in a safe direction
Rule 3: Load a firearm only when ready to fire
Rule 4: Identify your target beyond all doubt
Rule 5: Check your firing zone
Rule 6: Store firearms and ammunition safely
Rule 7: Avoid alcohol and drugs when handling firearms
-
07-07-2014, 09:32 PM #8
Rushy, so how many loops do you have in total ?
On the ridgeline you only have on on either side ? does the middle of the ridgeline not sag ?Viva la Howa ! R.I.P. Toby | Black rifles matter... | #illegitimate_ute
-
07-07-2014, 09:41 PM #9OPCz


- Join Date
- Jun 2012
- Location
- Nor West of Auckland on the true right of the Kaipara River
- Posts
- 34,660
Without going to get it out to check I am going to say four down each long side one central to each of the short sides and two on the ridge line at the quarter and three quarter points so it can be rigged up with a guy rope running centrally along the ridge but outside and above the ridge (but I seldom string it up that way).

Last edited by Rushy; 07-07-2014 at 09:51 PM.
It takes 43 muscle's to frown and 17 to smile, but only 3 for proper trigger pull.
What more do we need? If we are above ground and breathing the rest is up to us!
Rule 1: Treat every firearm as loaded
Rule 2: Always point firearms in a safe direction
Rule 3: Load a firearm only when ready to fire
Rule 4: Identify your target beyond all doubt
Rule 5: Check your firing zone
Rule 6: Store firearms and ammunition safely
Rule 7: Avoid alcohol and drugs when handling firearms
-
07-07-2014, 09:47 PM #10
I run the string (actually paracord) on the inside lifting the centre ridge up.
You can flip it over the other way but I do it that way so I can hang my socks, gaiters, etc up to air and hang a torch up.
I find the stretchies good for if it snaps about in the wind and I peg mine with plastic pegs in the corners. I found some stretchies at Bunnings that are light with plastic hooks.
If it is windy I back one end into a treetrunk.
You know the round pebble method of tying down a sheet?
There is an illustration near the bottom of this page
Fundamentals of Camping
I've used this old method and it works well
-
08-07-2014, 10:37 AM #11Member

- Join Date
- Jun 2014
- Location
- CNI
- Posts
- 5,985
Hi guys. I have been making my own tent flys for years. I use the plastic that comes off timber stacks (this can be obtained from timber yards like bunnings etc as this stuff is very light but strong and uv resistant for it's weight) Cut it to whatever dimensions you want. For the centre ridge I cut an extra strip or two and glue then along the centre rope line using ADOS contact cement to protect from abrasion wear and to reduce stretch.
The edges, I reinforce using the same technique and also double the edges by folding over and gluing with ADOS for about a 4-6 inch width along the whole border of the tarp; and where I place my eyelets I cut squares or triangular shapes of spare vinyl from upholsterers rubbish bins and seal these into the seams by folding them inside as the seam is doubled and glued , again using ADOS. Then punch hole for eyelets and press these in place. (Kits available from saddlers or Mitre 10)
I usually insert eyelets on all edges including front and rear to ensure the tarp stays in place longitudinally as well as laterally. Nylon chainsaw cord for ties and rubber bungees made by cutting hoop sections from old tyre tubes. (Rigid tying will cause your tent to rip in stormy weather so bungees are important.) The biggest one I have made of this material is 20 ft long by 12ft wide and has lasted for several trips and several years so far. This timber stack wrap-plastic sheeting does not seem to perish like the polyester tarps commonly sold in Warehouse, Mitre 10/ bunnings etc. You can also buy it in large rolls from a plastic packaging wholesale specialist. For pegs I use reinforcing steel rod or if weight is an issue, cut them from dead teatree or other dead vegetation on site. (Always take a small saw)
In the event of an eyelet busting I use a rounded pebble / small rock wrapped / folded / twisted into the tent edge and tied in place using some twine (like a hanged man). Puts crinkles into the tent but prevents loss of the shelter.
Tags for this Thread
Welcome to NZ Hunting and Shooting Forums! We see you're new here, or arn't logged in. Create an account, and Login for full access including our FREE BUY and SELL section Register NOW!!


 6Likes
 LinkBack URL
 About LinkBacks


 Reply With Quote


Bookmarks