I just struggled to get those sizes locally. Normally get taps from TradeTools or Chevpac.Quote:
Originally Posted by Mauser308
Will keep Bay Engineers in mind for next time :thumbsup:
Printable View
I just struggled to get those sizes locally. Normally get taps from TradeTools or Chevpac.Quote:
Originally Posted by Mauser308
Will keep Bay Engineers in mind for next time :thumbsup:
or Bearing and Engineering Supplies is another goodyQuote:
Originally Posted by ebf
I should make it clear im not a lapping expert. I have done a lot of research and reading about the subject, but have lapped less than 10 barrels so far, so take everything I say with a grain of salt.Quote:
Originally Posted by PaulNZ
What grit are you lapping to?
On a barrel that is not bad, I will lap with 320 and nothing else, If a barrel needs a fair bit of helping, I start with 220, and then just do a finish run with 320. Make sure to clean the barrel well between grits and cast a brand new lap.
I have read in multiple places that you dont want to go much finer than 320 as it actually increases the friction on the surface and can lead to very bad copper (or lead) fouling. I have not verified this myself, and its only been forum chat that suggests this, nothing from any real experts.
I made my own compound by buying silicone carbide powder if various grits from Rotorua lapidary Supplies. I then mixed up a batch for each grit with grease and with oil. I have found that grease is better than oil for barrel lapping. Any new grease will work.
I thought cut rifled barrels shouldn't open up when the OD is machined?
I have come across this idea myself. I believe they do open up a little with diameter changes as it can be felt with a slug. I have not checked my factory lapped Krieger (Which I believe are cut rifling) but I have come across it on a couple of other cut barrels that were known to be consistent before profiling/muzzle threading. I didnt lap either of these barrels and they both shot just fine.
Bill Calfees book has some information on the subject and he has documented that any change in the outside diameter of a barrel blank will result in a change in the bore size. This goes for receiver threads, barrel contouring, dovetails for sights and muzzle threading.
His book is appallingly bad and I struggled though it thinking there might be some information on the actual mechanics and tools involved in lapping. There isnt. Most of the book is him telling ego stroking stories that have nothing to do with improving rifles. There are a few tidbits here and there, but the good stuff could be covered in less than 5 pages, and its something like 200 pages long. That said, he is a proven gunsmith that has consistently turned out championship winning rimfire benchrest guns, so he cant be completely full of shit.
What I've read suggests that you normally lap before cutting the barrel to length, because the lap tends to bell the muzzle end where it exits and reverses. How are you avoiding this?
I dont extend the lap out the muzzle at all. I butt the muzzle up against something hard to stop the lap from extending out. I only push it out when I need to add more lapping compound. This will stop any bell-mouthing.
Considered it for my problematic grey birch barrel to remove the bore constriction, but preheating the barrel before casting the lap would have been an issue with the carbon fibre wrap.
The Pre-heat is probably only 150c. The carbon on your barrel should handle that just fine for a while. If it doesnt, then the manufacturer is using a type of resin that has no business being on a rifle.
You can sometimes get away with a lower temp pre-head, but the lap wont fill out as well. This can be fixed to a degree by a couple of good bumpings, just make sure you have the lap and barrel greased before you bump it, or you might get it stuck (dont ask me how I found this out)
Hope this helps.
eagerly awaiting progress photos..........:thumbsup:
Attachment 170884Quote:
Originally Posted by Micky Duck
Attachment 170885
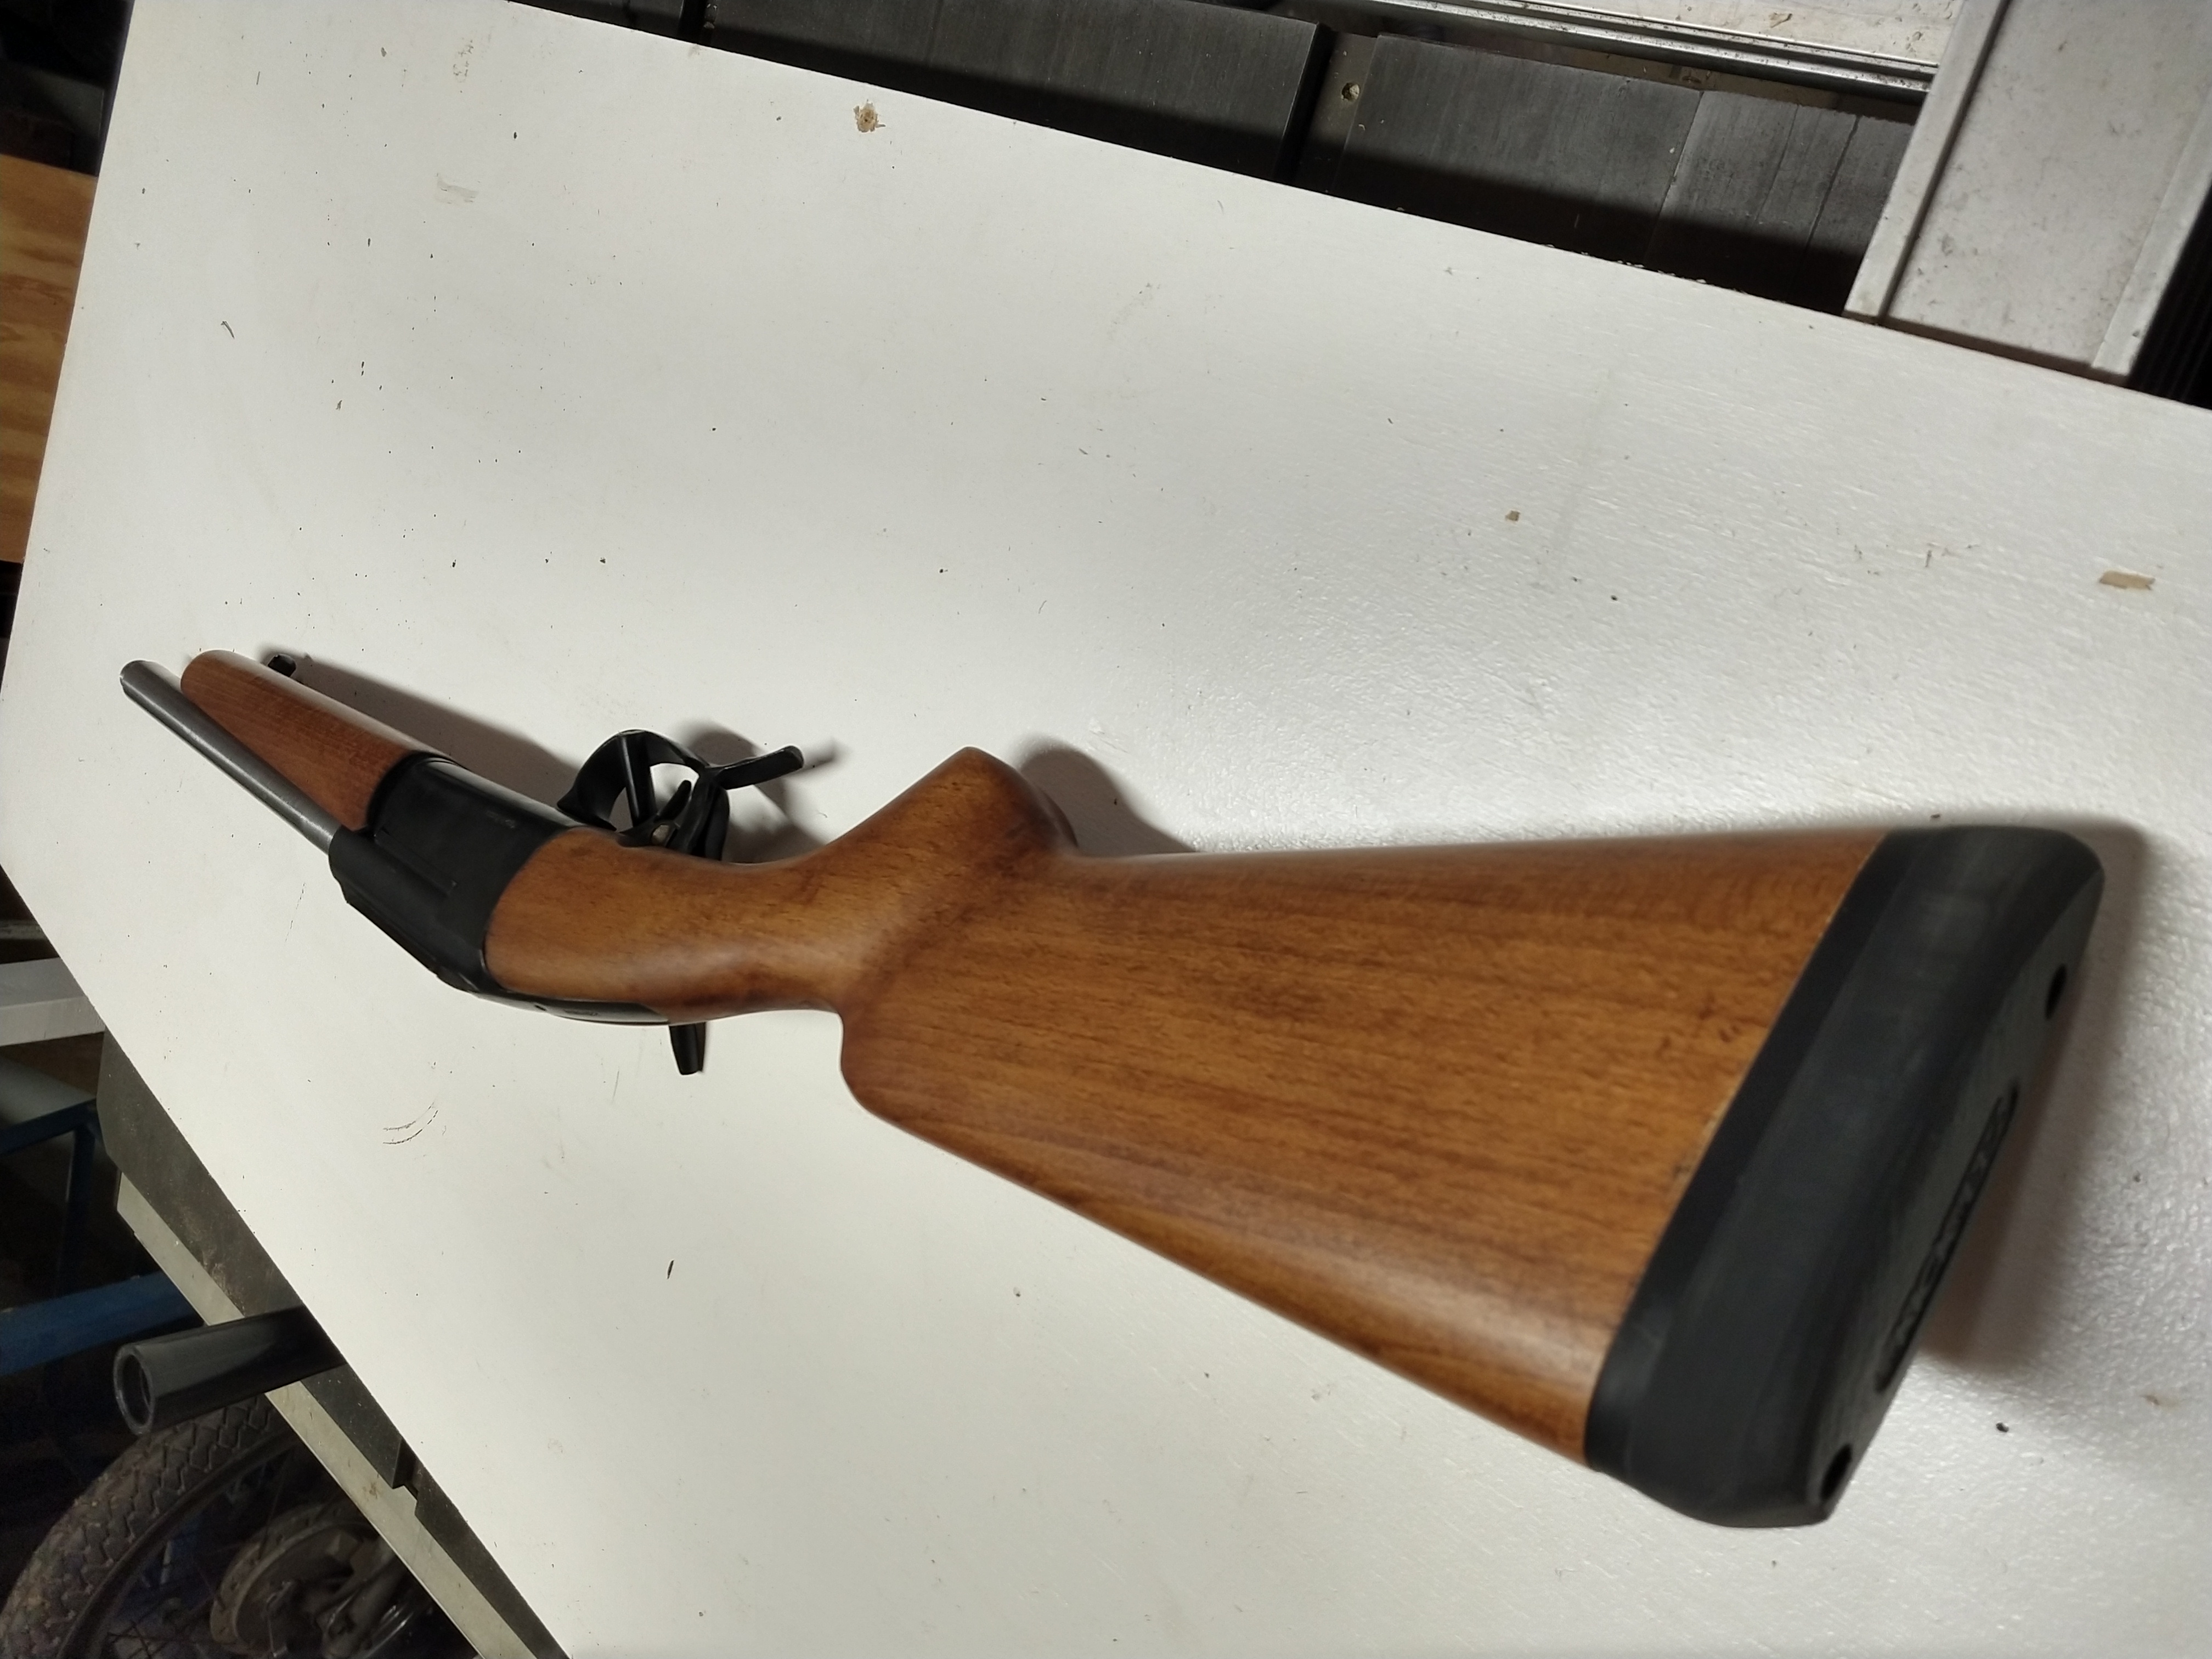
There you go.
Recoil pad is installed.
2600g (5.7lbs) at the moment.
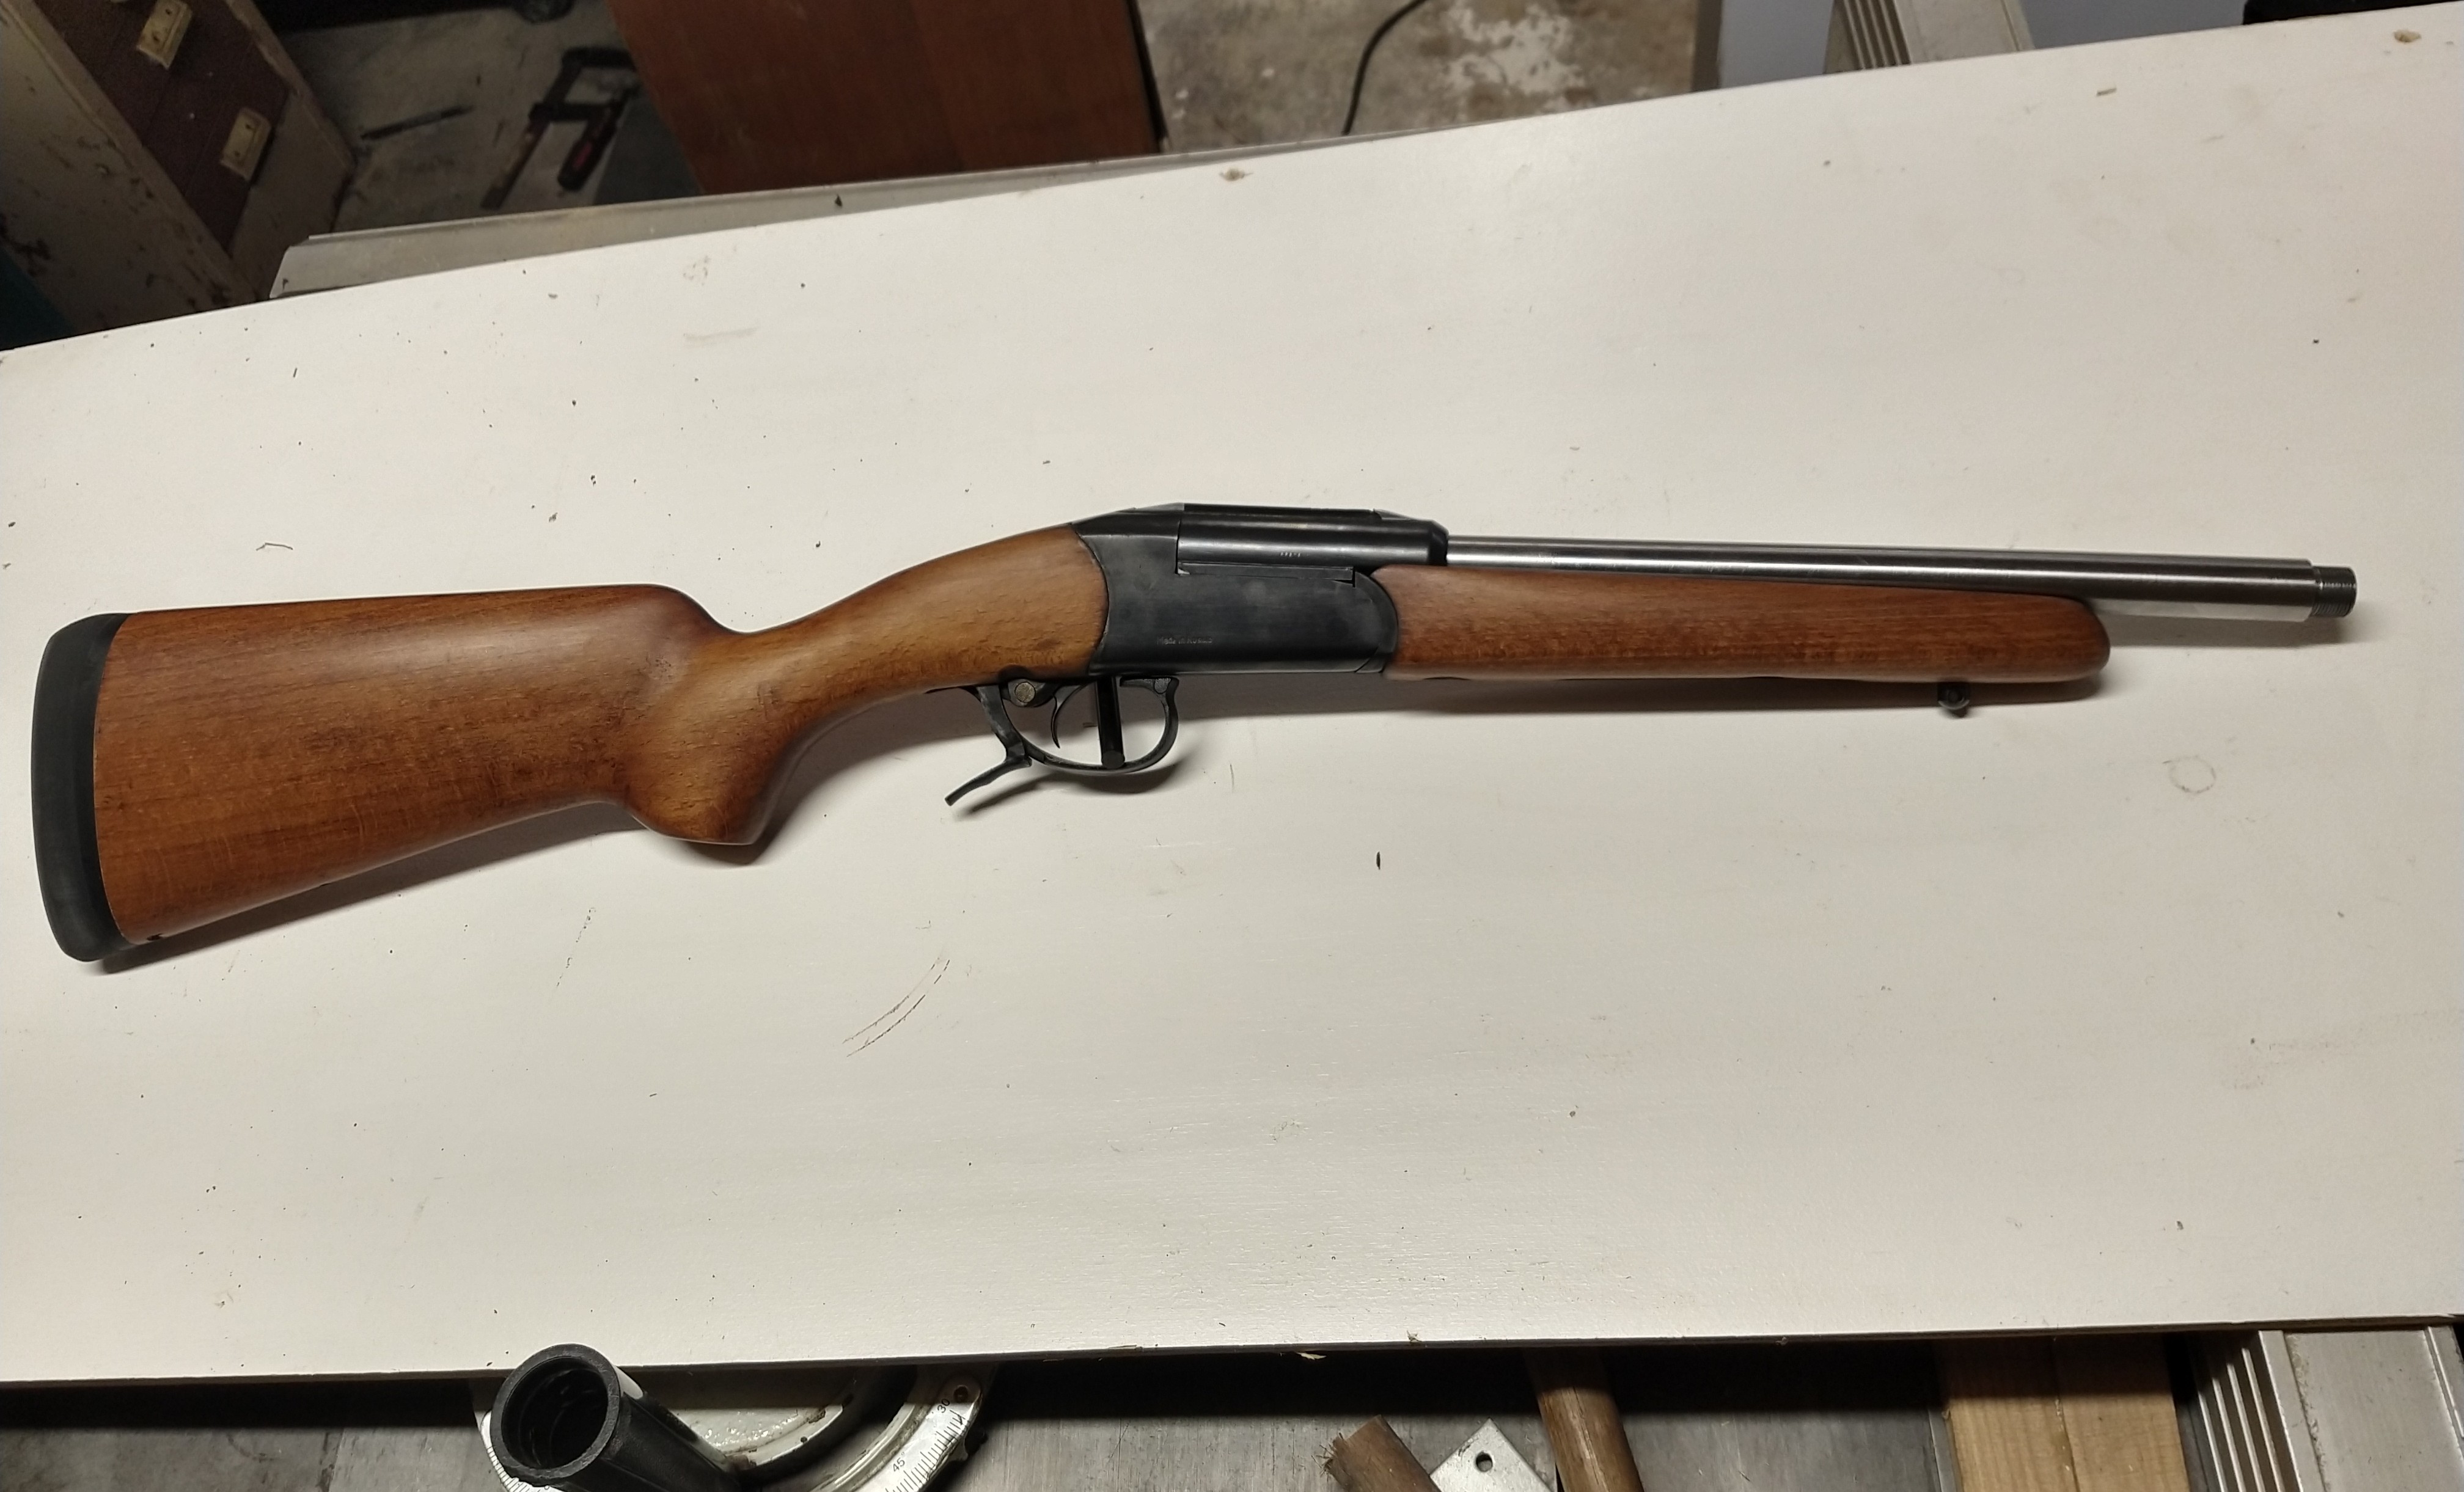
Im trying to decide how to finish the barrel. The best would be having the barrel hot blued before installing it into the adaptor. next best would be leaving the adaptor blued and painting the barrel with black duracoat after installation. The simplest would be to just cold blue the barrel, but I have not had good luck with cold blue over the years.
fark you cut her off short!!!!!!!! I see top of your barrel is higher,with rib,so discount my comment re ramp...on SHOTGUN it sticks up proud of barrel so can be notched as rear sight.
It's about 775mm. Barrel is just under 14"
That's great info, thanks for taking the time to lay it out. I presume you haven't seen an issue with lengthening the chamber throat during lapping either?Quote:
Originally Posted by SixtyTen
I'll have to give it a try one of these days. The Grey Birch barrel is long gone though - I took the refund while it was on offer. If the pre-heat is only 150C I expect you're right that the carbon wrap would have taken it - then again that particular barrel already had several features that had 'no business being on a rifle.' I have no idea what resin they would have used.
so are you making another 12" one with other half of barrel???? LOL
waiting for range report..............
still waiting........
I found a little time to do some work on this rifle again, so a small update.
I have been working on sorting out the sights before I permanently fix the barrel in place.
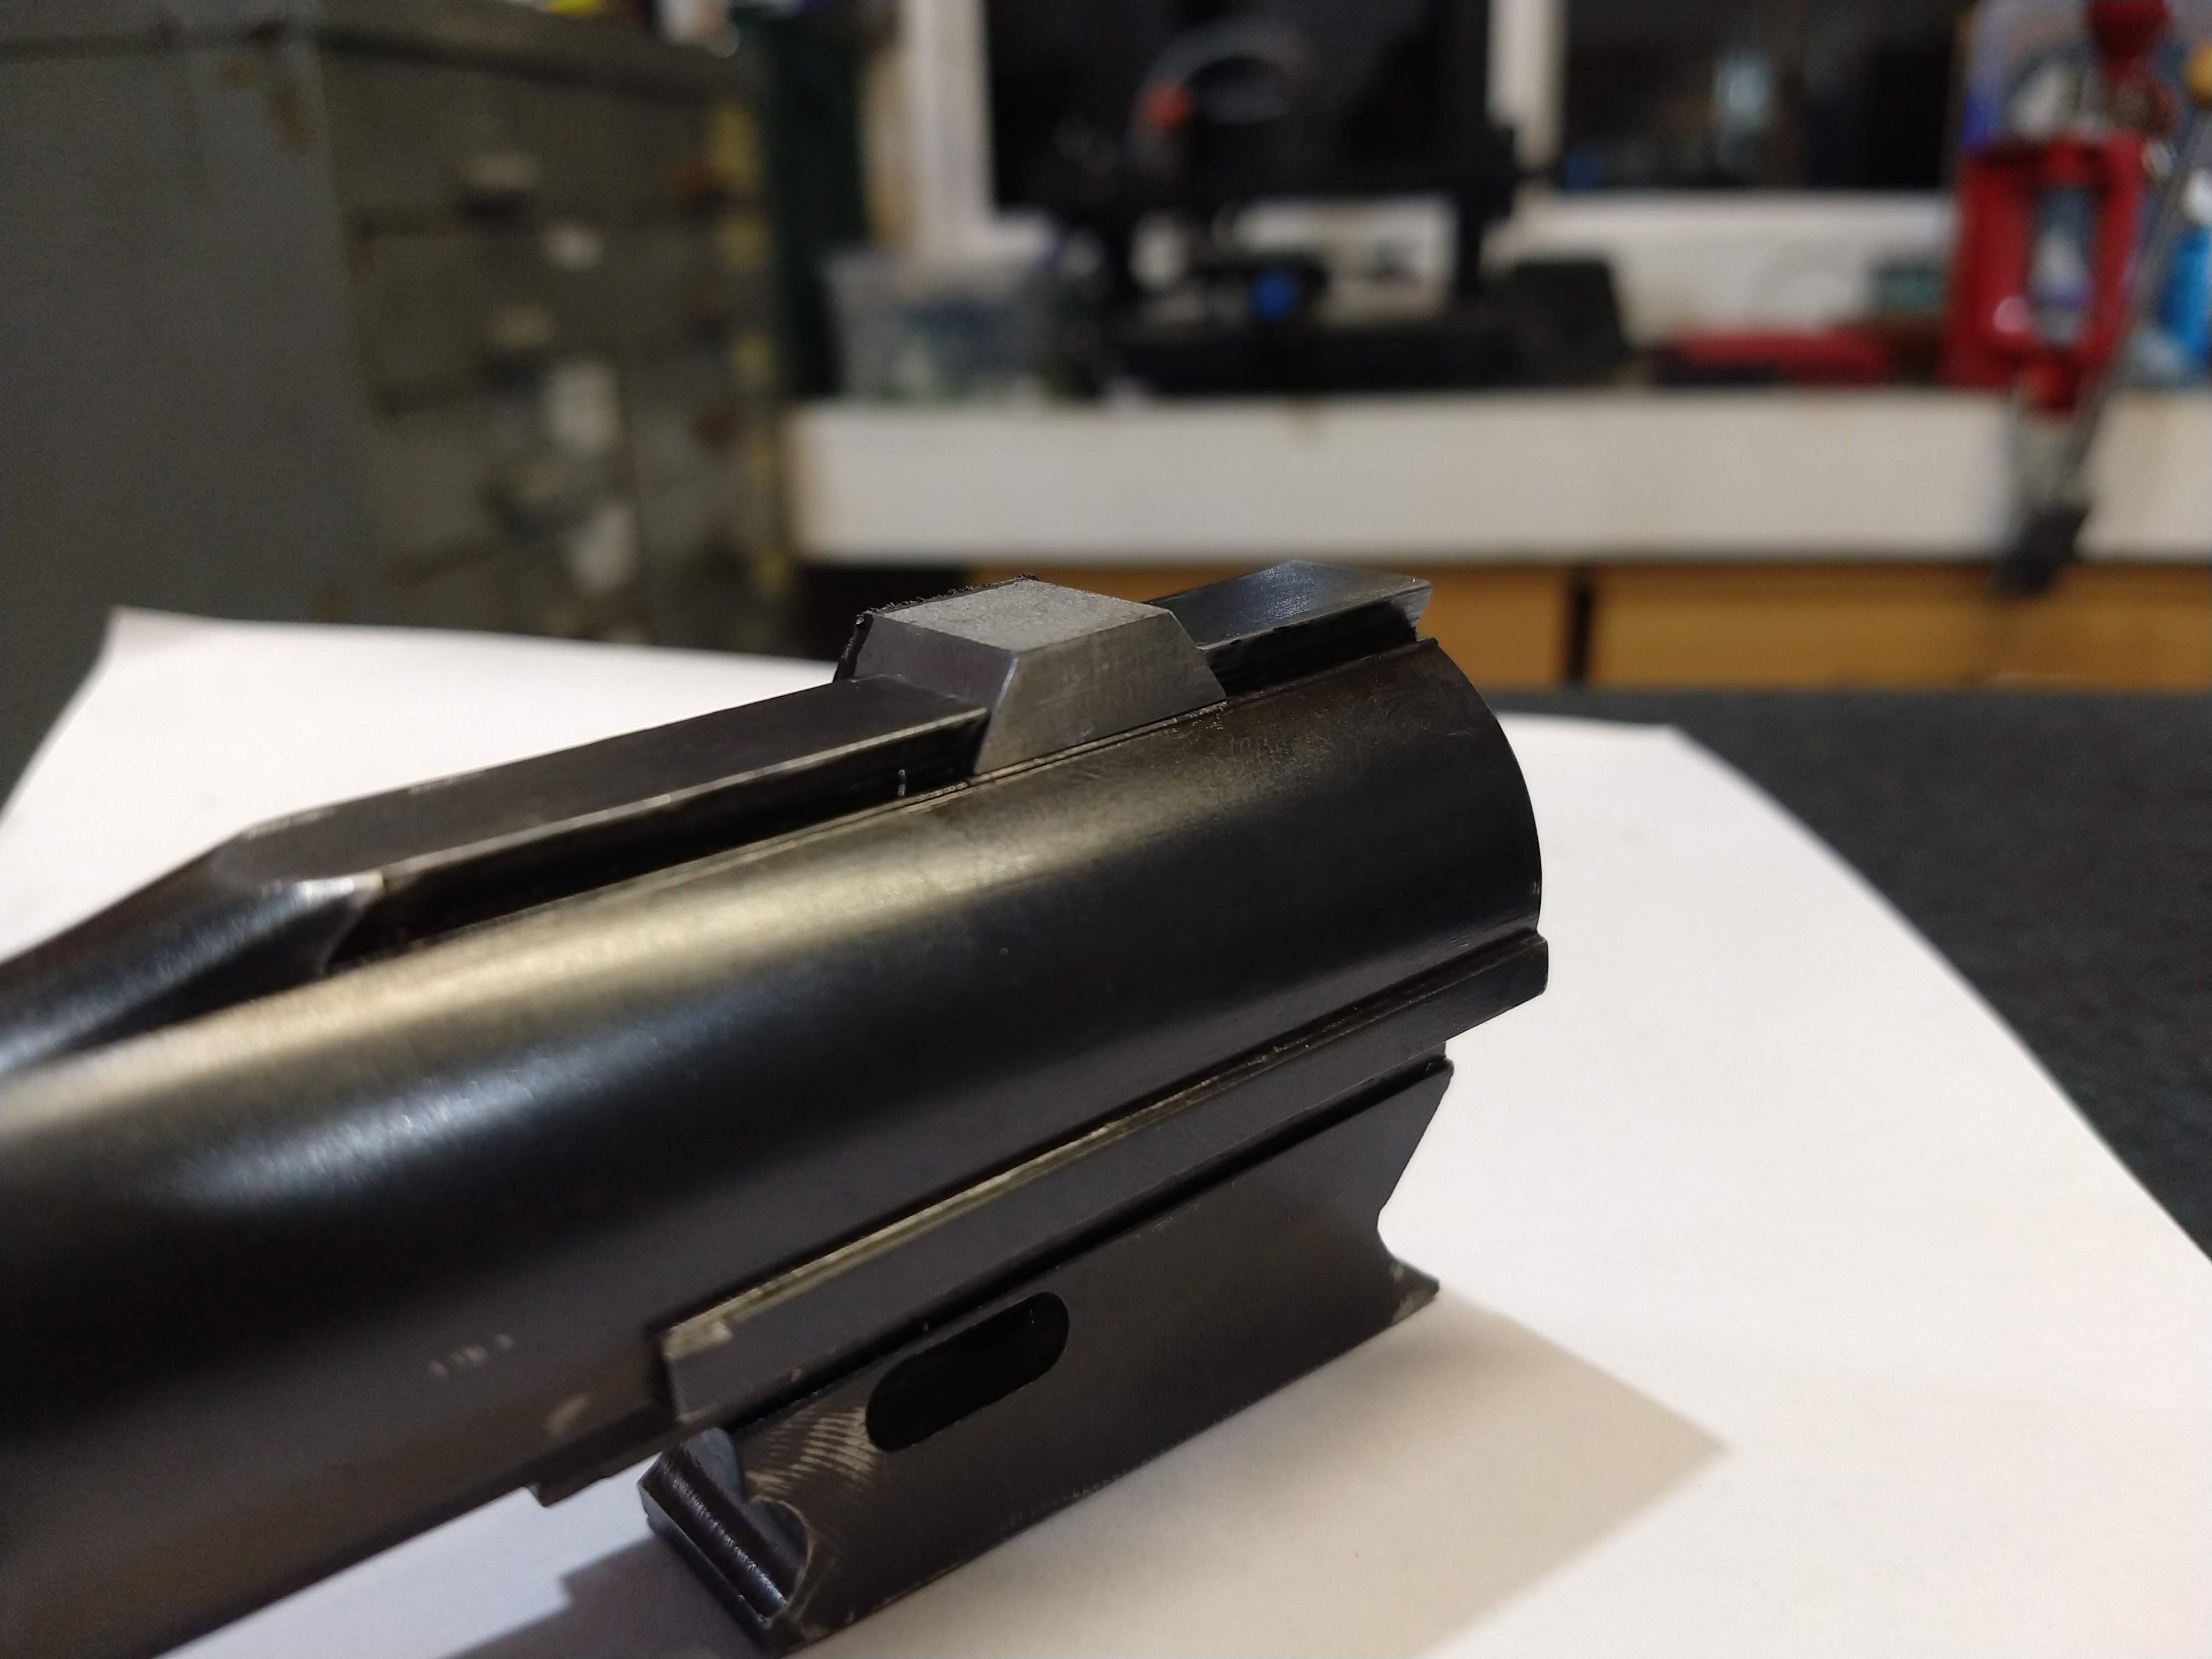
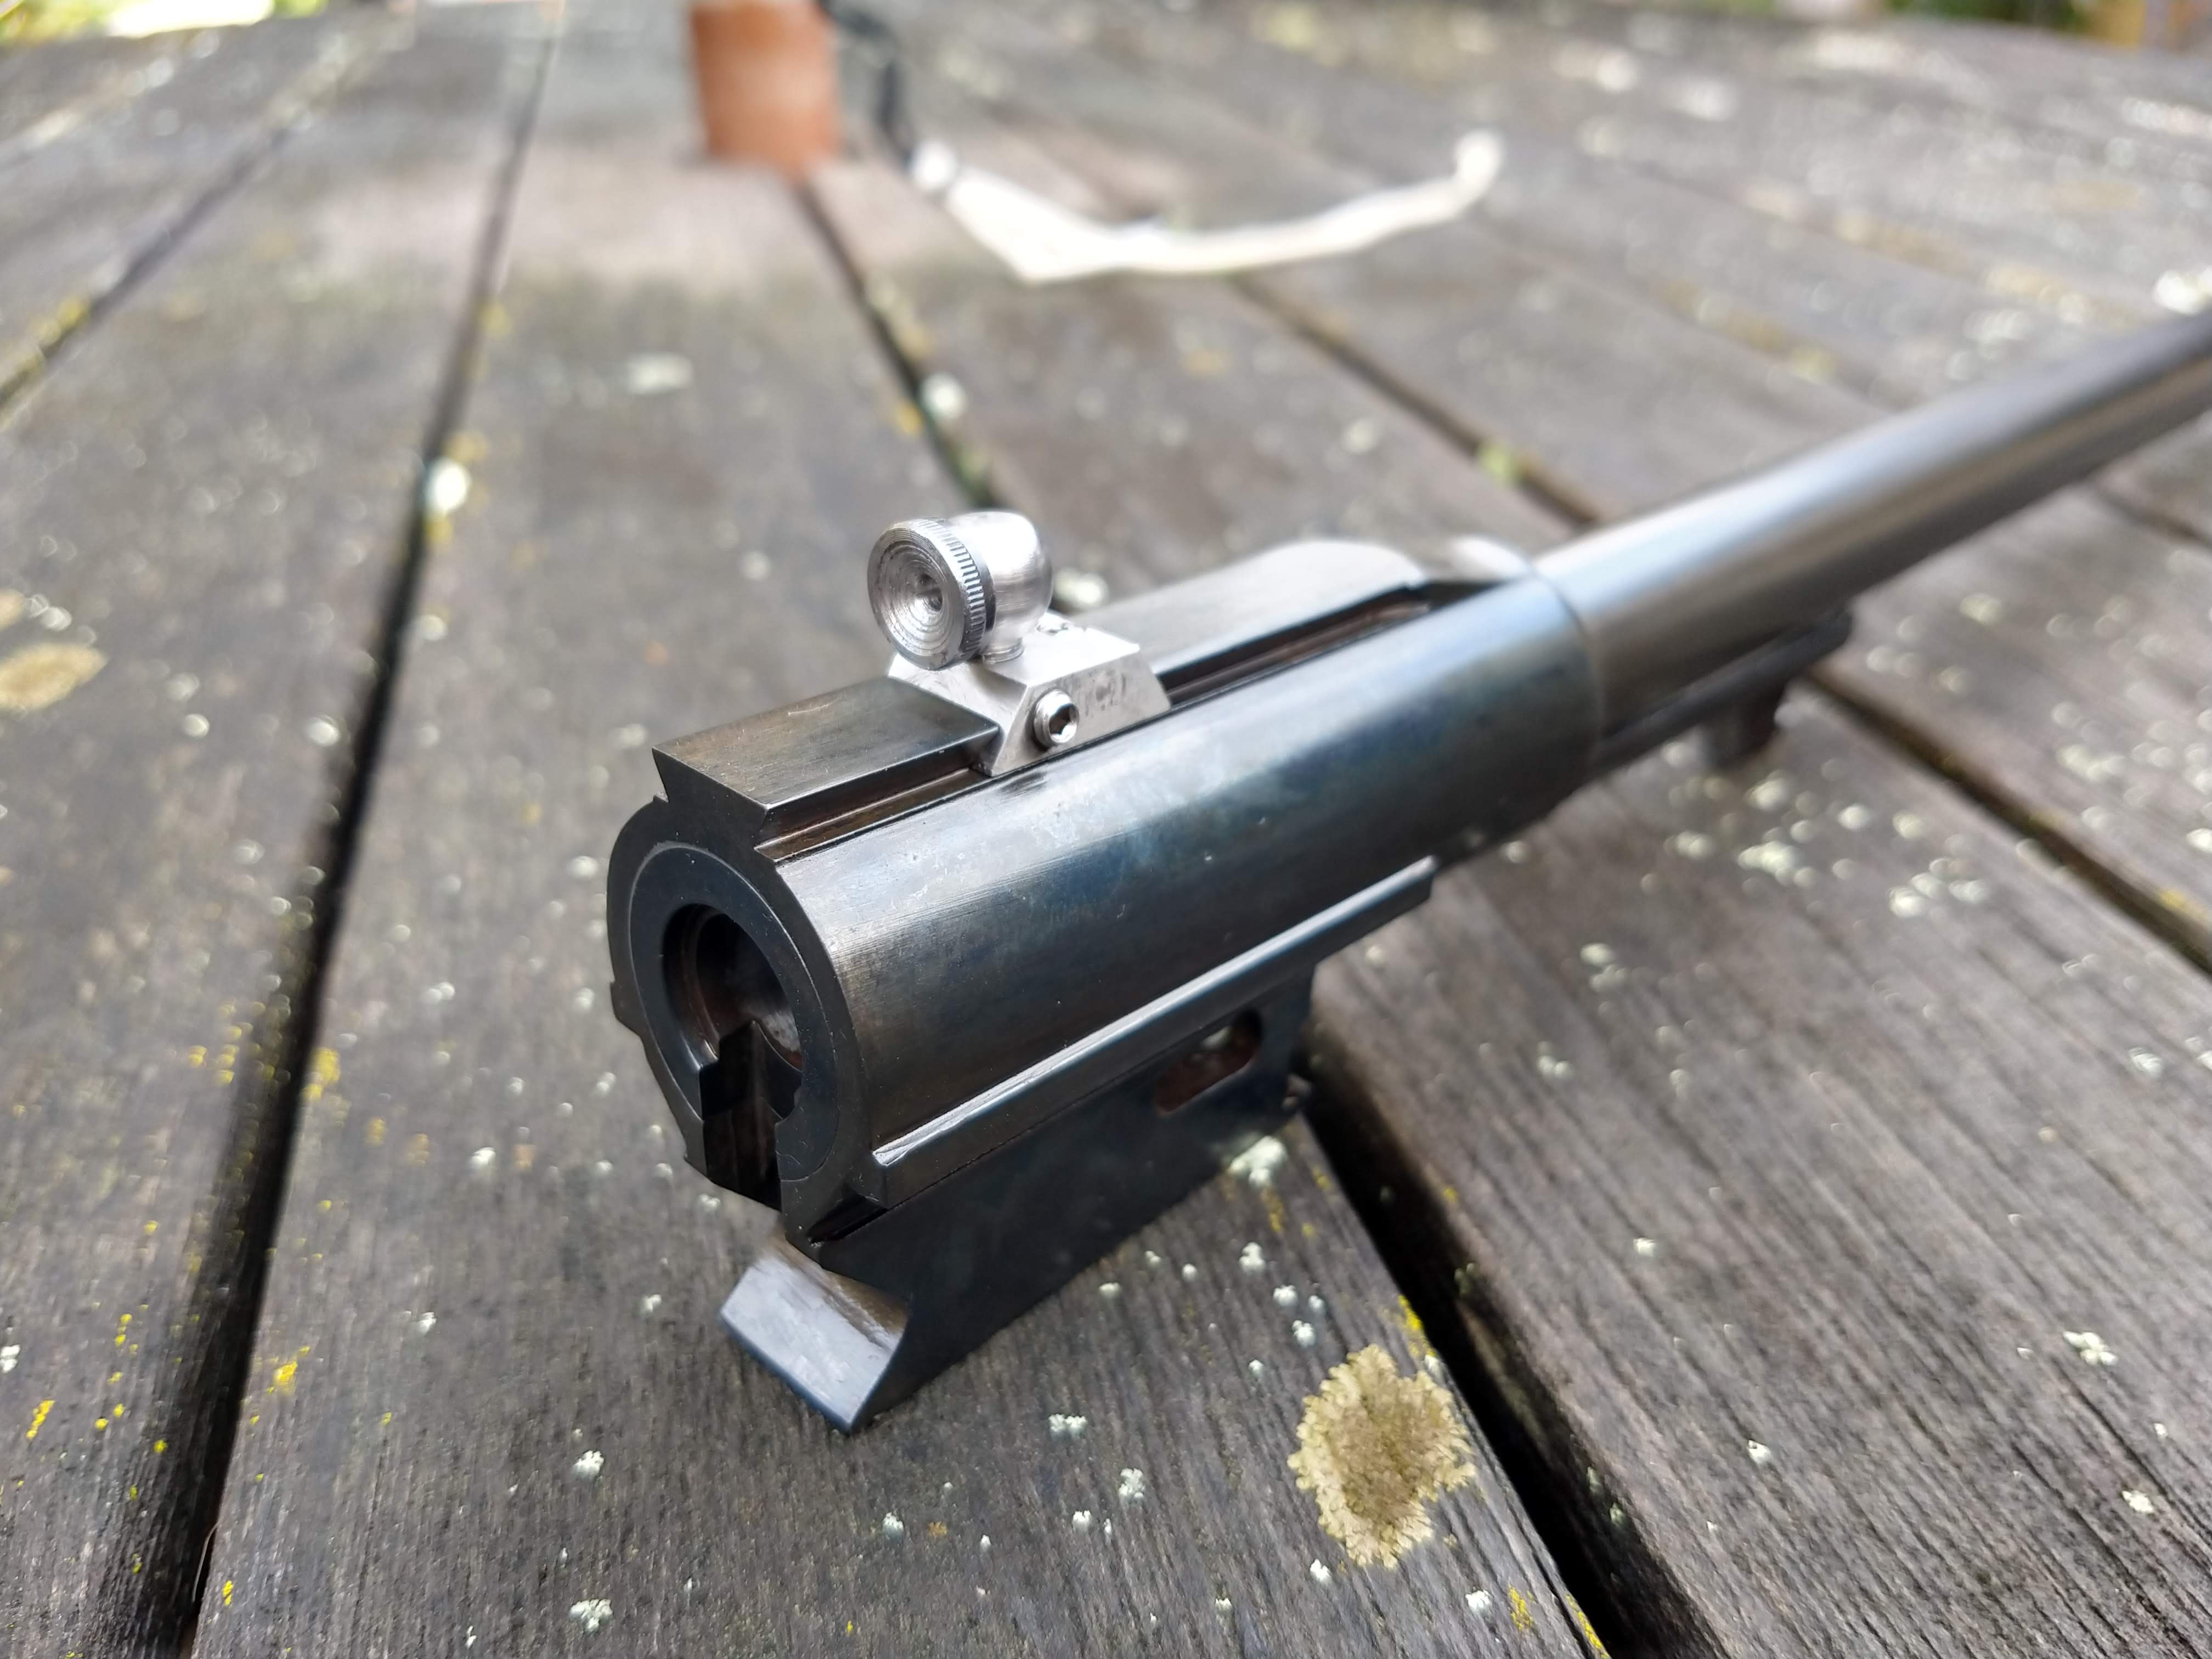
I ran through a few different designs for the rear sight and eventually settled on a simple and effective solution, which is to cut a dovetail 90degrees to the current top dovetail and have a removable insert the same is what is seen on a Skinner sight.
This means that I can still mount a scope if I want to by simply releasing the windage locking screw and sliding the whole sight block out one side. elevation change is done by screwing the threaded aperture mount up and down, this is locked by a grub screw. Windage is changed by sliding the block sideways and is also locked with a grub screw. My front sight will be adjustable for windage as well, so I should be able to zero the rear to a scribe line.
Attachment 174219
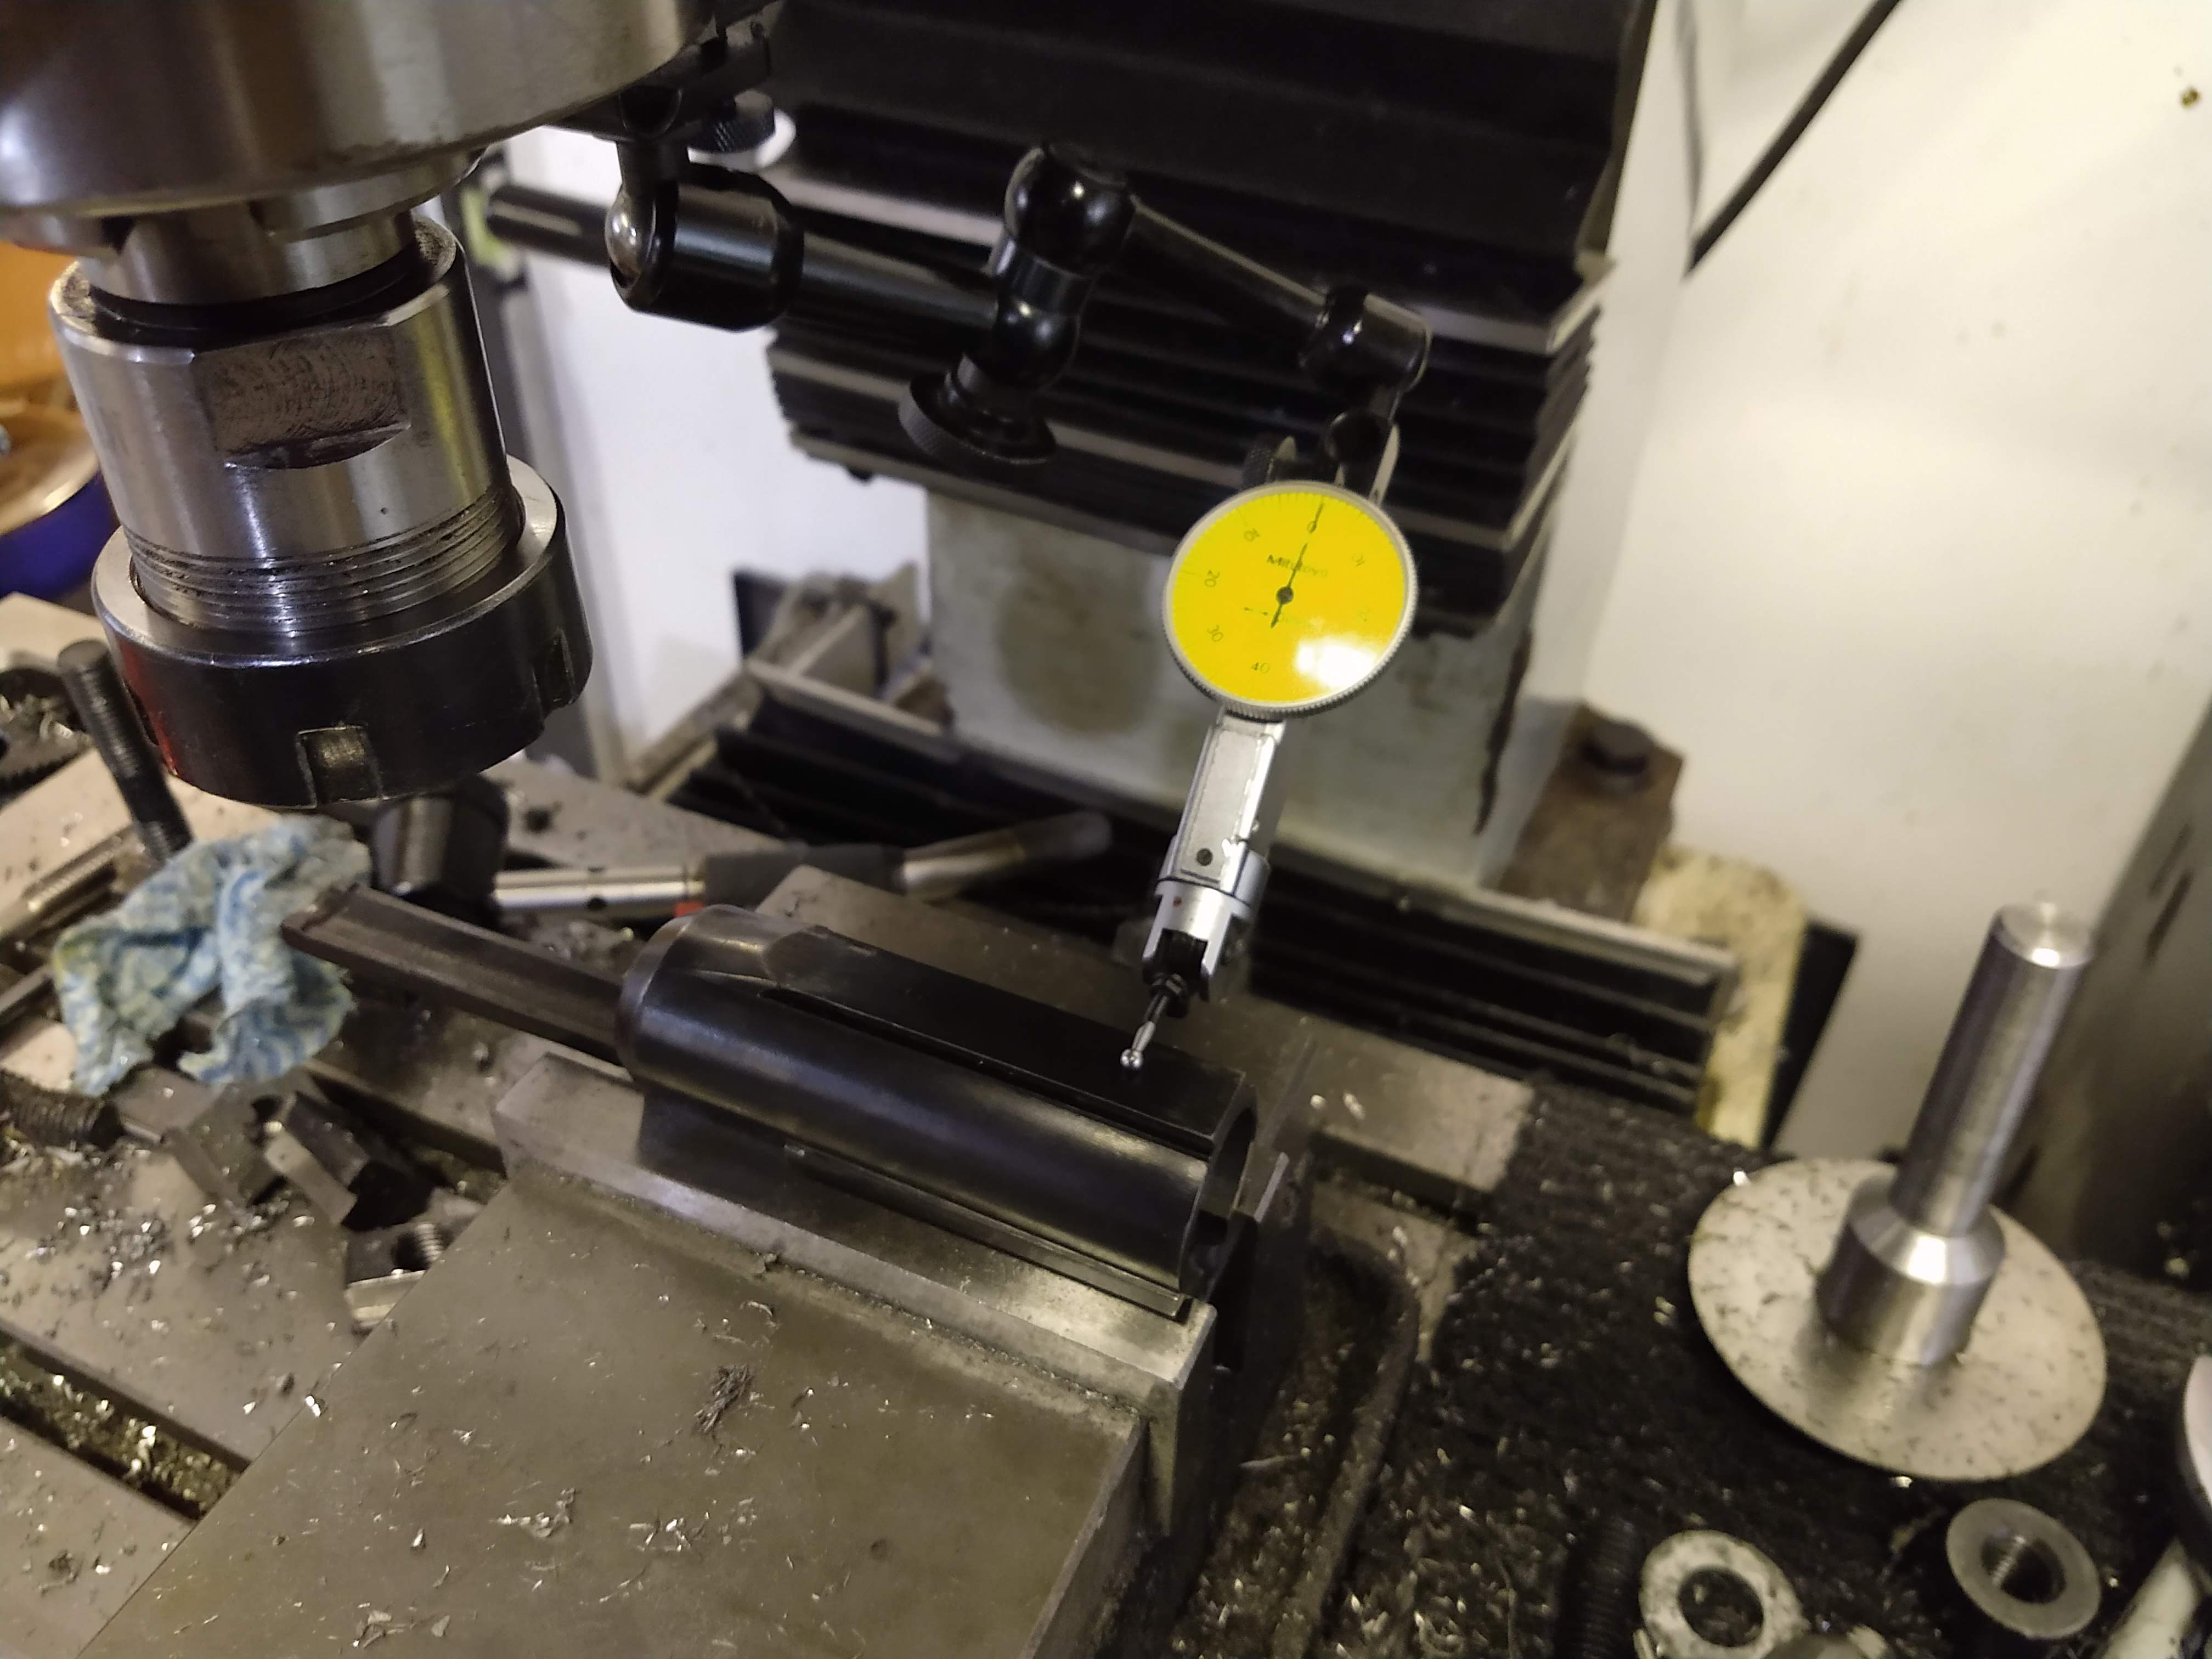
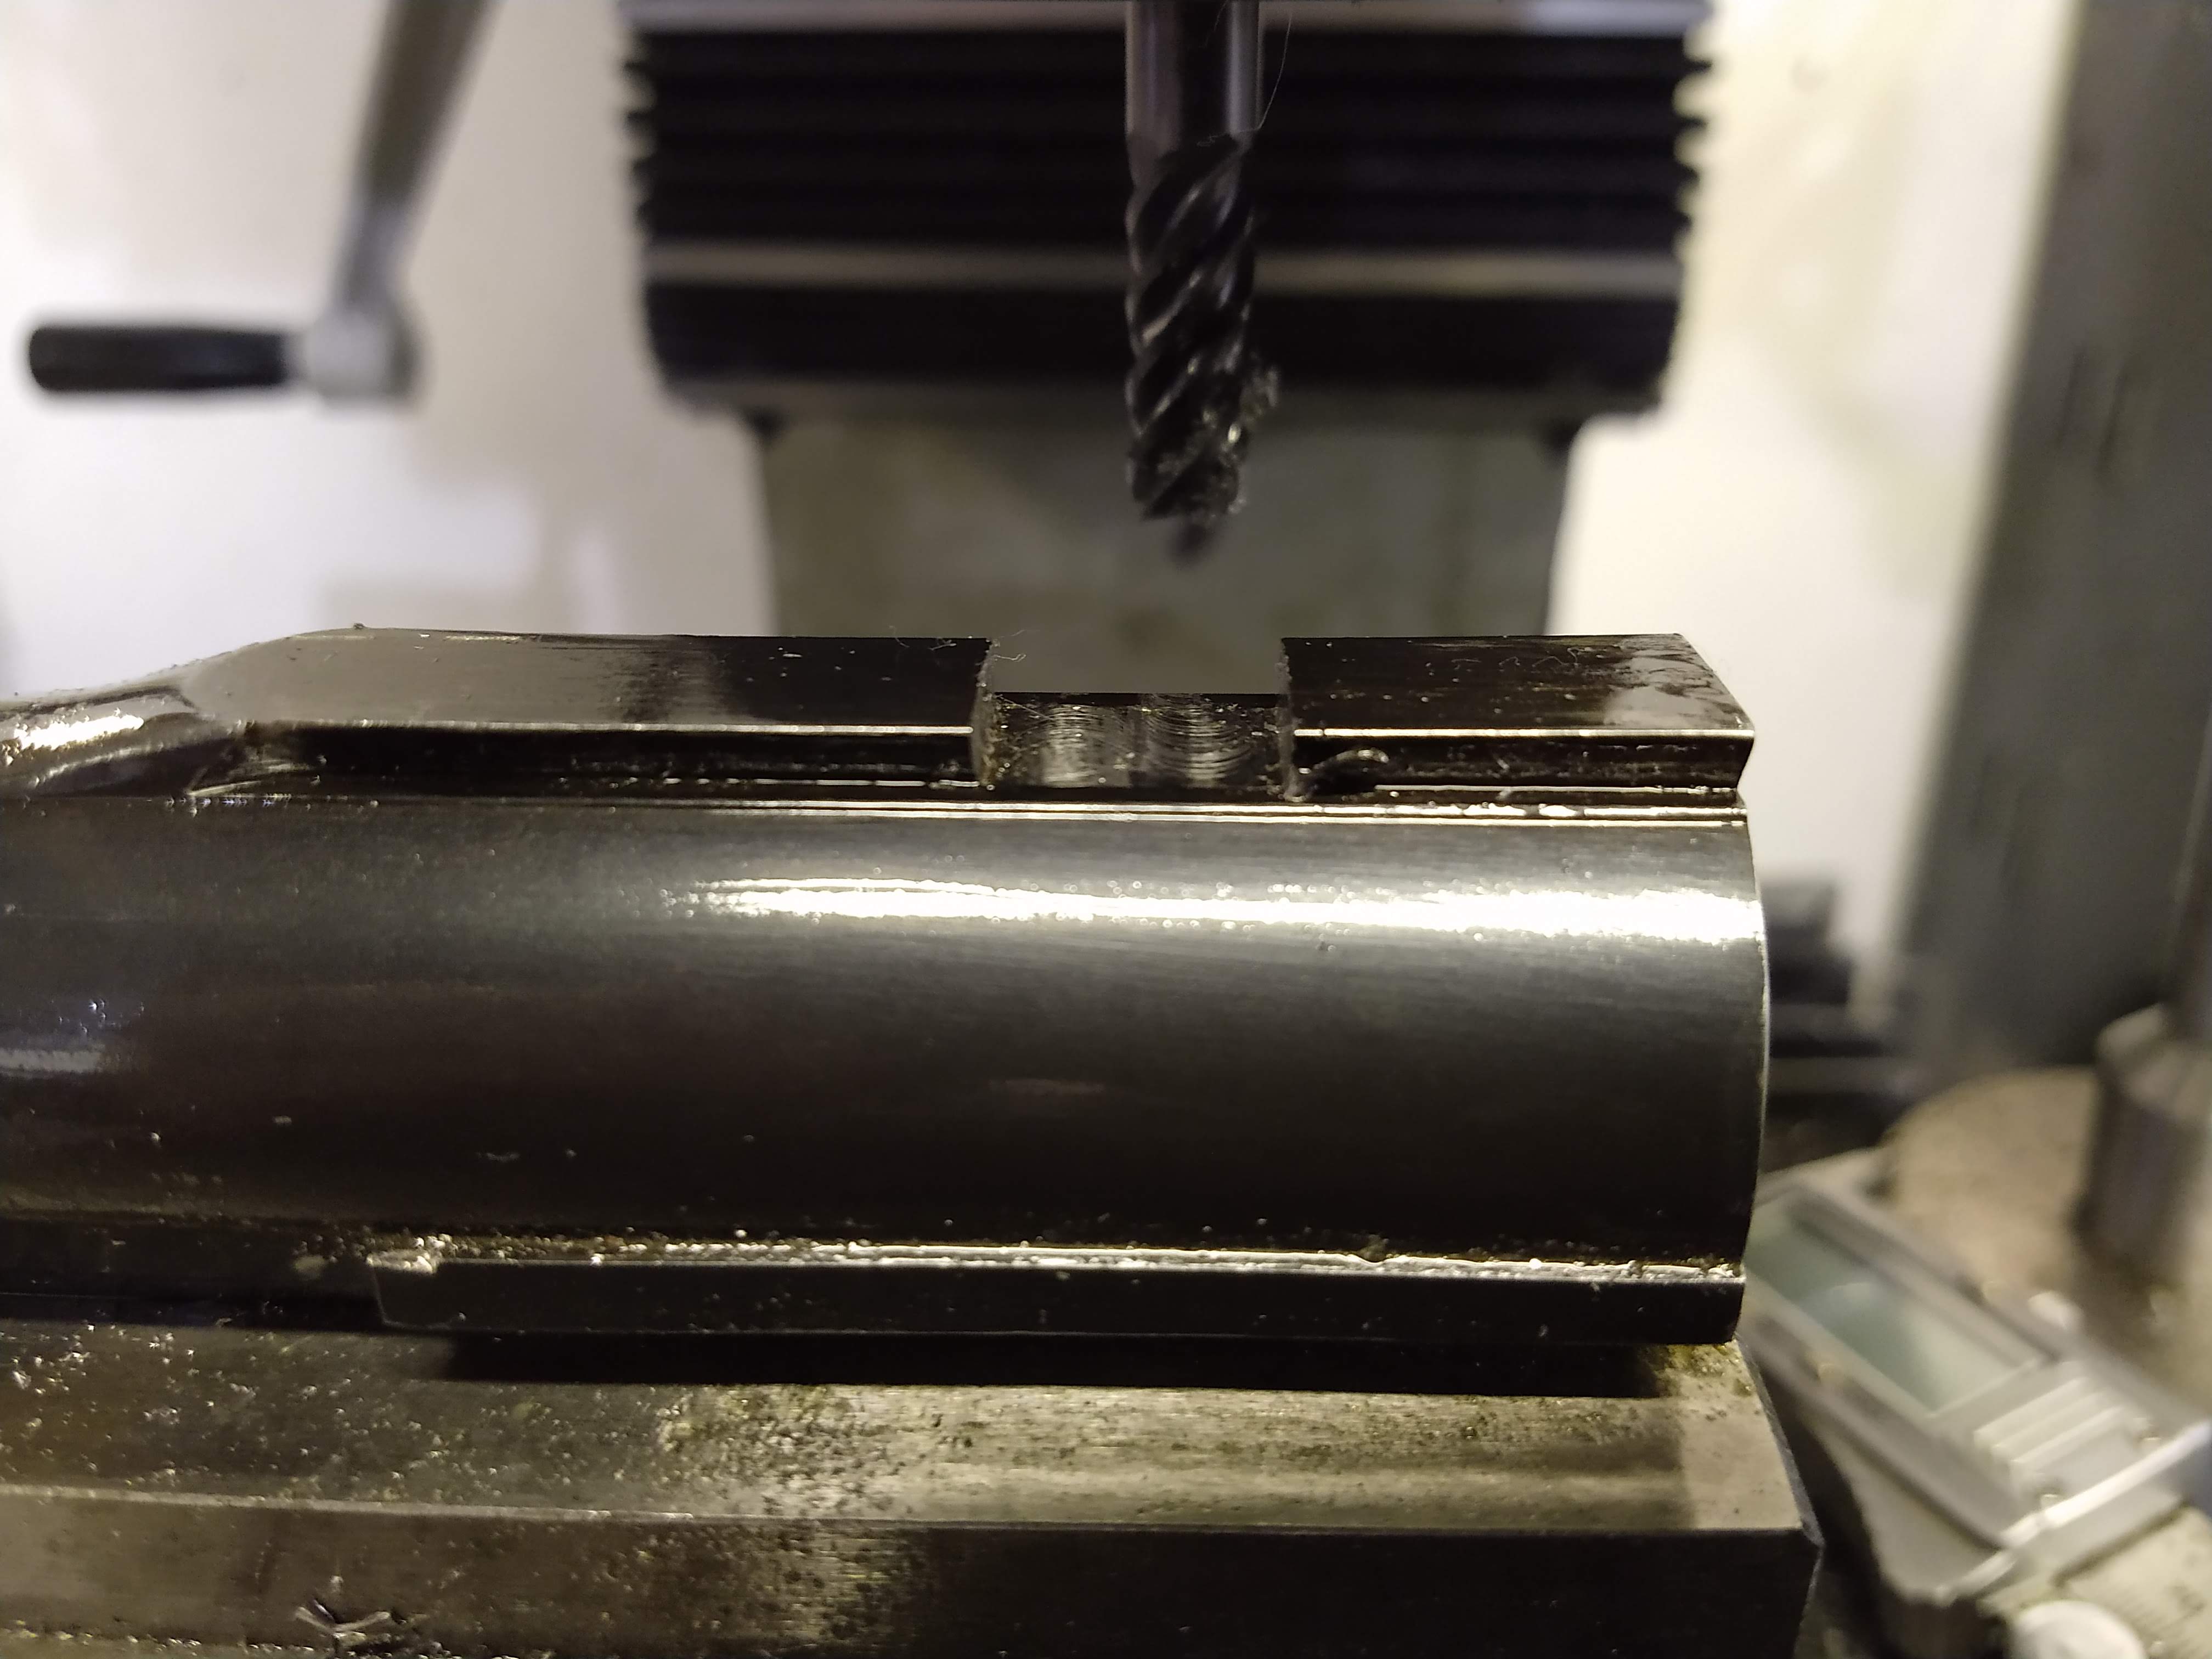
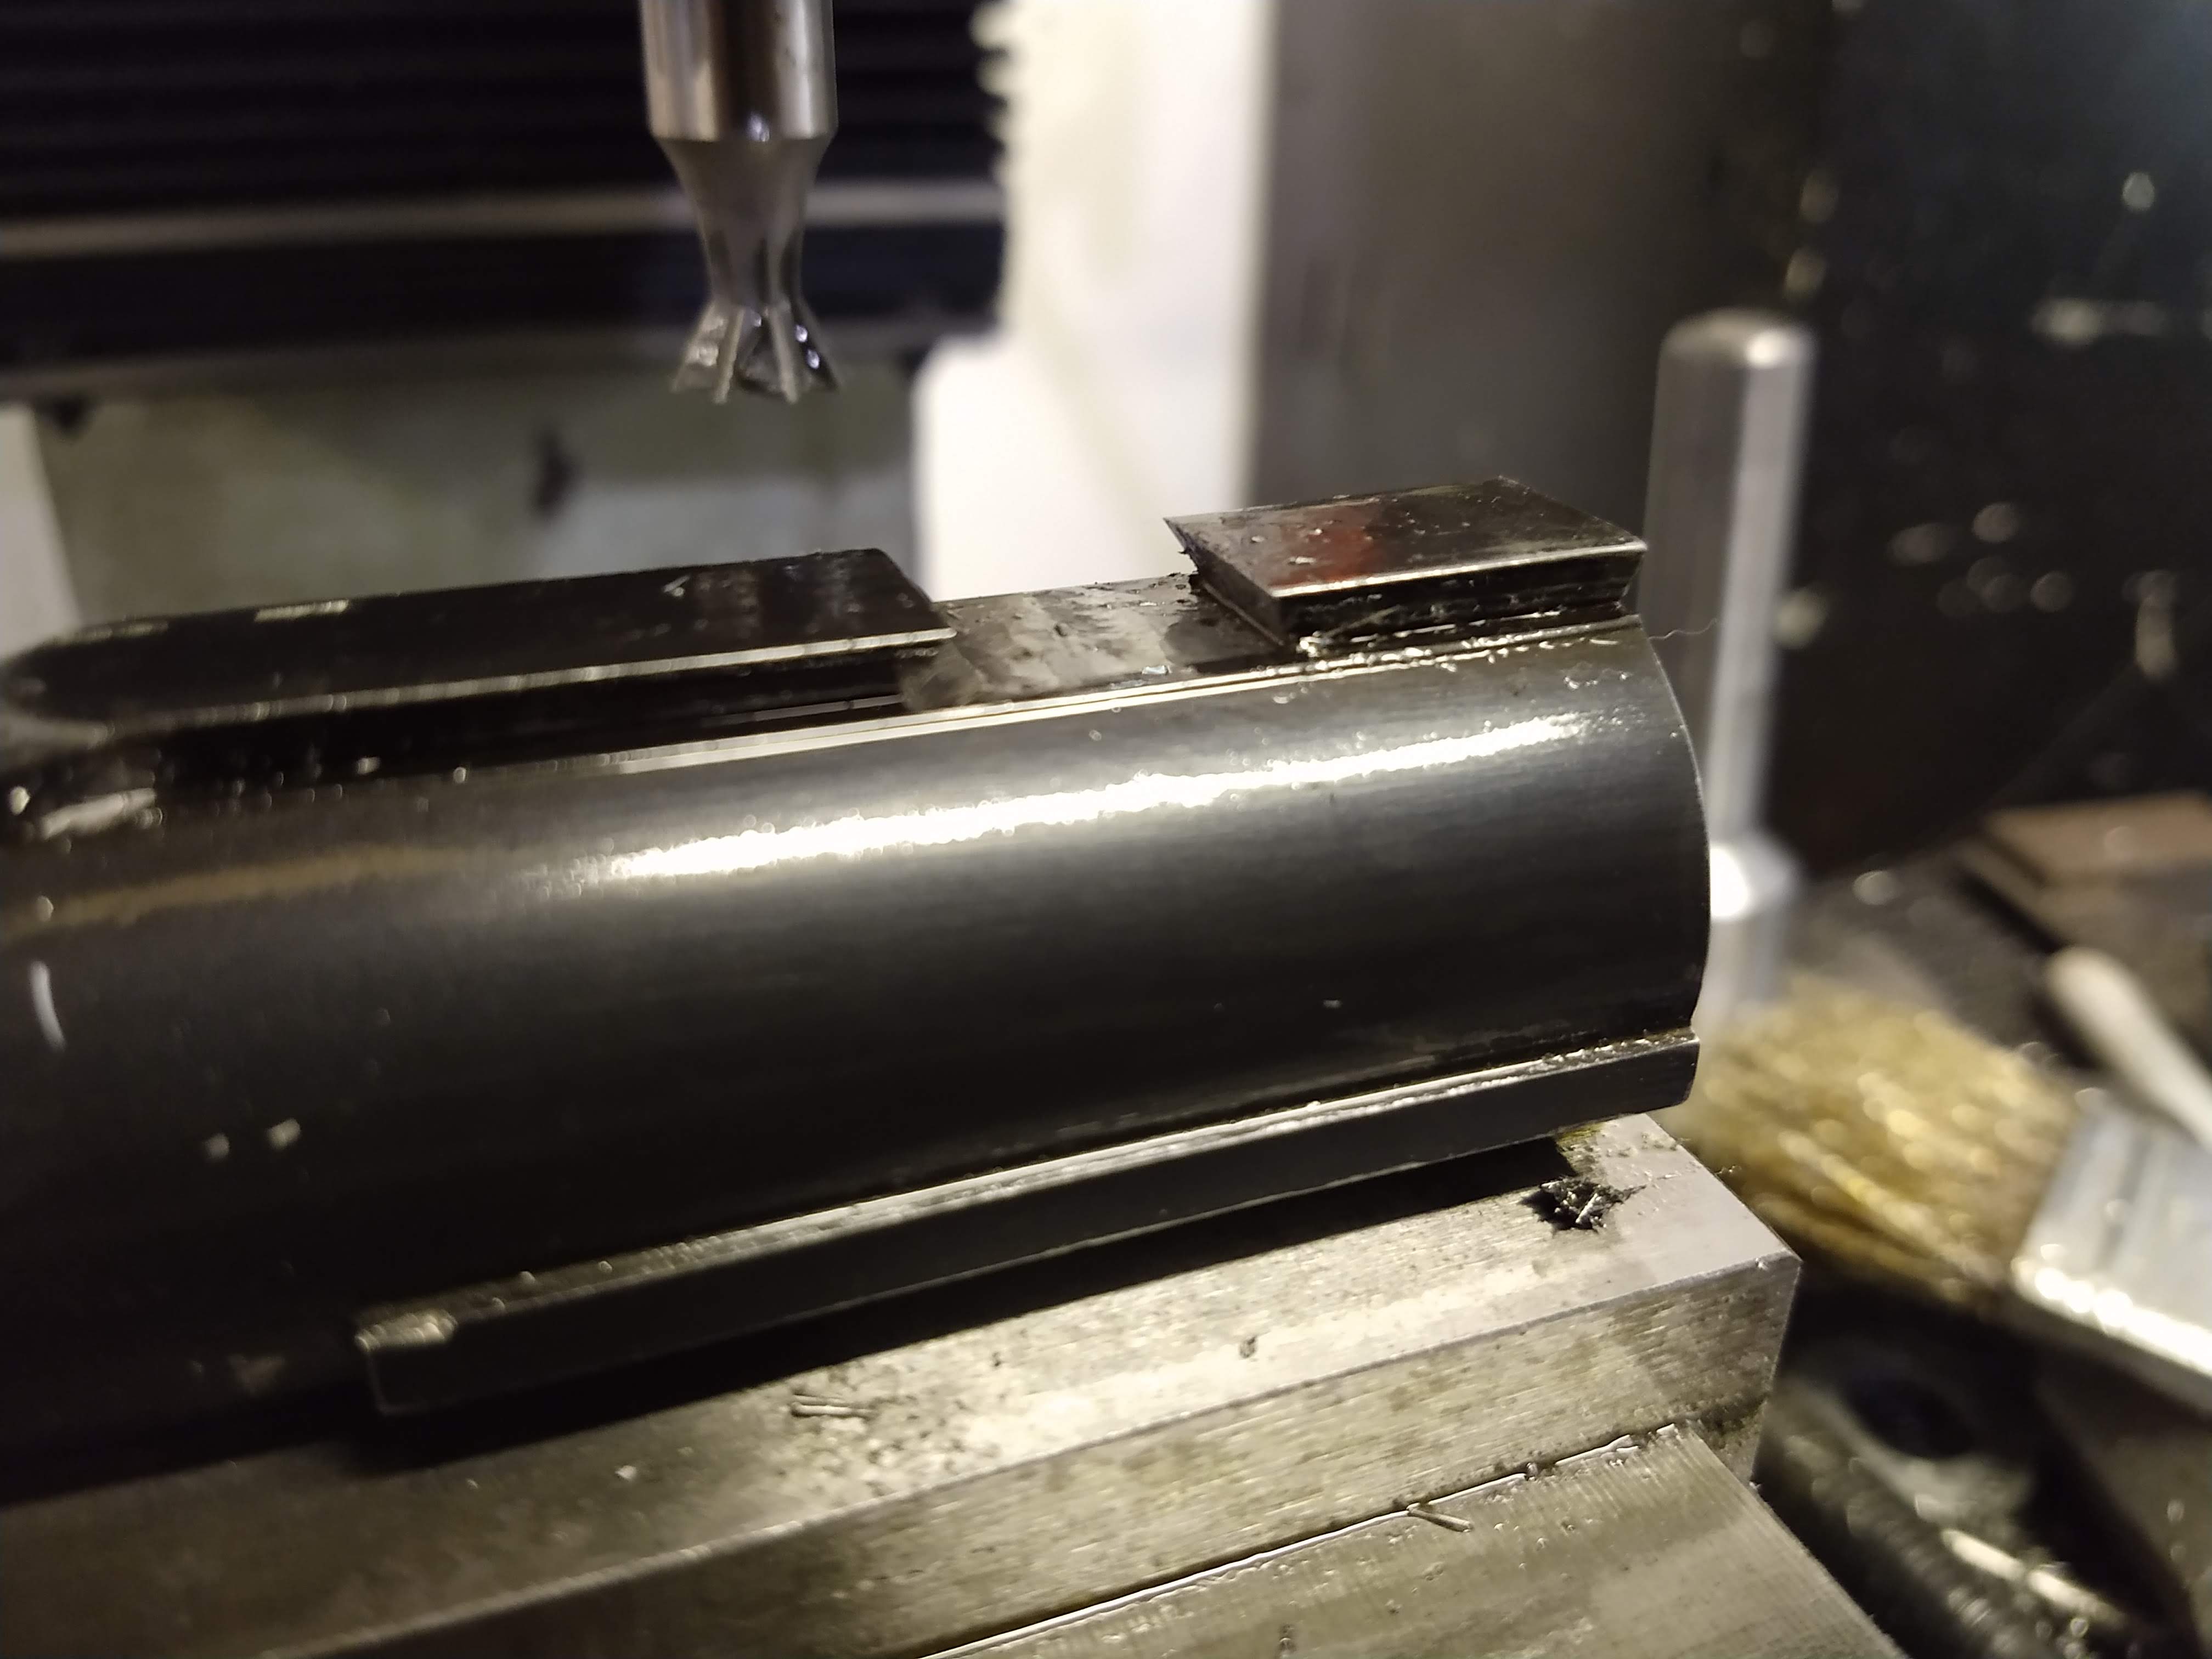
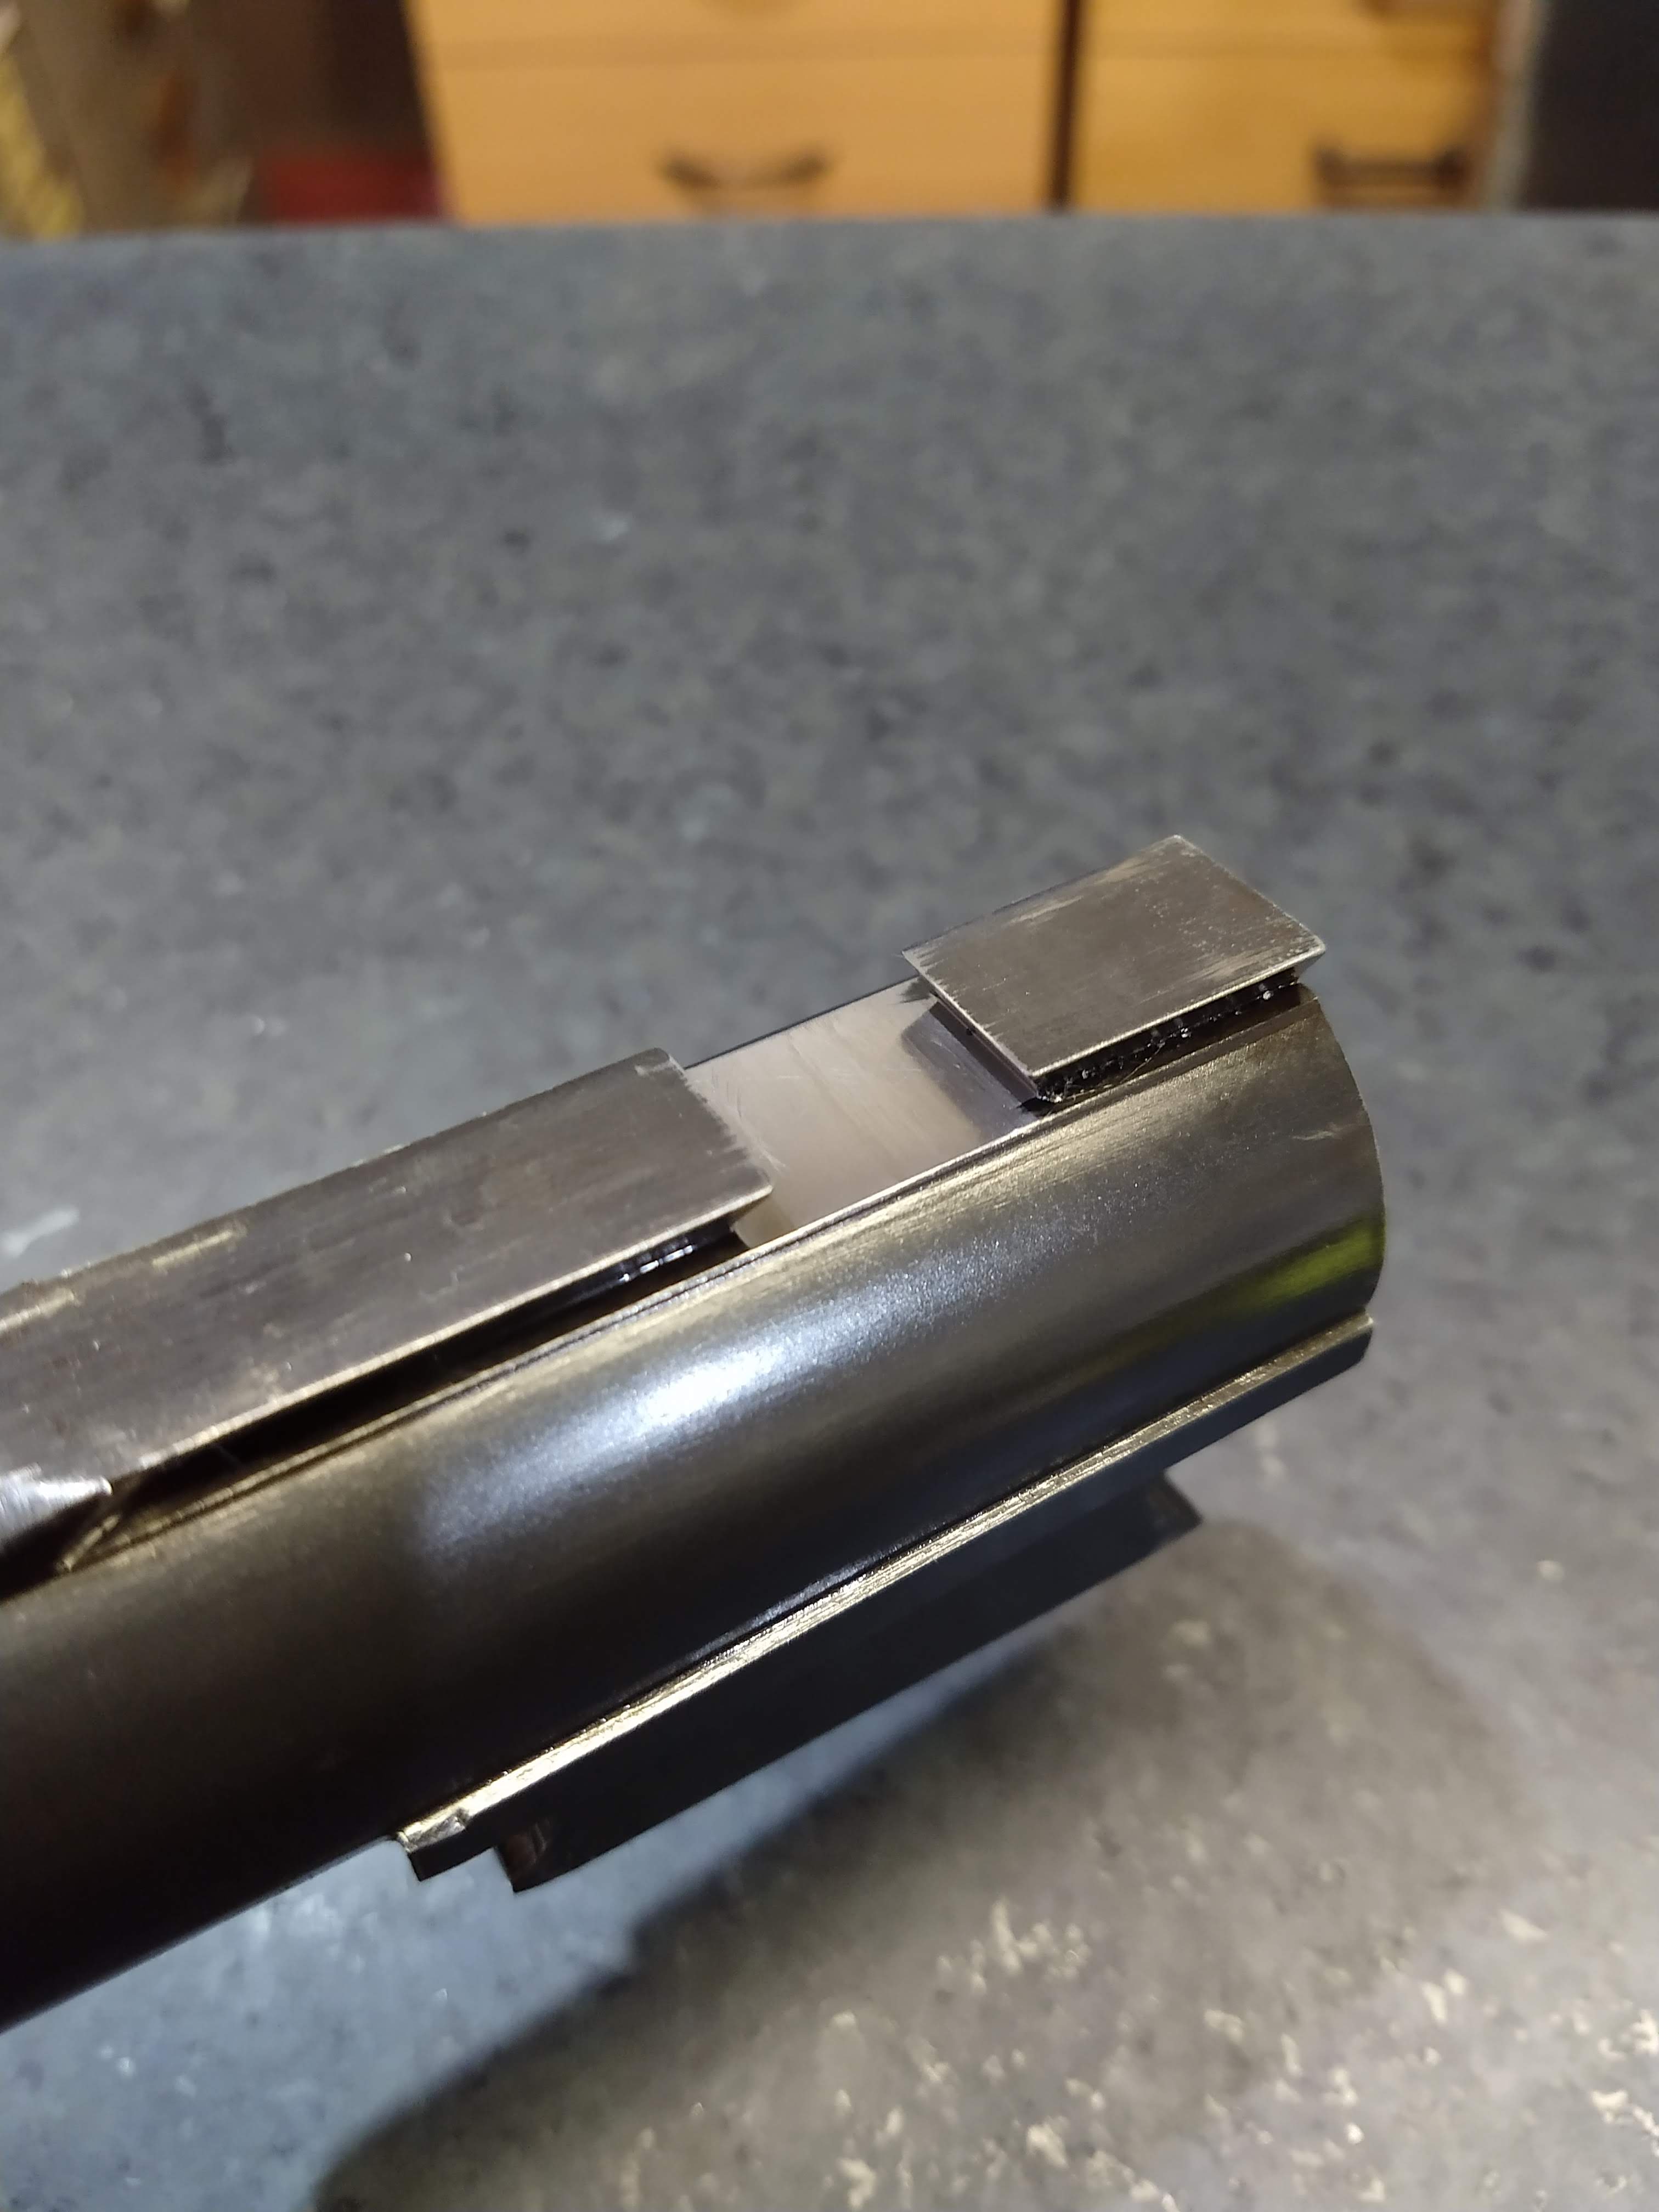
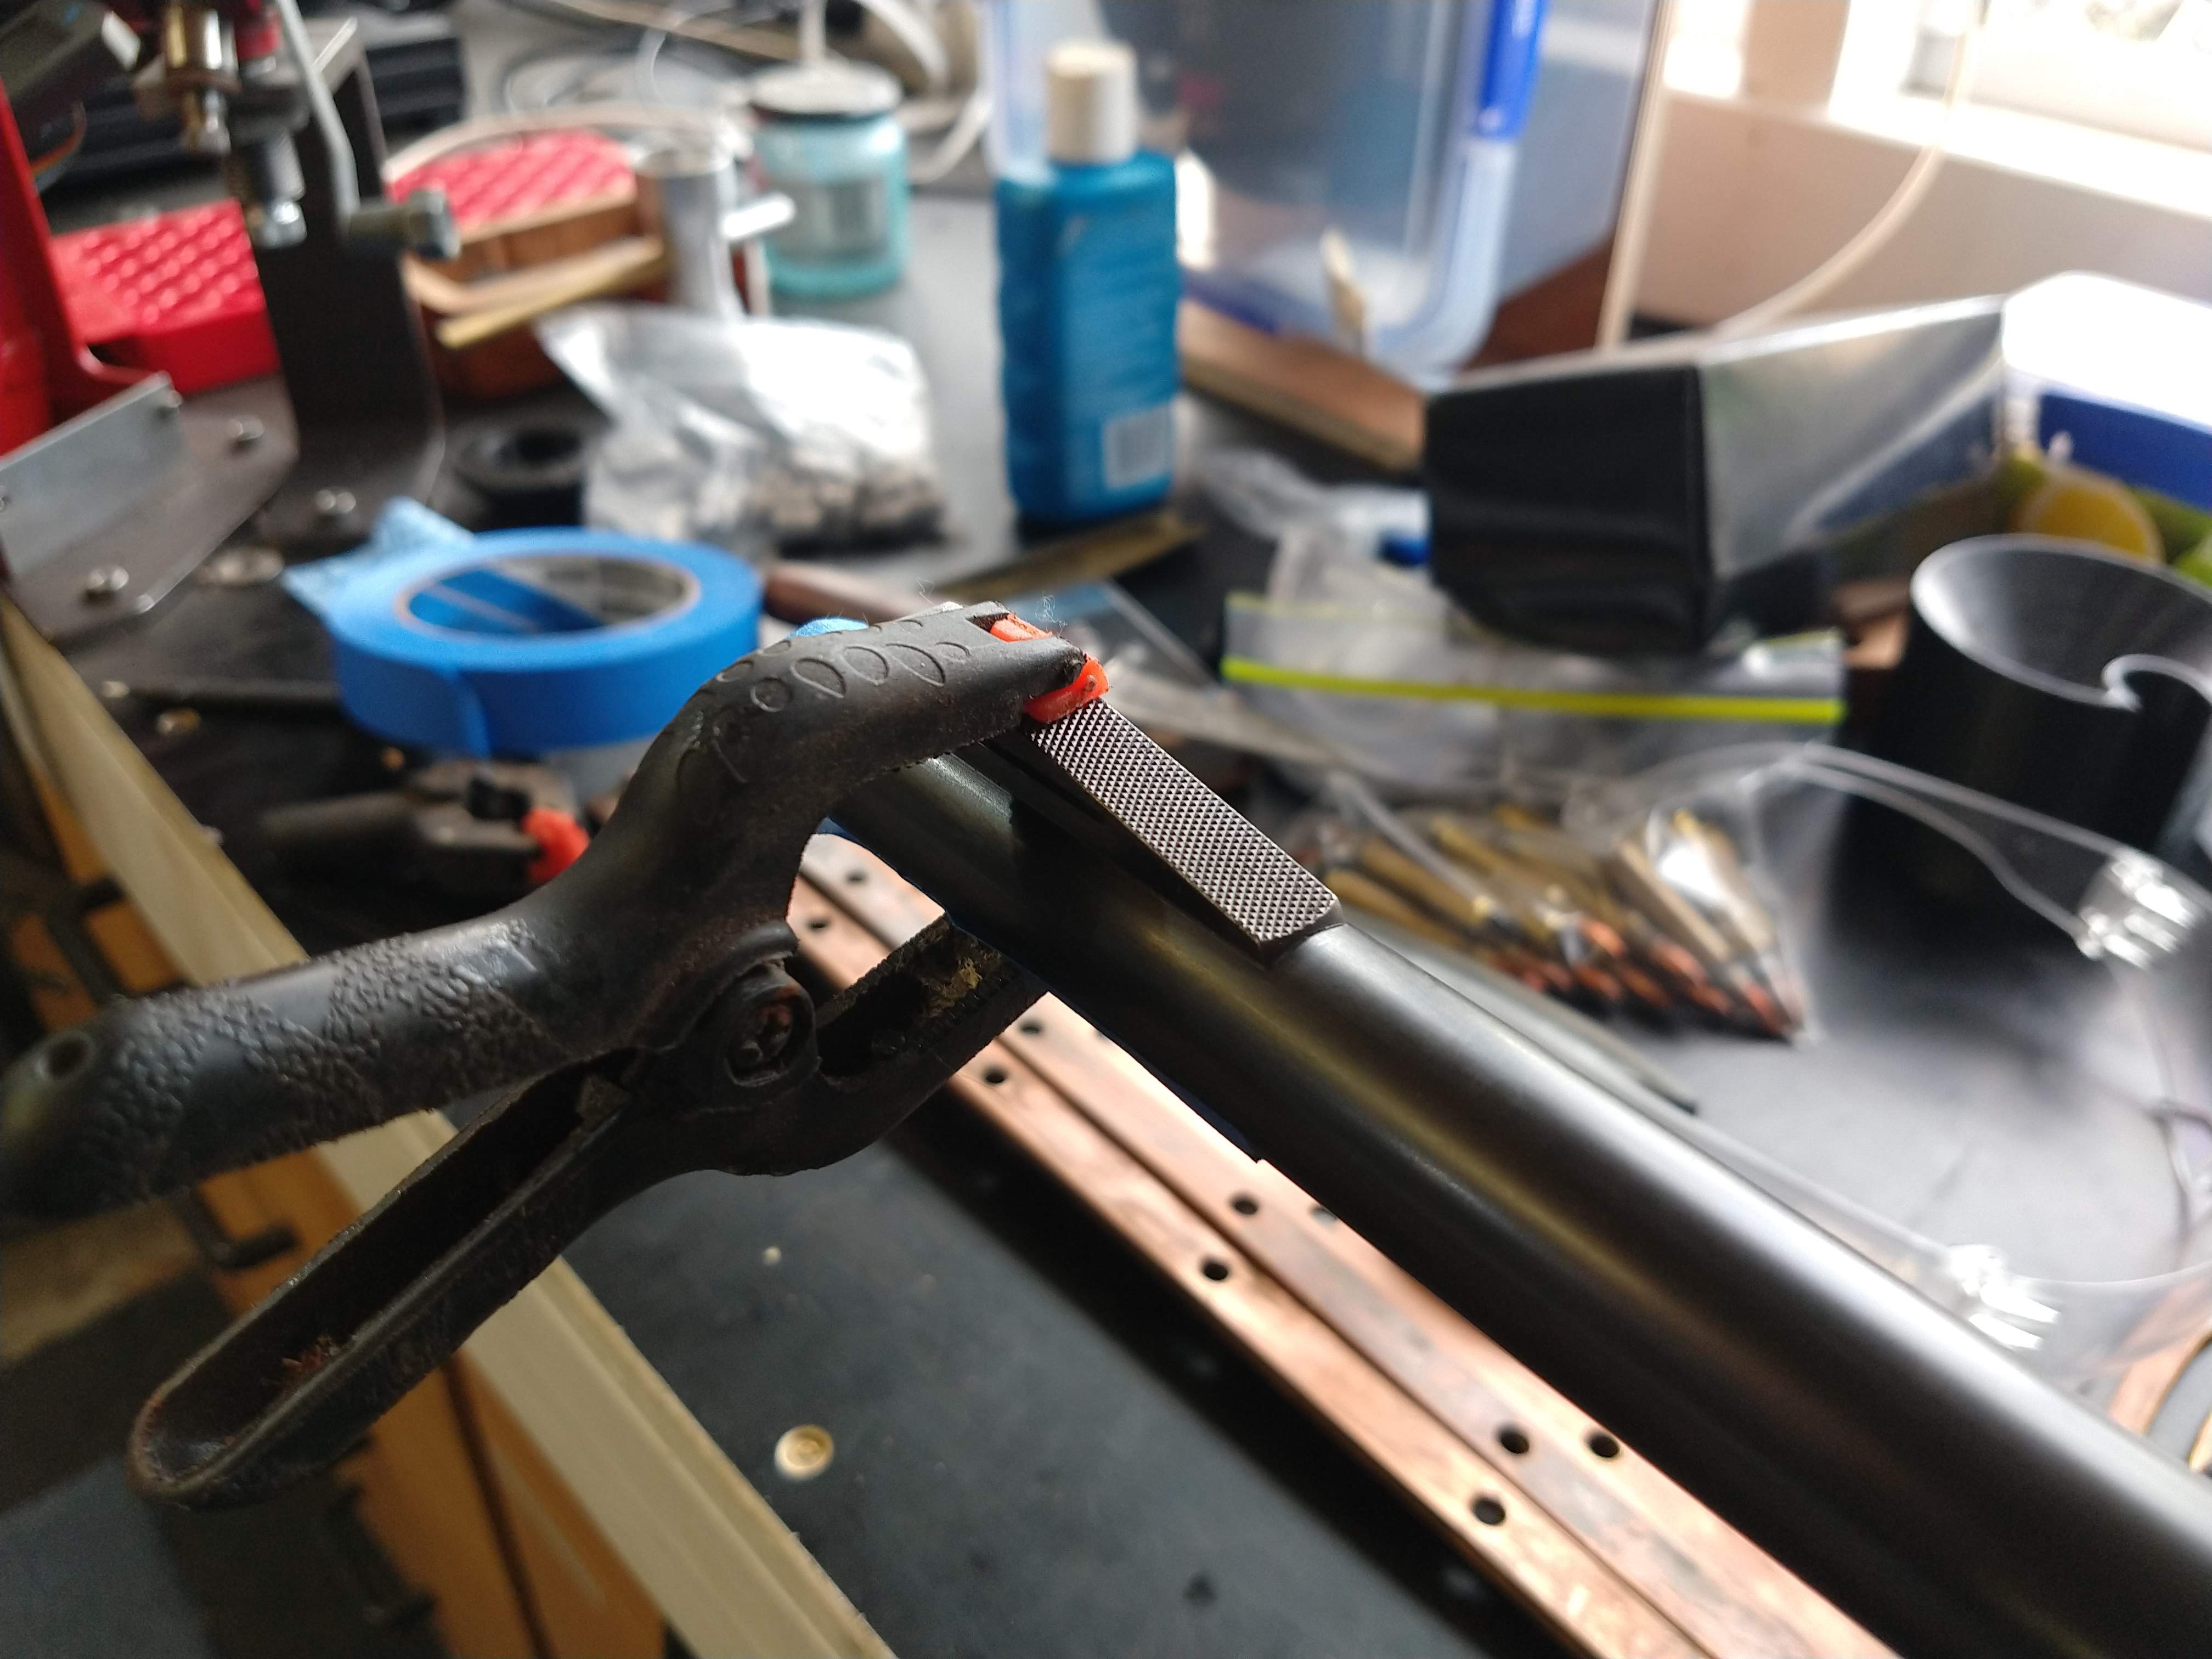
Cutting the dovetail in the barrel block was easy enough. I held it in the mill vice and used an indicator to check that the top rail was parallel to the table. I then cut the bulk of the material out with an end mill and cut the dovetail sides with a 60deg cutter.
After that was roughed out, I de-burred and smoothed everything out with a selection of stones.
Attachment 174221
Attachment 174222
Attachment 174223
Attachment 174224
Once that was finished to size, I started on making the sight mounting block. This is made from an offcut of 416 stainless, as it machines beautifully and I can bead blast it and not have to finish it otherwise.
Attachment 174225
I need to either make or buy a very fine tap for the sight elevation screw. Im thinking something like M6x0.5 or M5x0.5. TradeTools have an M6x0.5 tap for about $35, which while expensive for a single hole, would be smarter than spending an hour or two making and hardening a tap from carbon steel.
I also found this front sight block soldered to a barrel stub I had in my offcuts box. I need to change the underside radius to match my barrel and make a new sight post, then I can solder it in place once the barrel is installed.
Attachment 174226
I now have brass, dies, powder, a handful of projectiles and primers for this rifle, but the range test is still a ways off. Lots to do beforehand. So settle down Micky Duck! I will get there.
Some great work going on there.
If a gun tap would do the job for you (it is a through hole you're talking about if I understand correctly?) I see CarbideNZ have M5x0.5 for $14 and M6x0.5 for $22. Bit cheaper than Tradetools.Quote:
Originally Posted by SixtyTen
Thanks for the heads up, I had somehow missed that CarbideNZ had them. I just ordered a M5x0.5Quote:
Originally Posted by PaulNZ
I also got a couple of R8 collets for my mill which are mighty hard to find for a decent price.
Seeing as I have been stuck at home for the last week, I managed to find some time to work on this rifle.
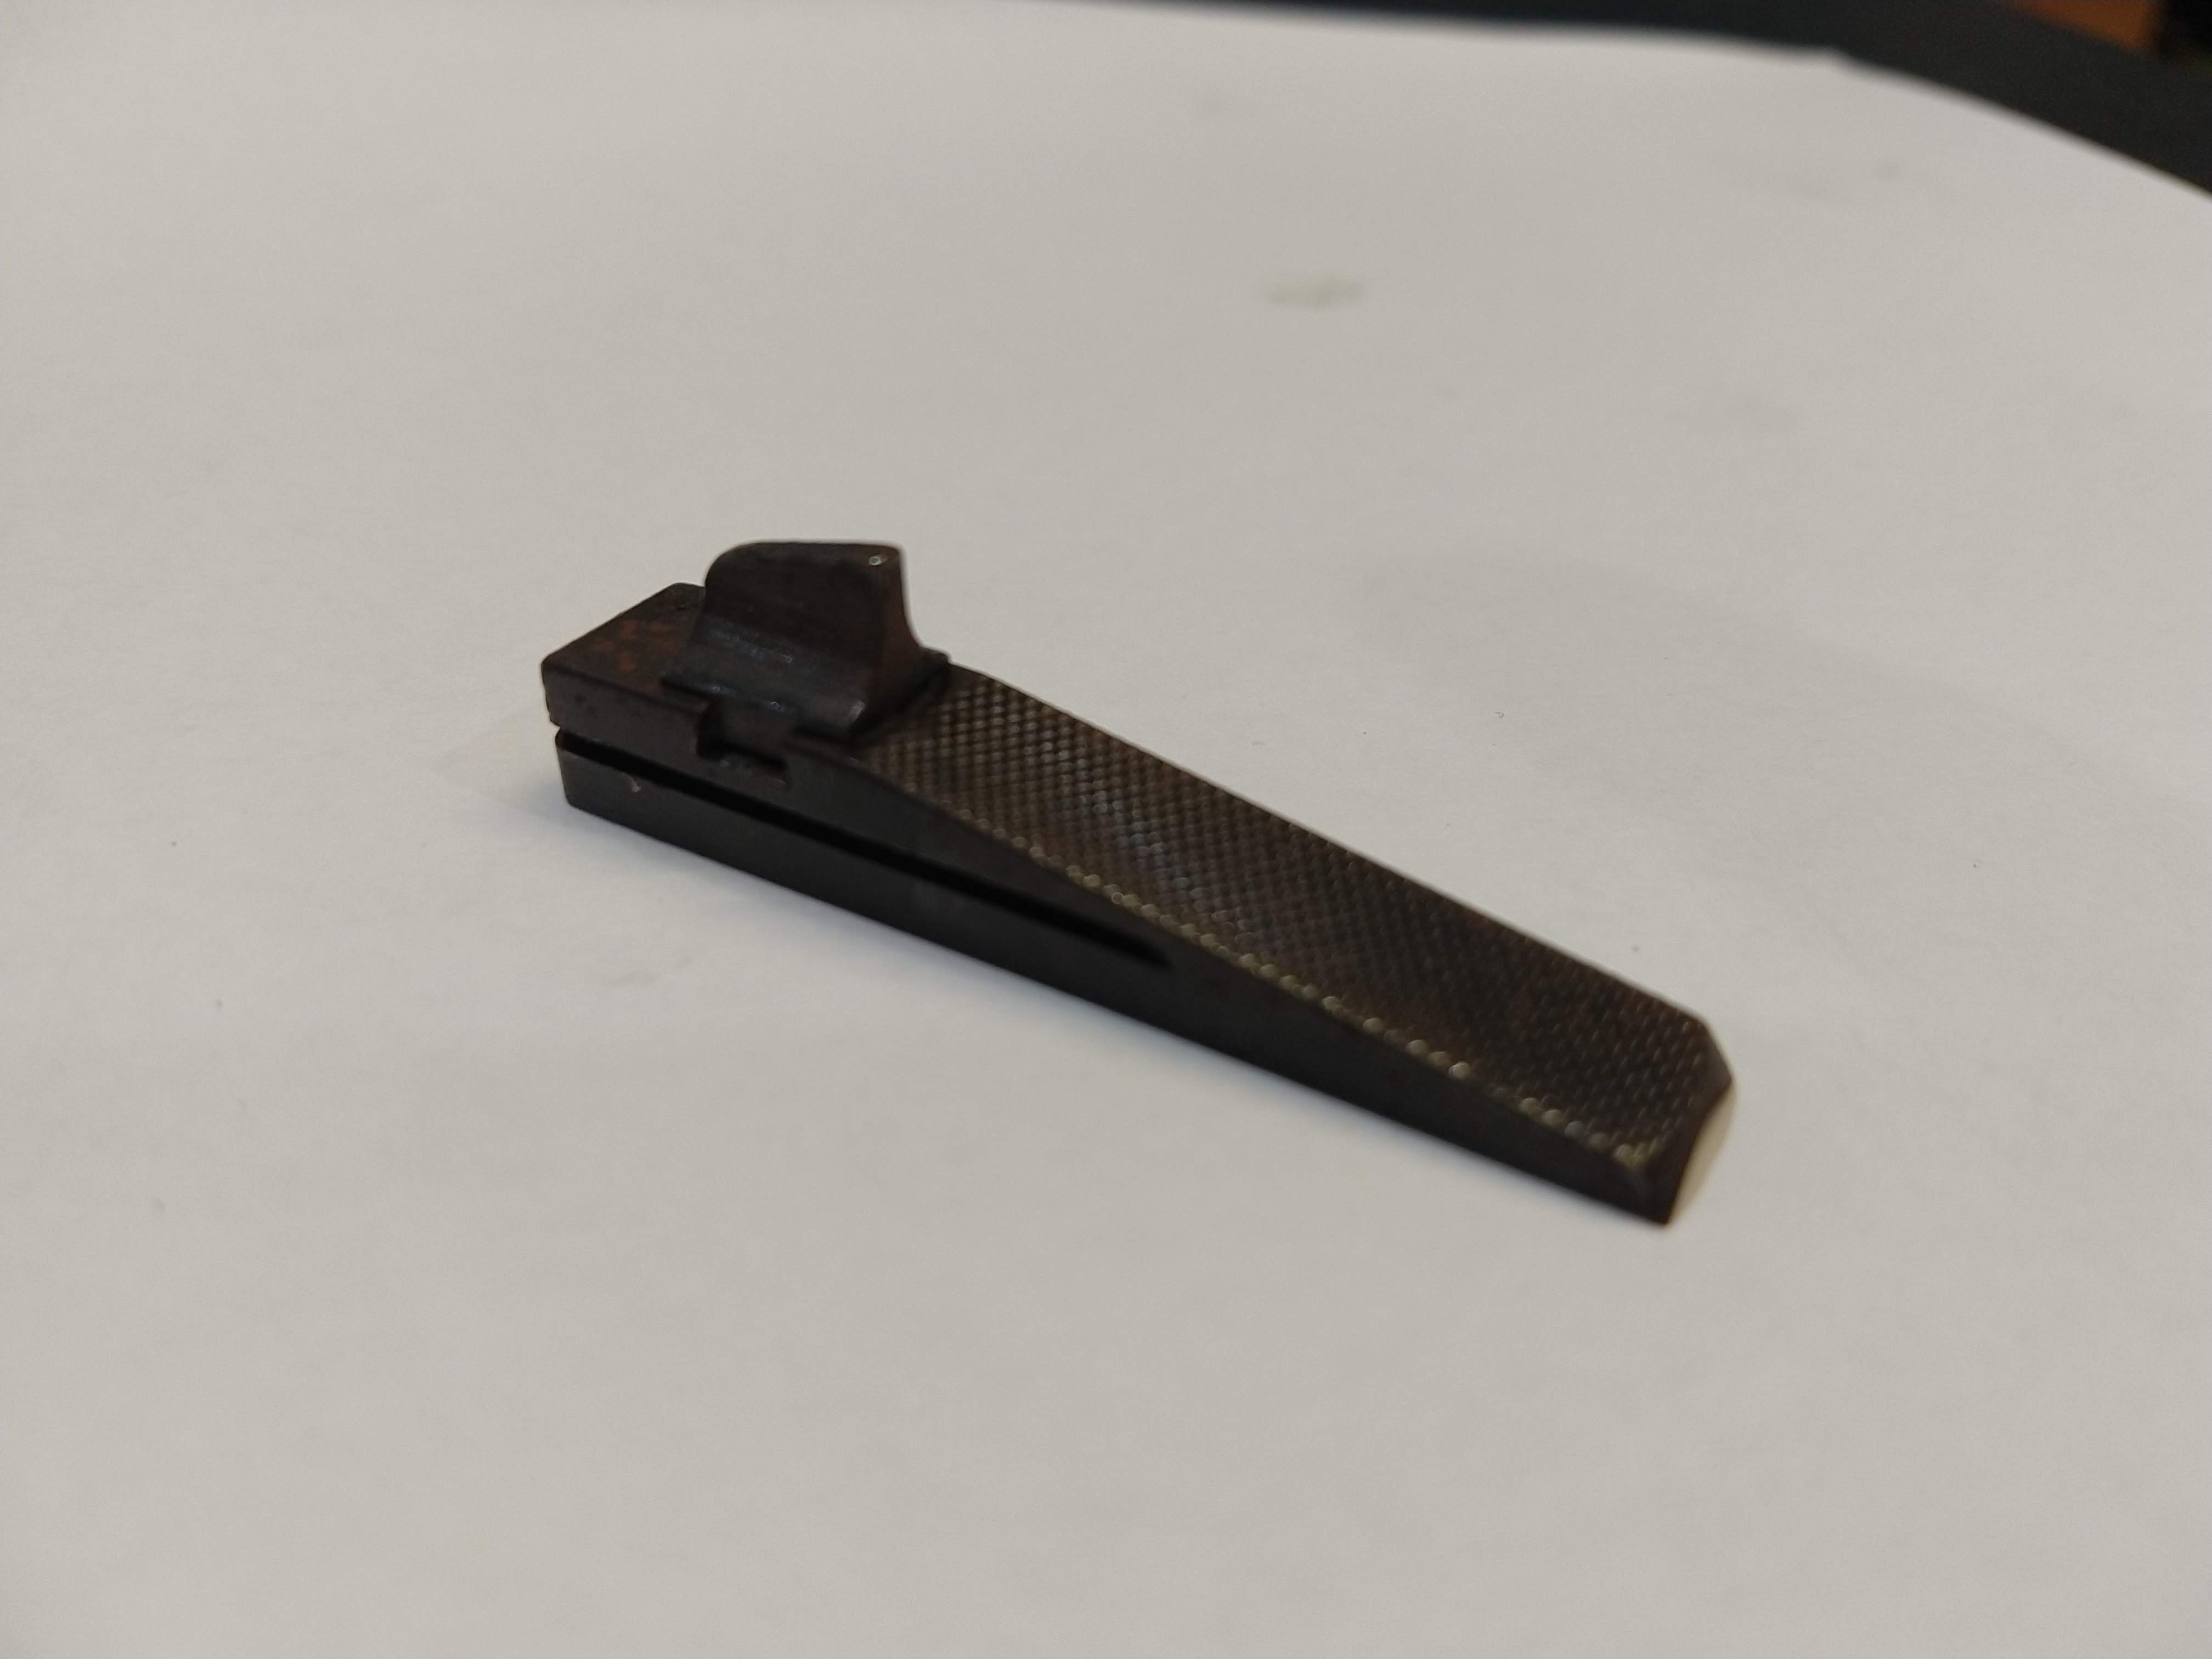
I finished off the sight block and made a aperture holder to screw into it. I am likely going to have to make this again, as the threaded hole for the aperture is not dead center on the threaded post that goes into the block. Meaning that if I rotate it 180degrees, the windage will change along with elevation.
I also made a quick aperture insert from an M6 capscrew. I will experiment with different sizes and designs once I start shooting it.
I cold blued the barrel and it came out way better than I expected. Turns out 4140 takes cold blue really well. The most important thing I have found is having the metal extremely clean before starting. I use CRC Brake Clean to degrease and then Acetone.
Attachment 175811
Attachment 175812
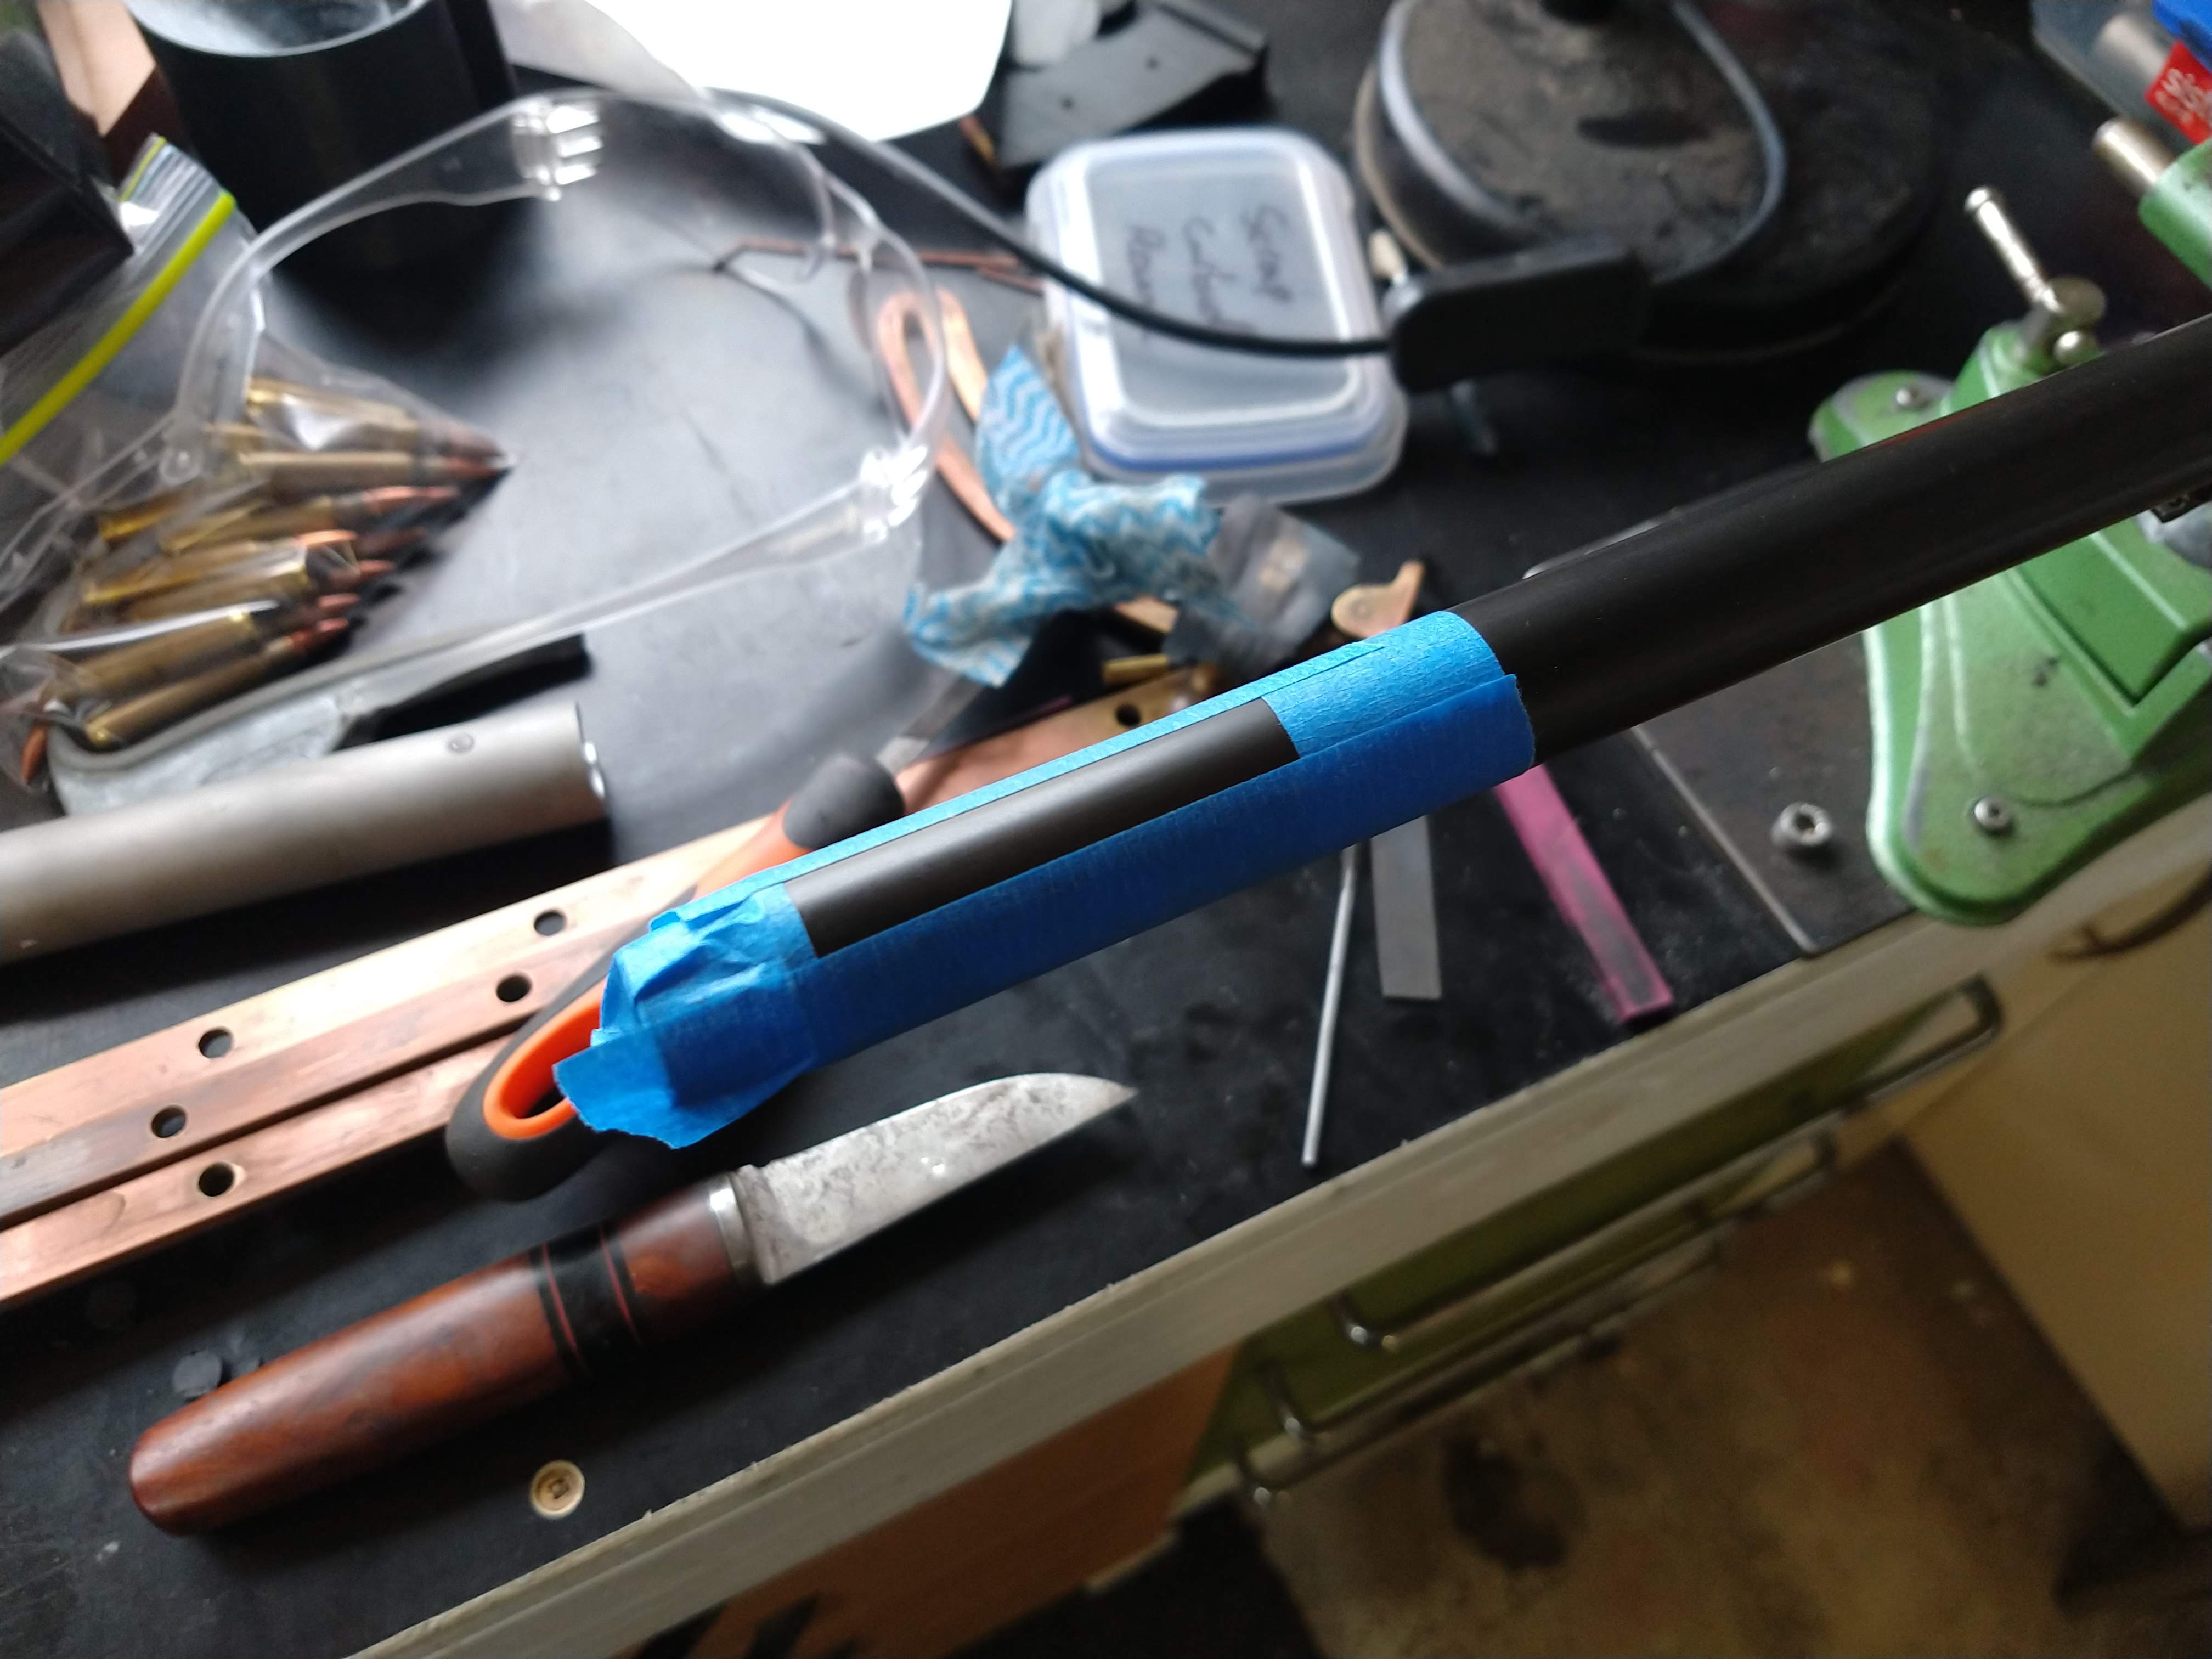
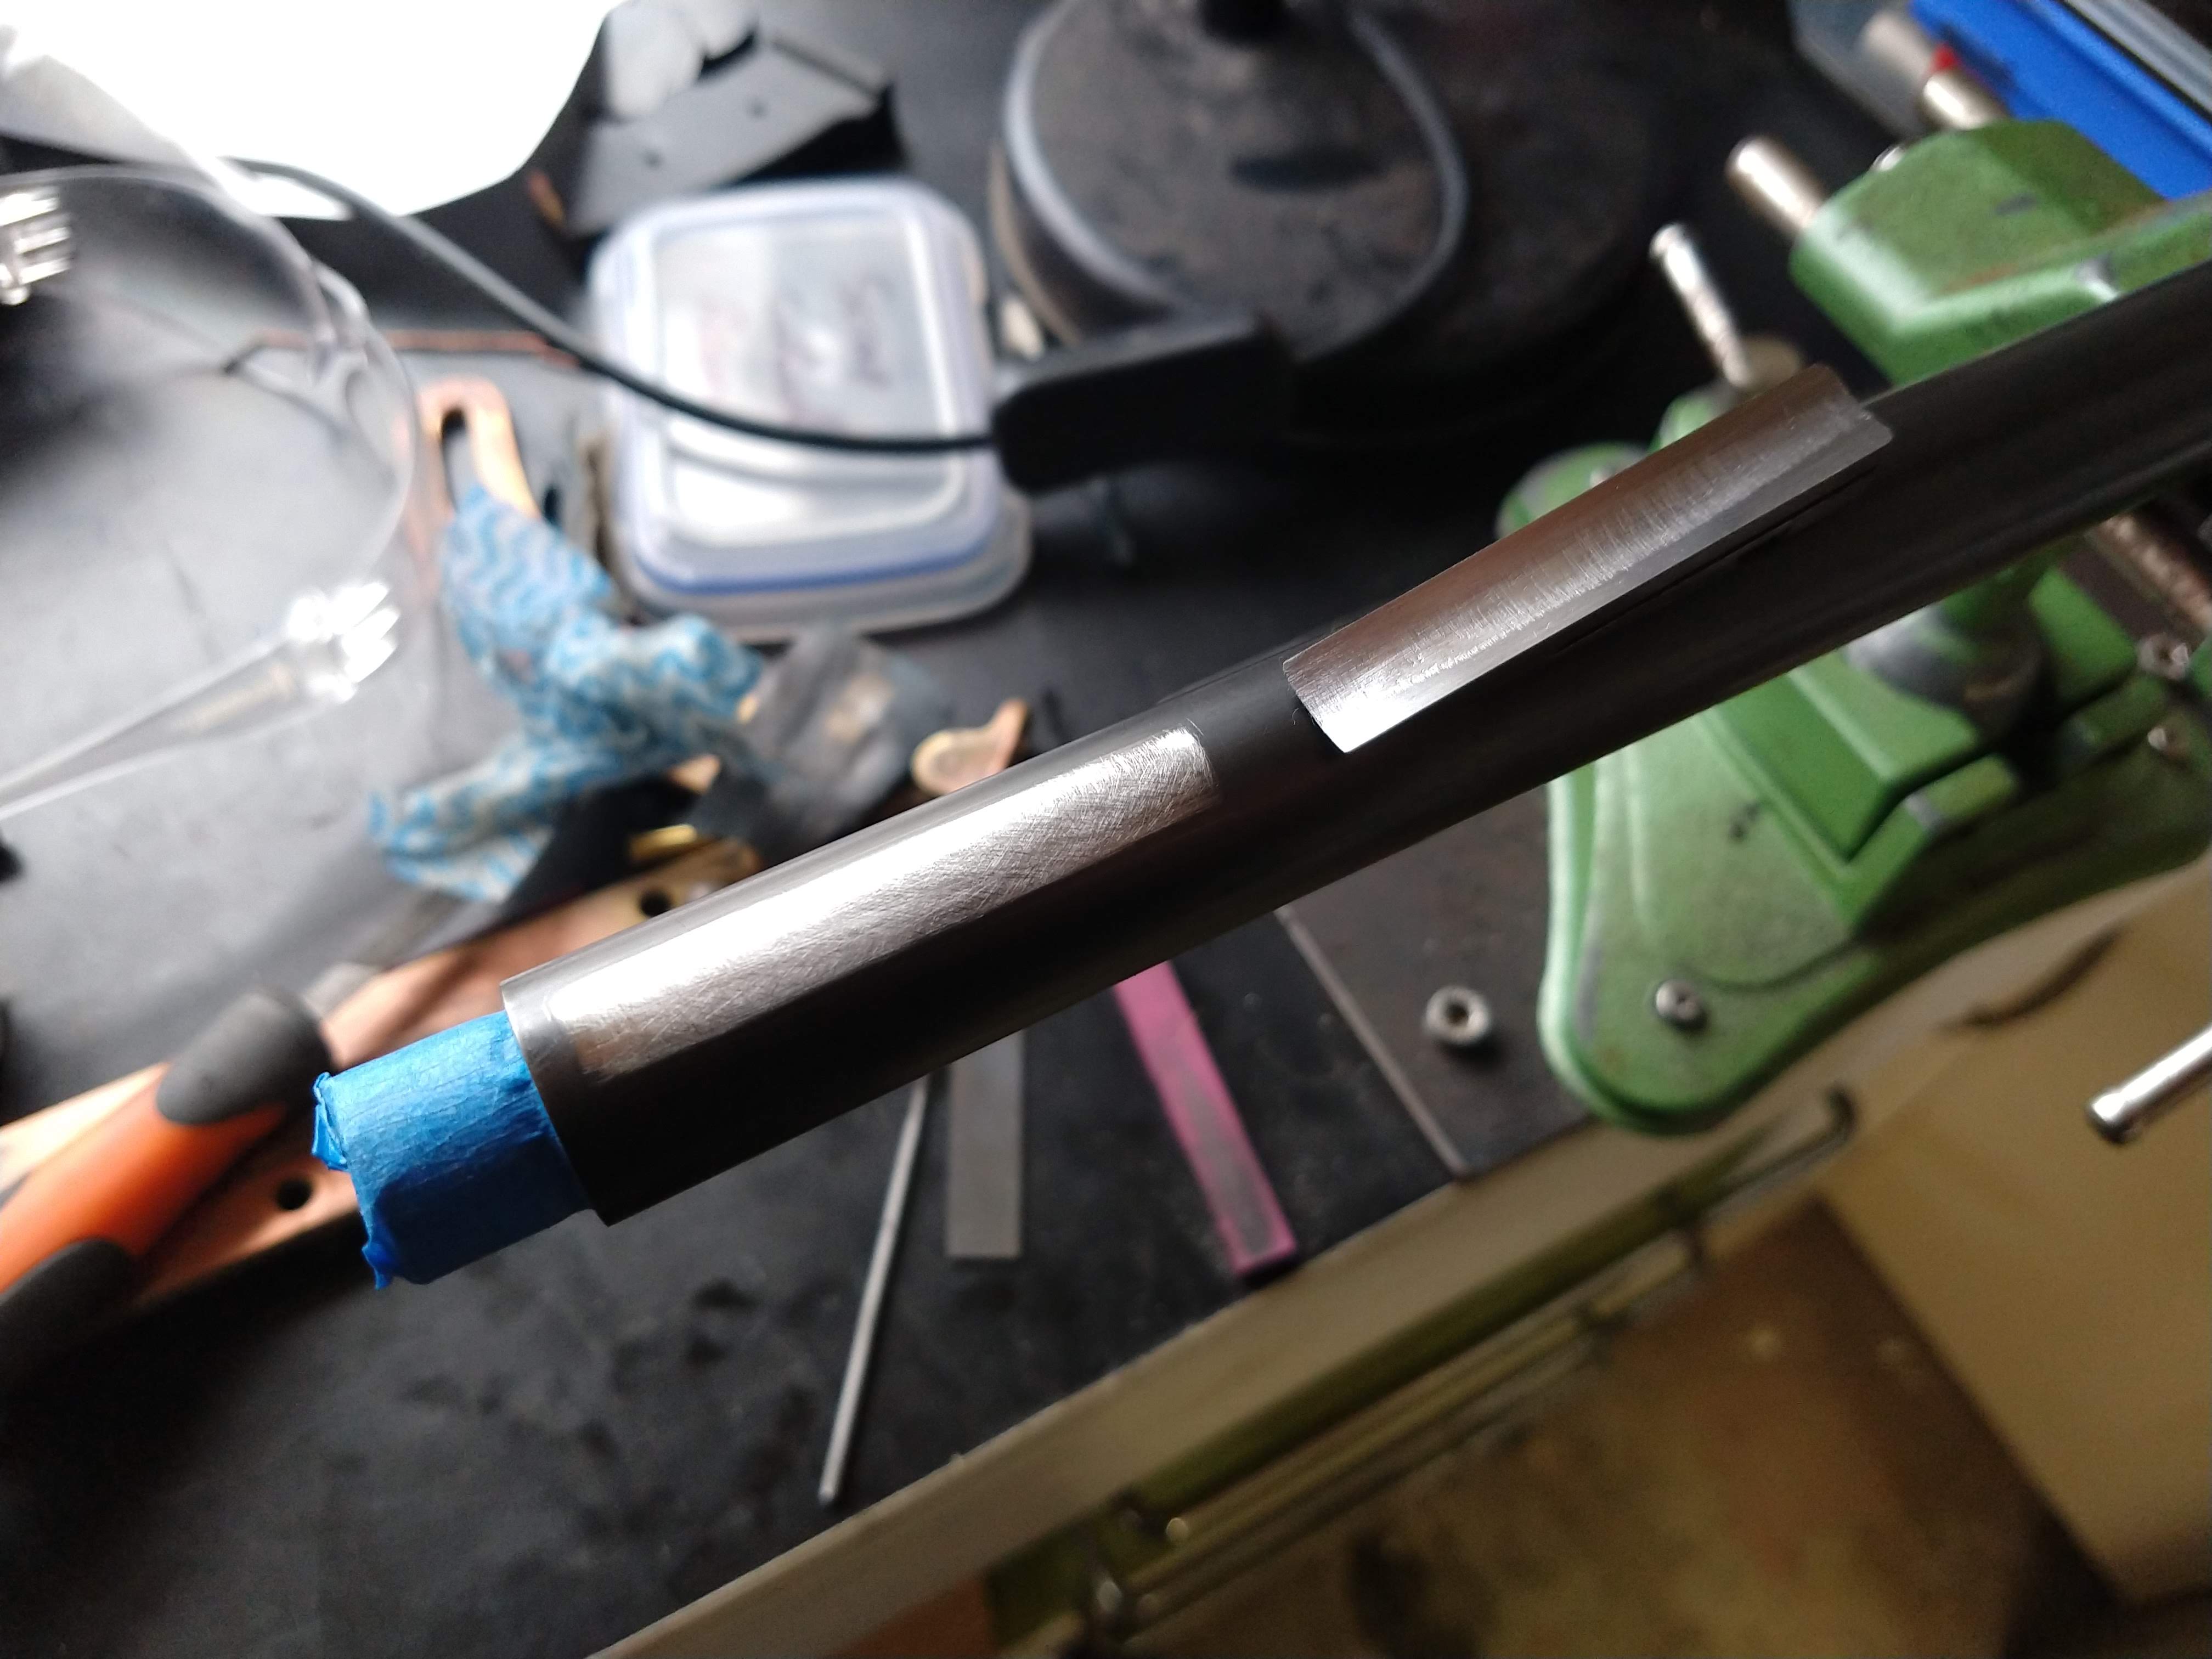
I ended up gluing the barrel in with JB Weld, as I am not that confident in my soldering skills to do a nice neat job. I also decided to glue the front sight base on with JB Weld. Time will tell whether this is a good idea or not. With proper joint prep, it should be more than strong enough.
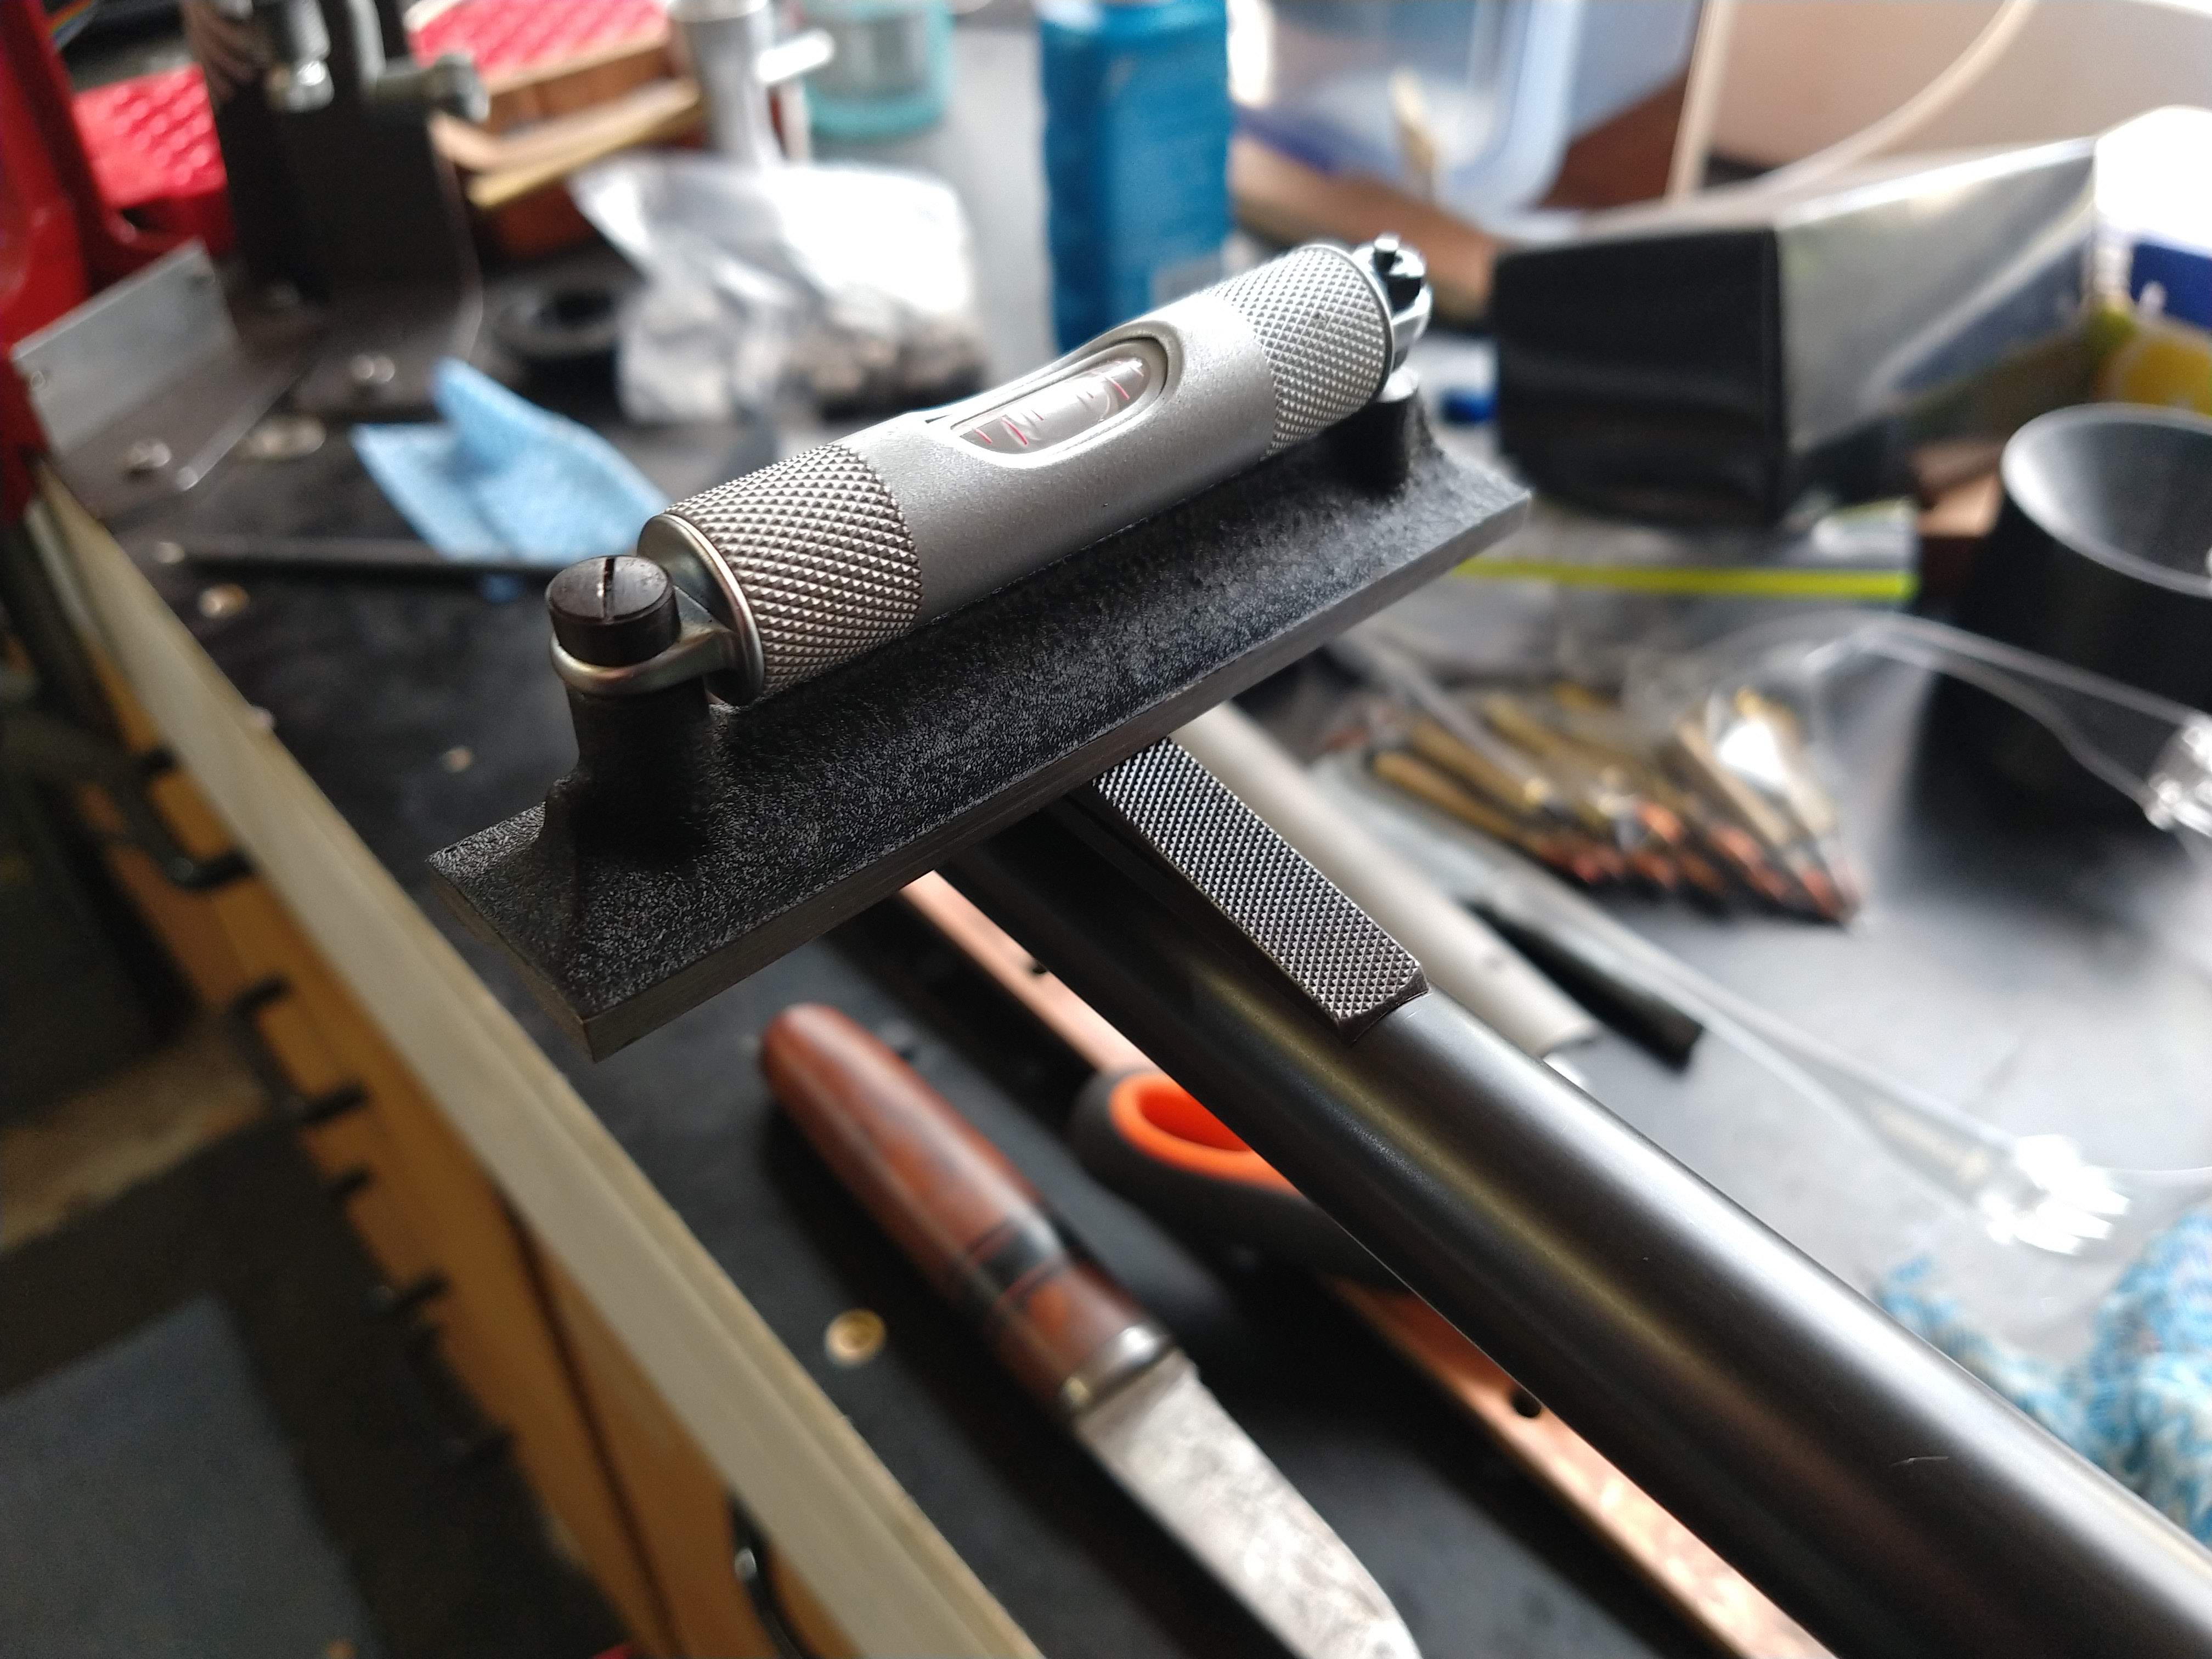
I used a machinists level to align the top face of the sight with the dovetail rail and marked its position. I then masked off and prepped the area for bonding. A good sand, brake clean, then acetone.
The sight base was held in place using a spring clamp and the joint cleaned up.
Attachment 175813
Attachment 175814
Attachment 175815
Attachment 175816
Once that was cured overnight in the hot water cupboard. I decided that I wanted to make the dovetail in the front sight block larger. This would have been much easier to setup before it was glued to the barrel.
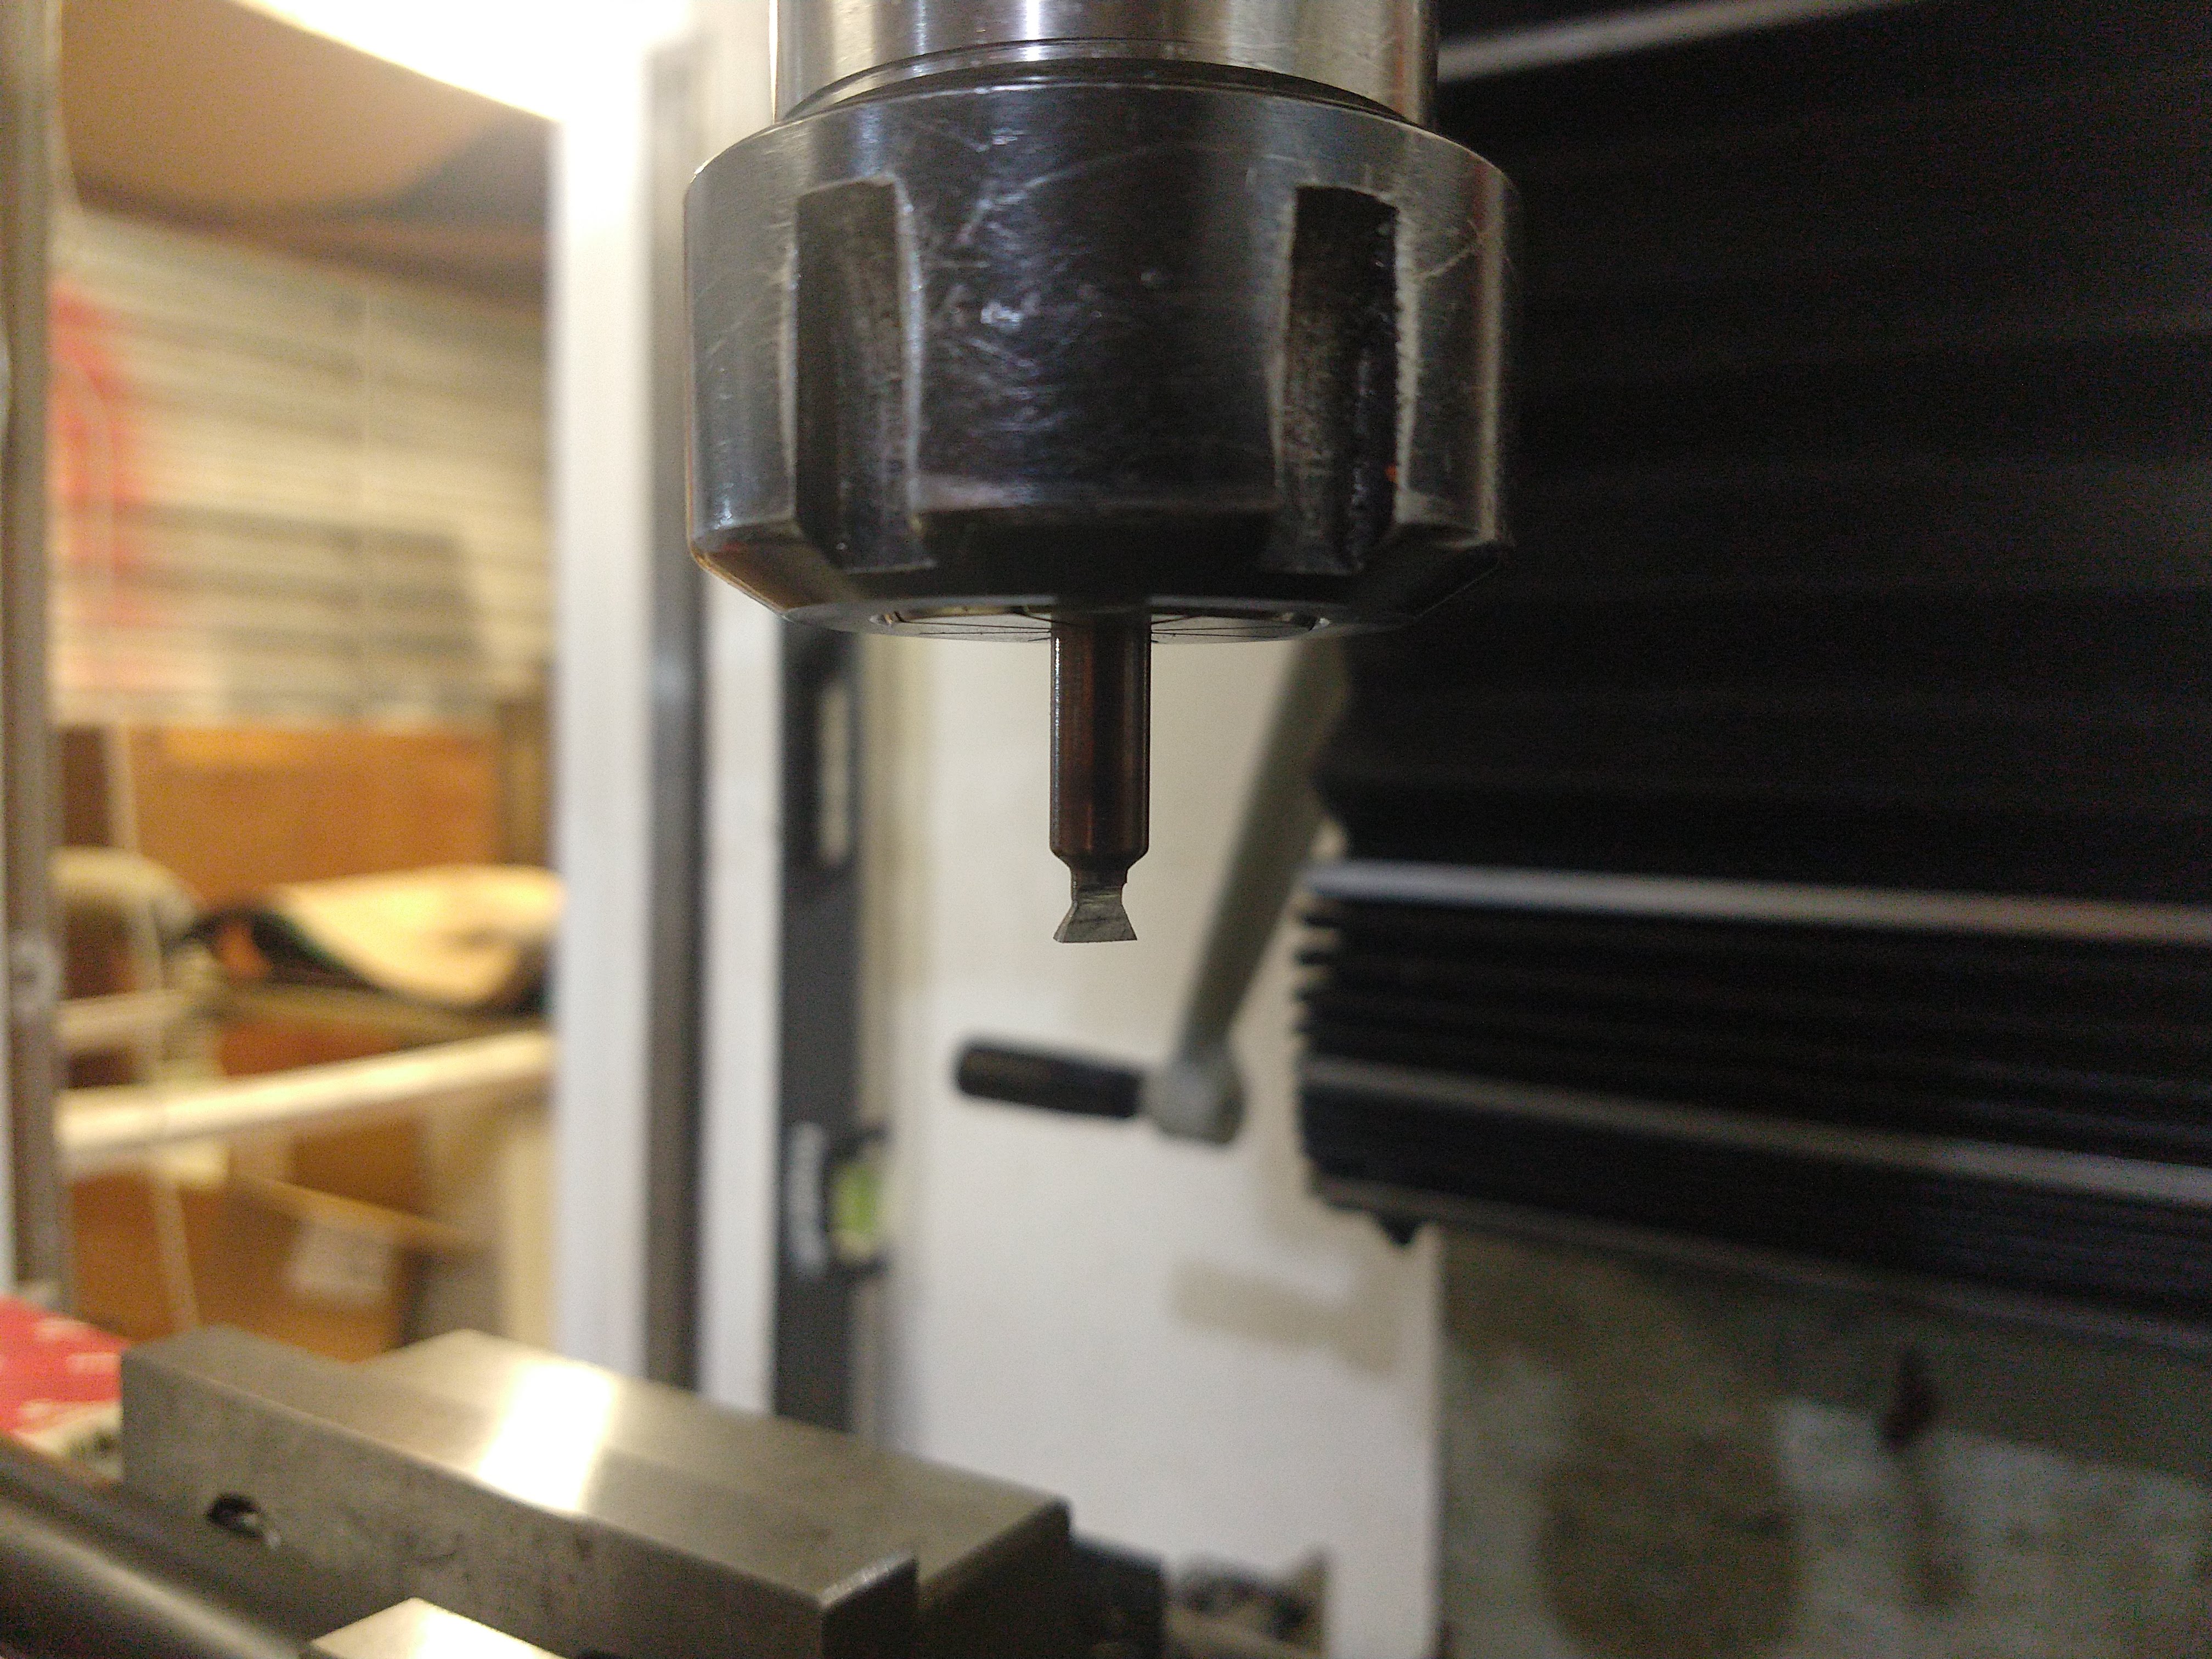
I did not have any dovetail cutters small enough, so I ordered a couple from ebay and then decided I couldnt wait that long and made my own from some 6mm Drill rod. It was a simple case of turn the correct profile on the lathe, polish, harden and temper the blank, and then grind it exactly in half on the surface grinder. I then manually added some relief to the bottom face and cutting edge. It worked surprisingly well and only tool about an hour to make. A good skill to have in a shop like mine.
Attachment 175817
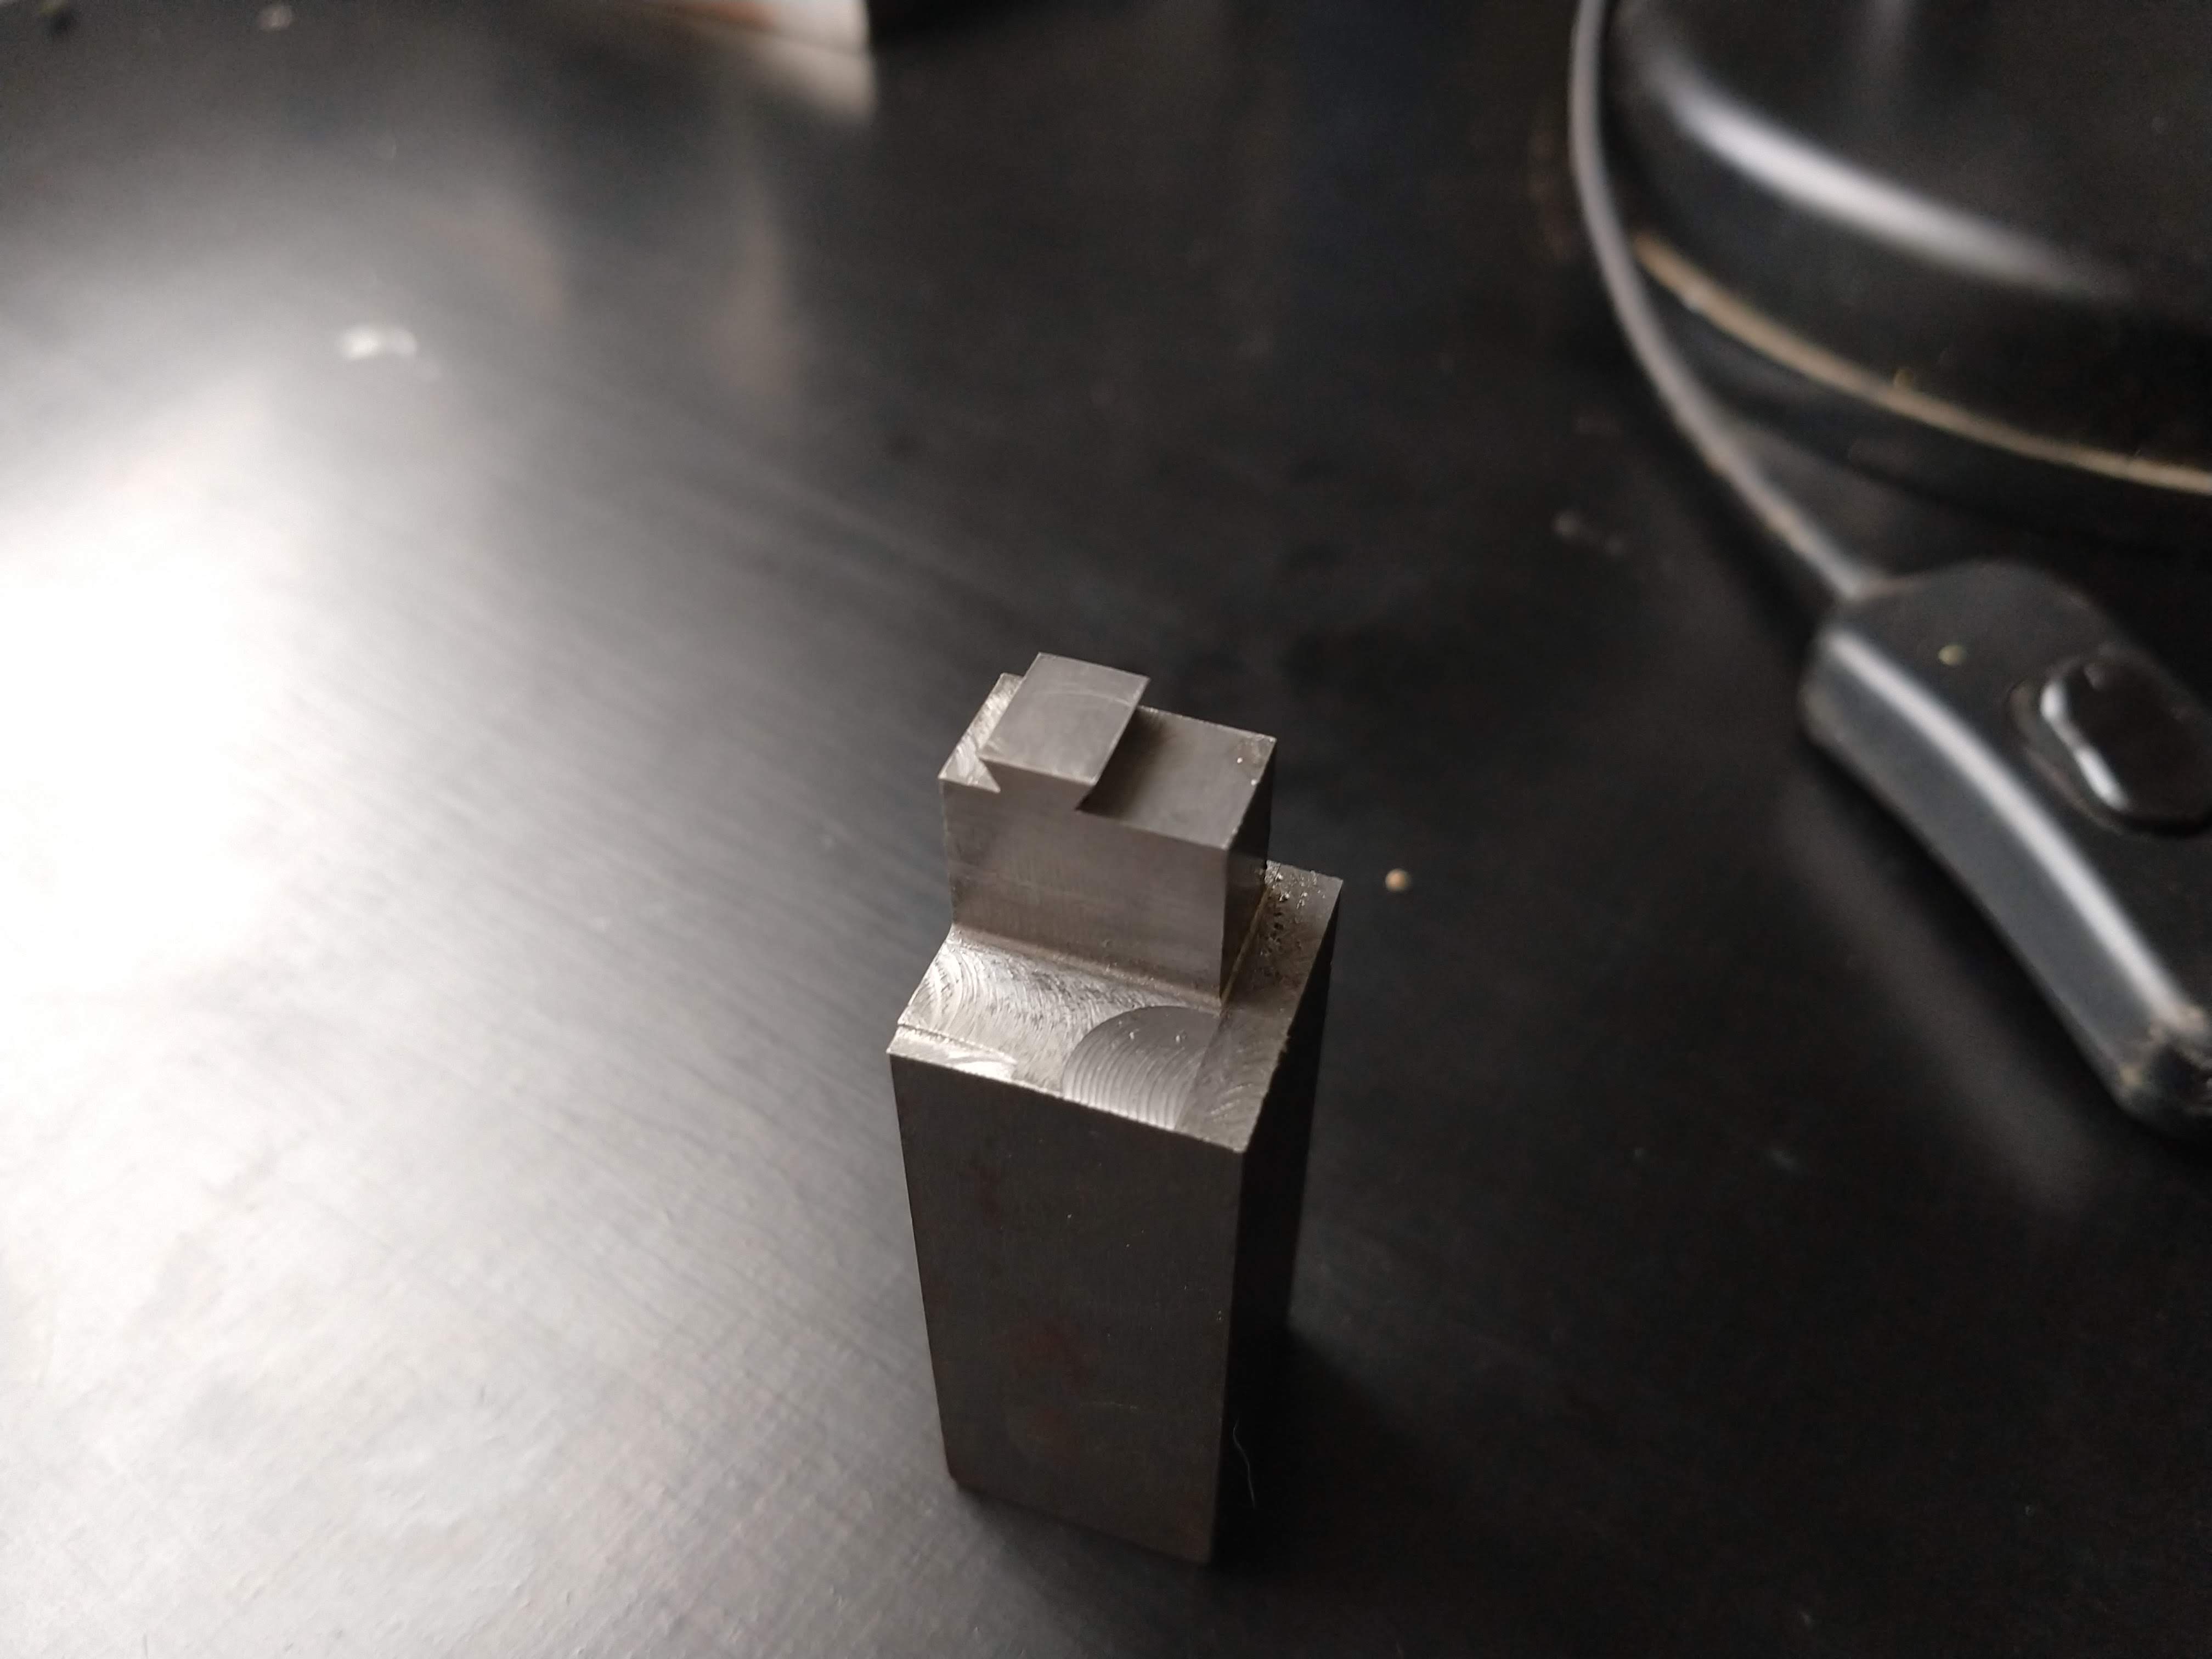
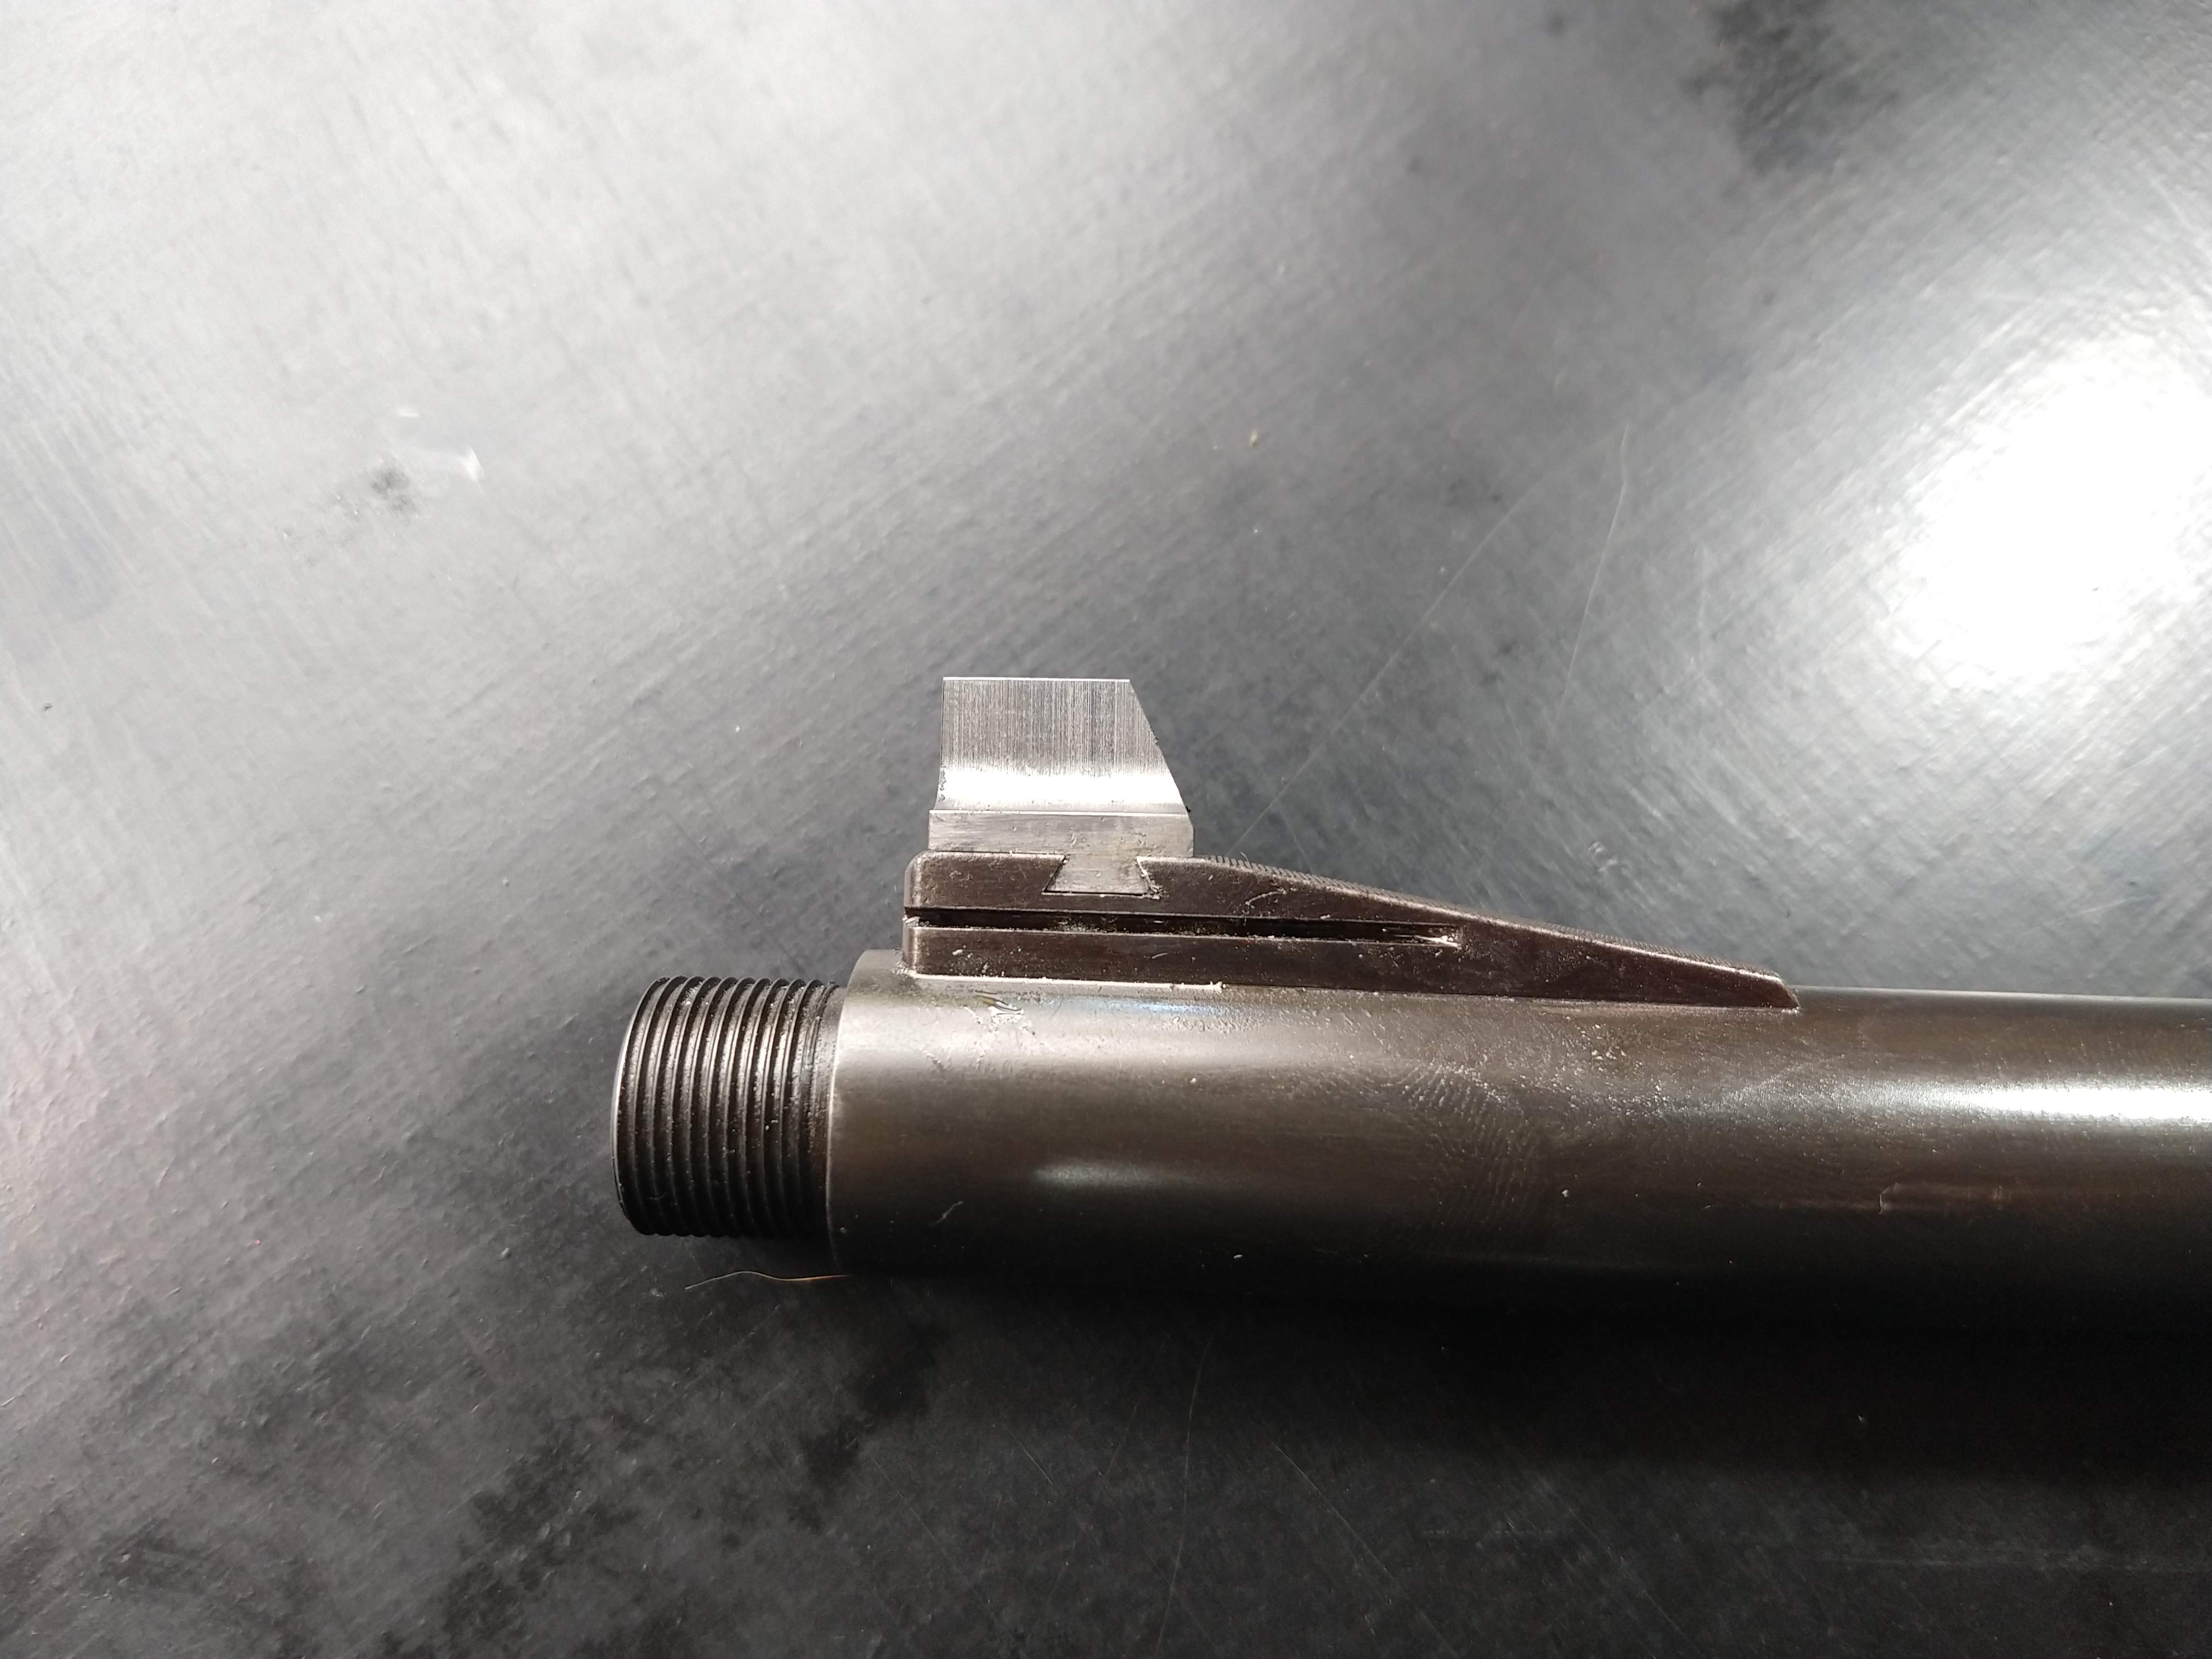
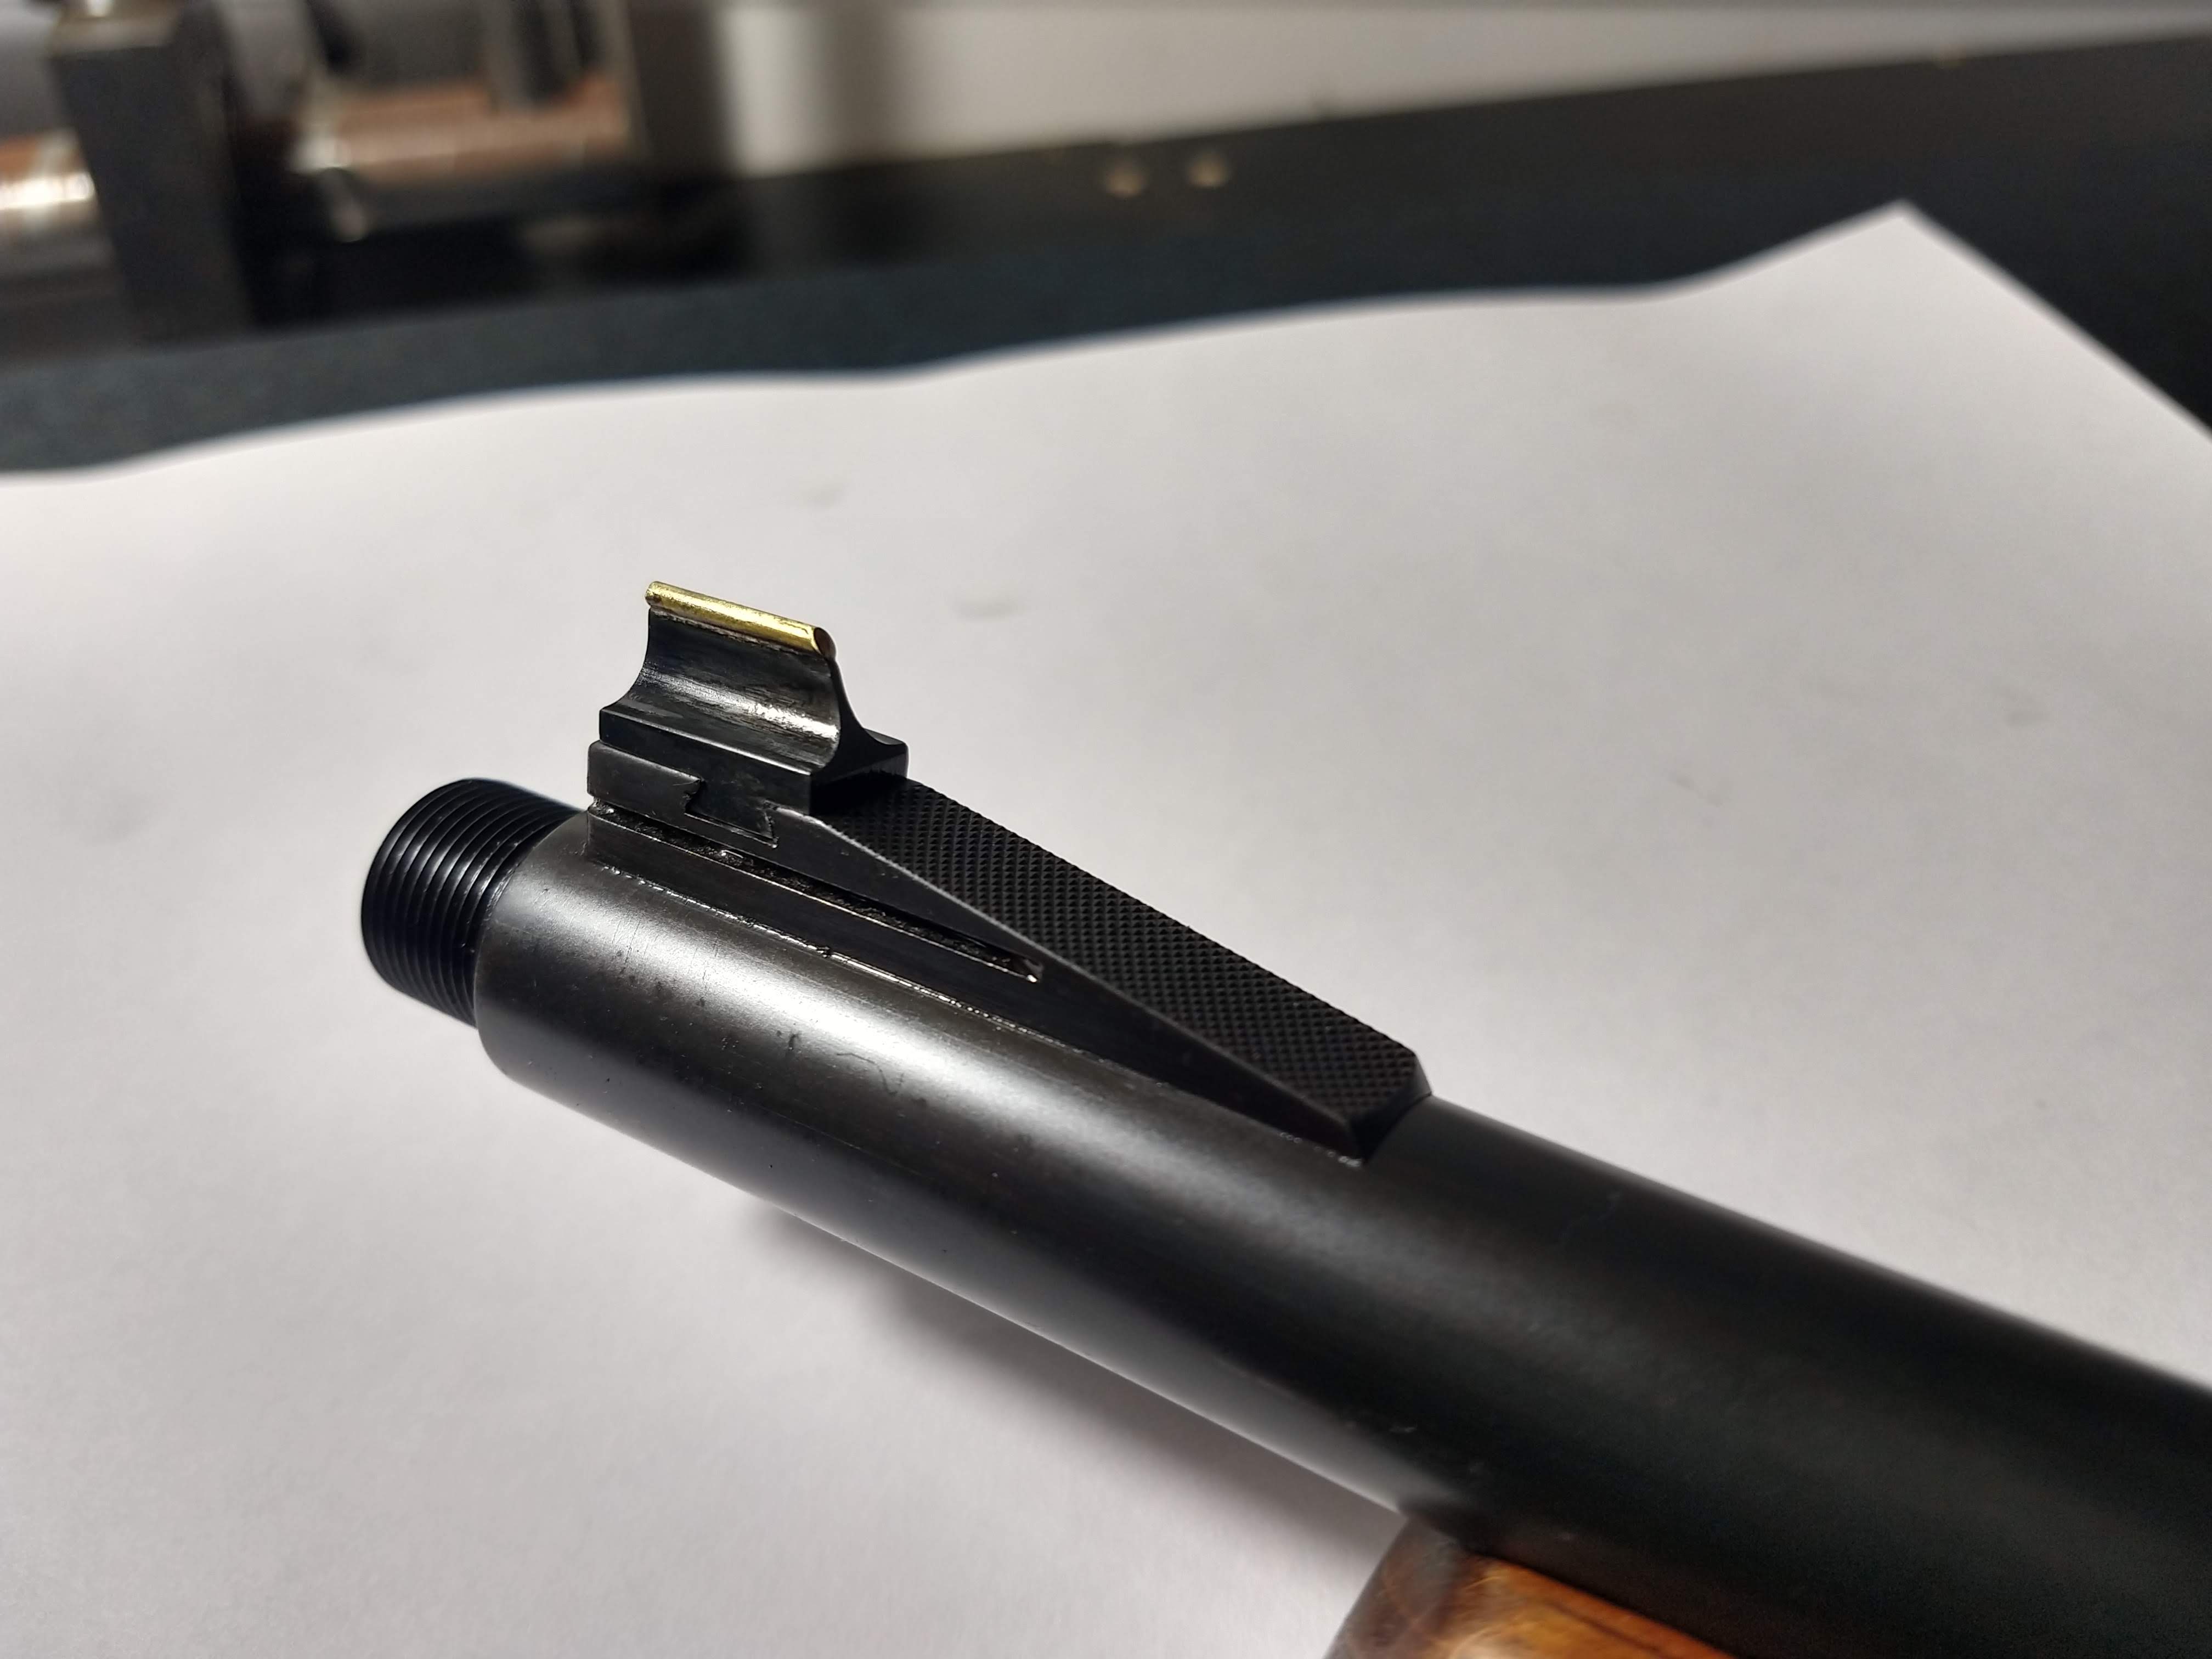
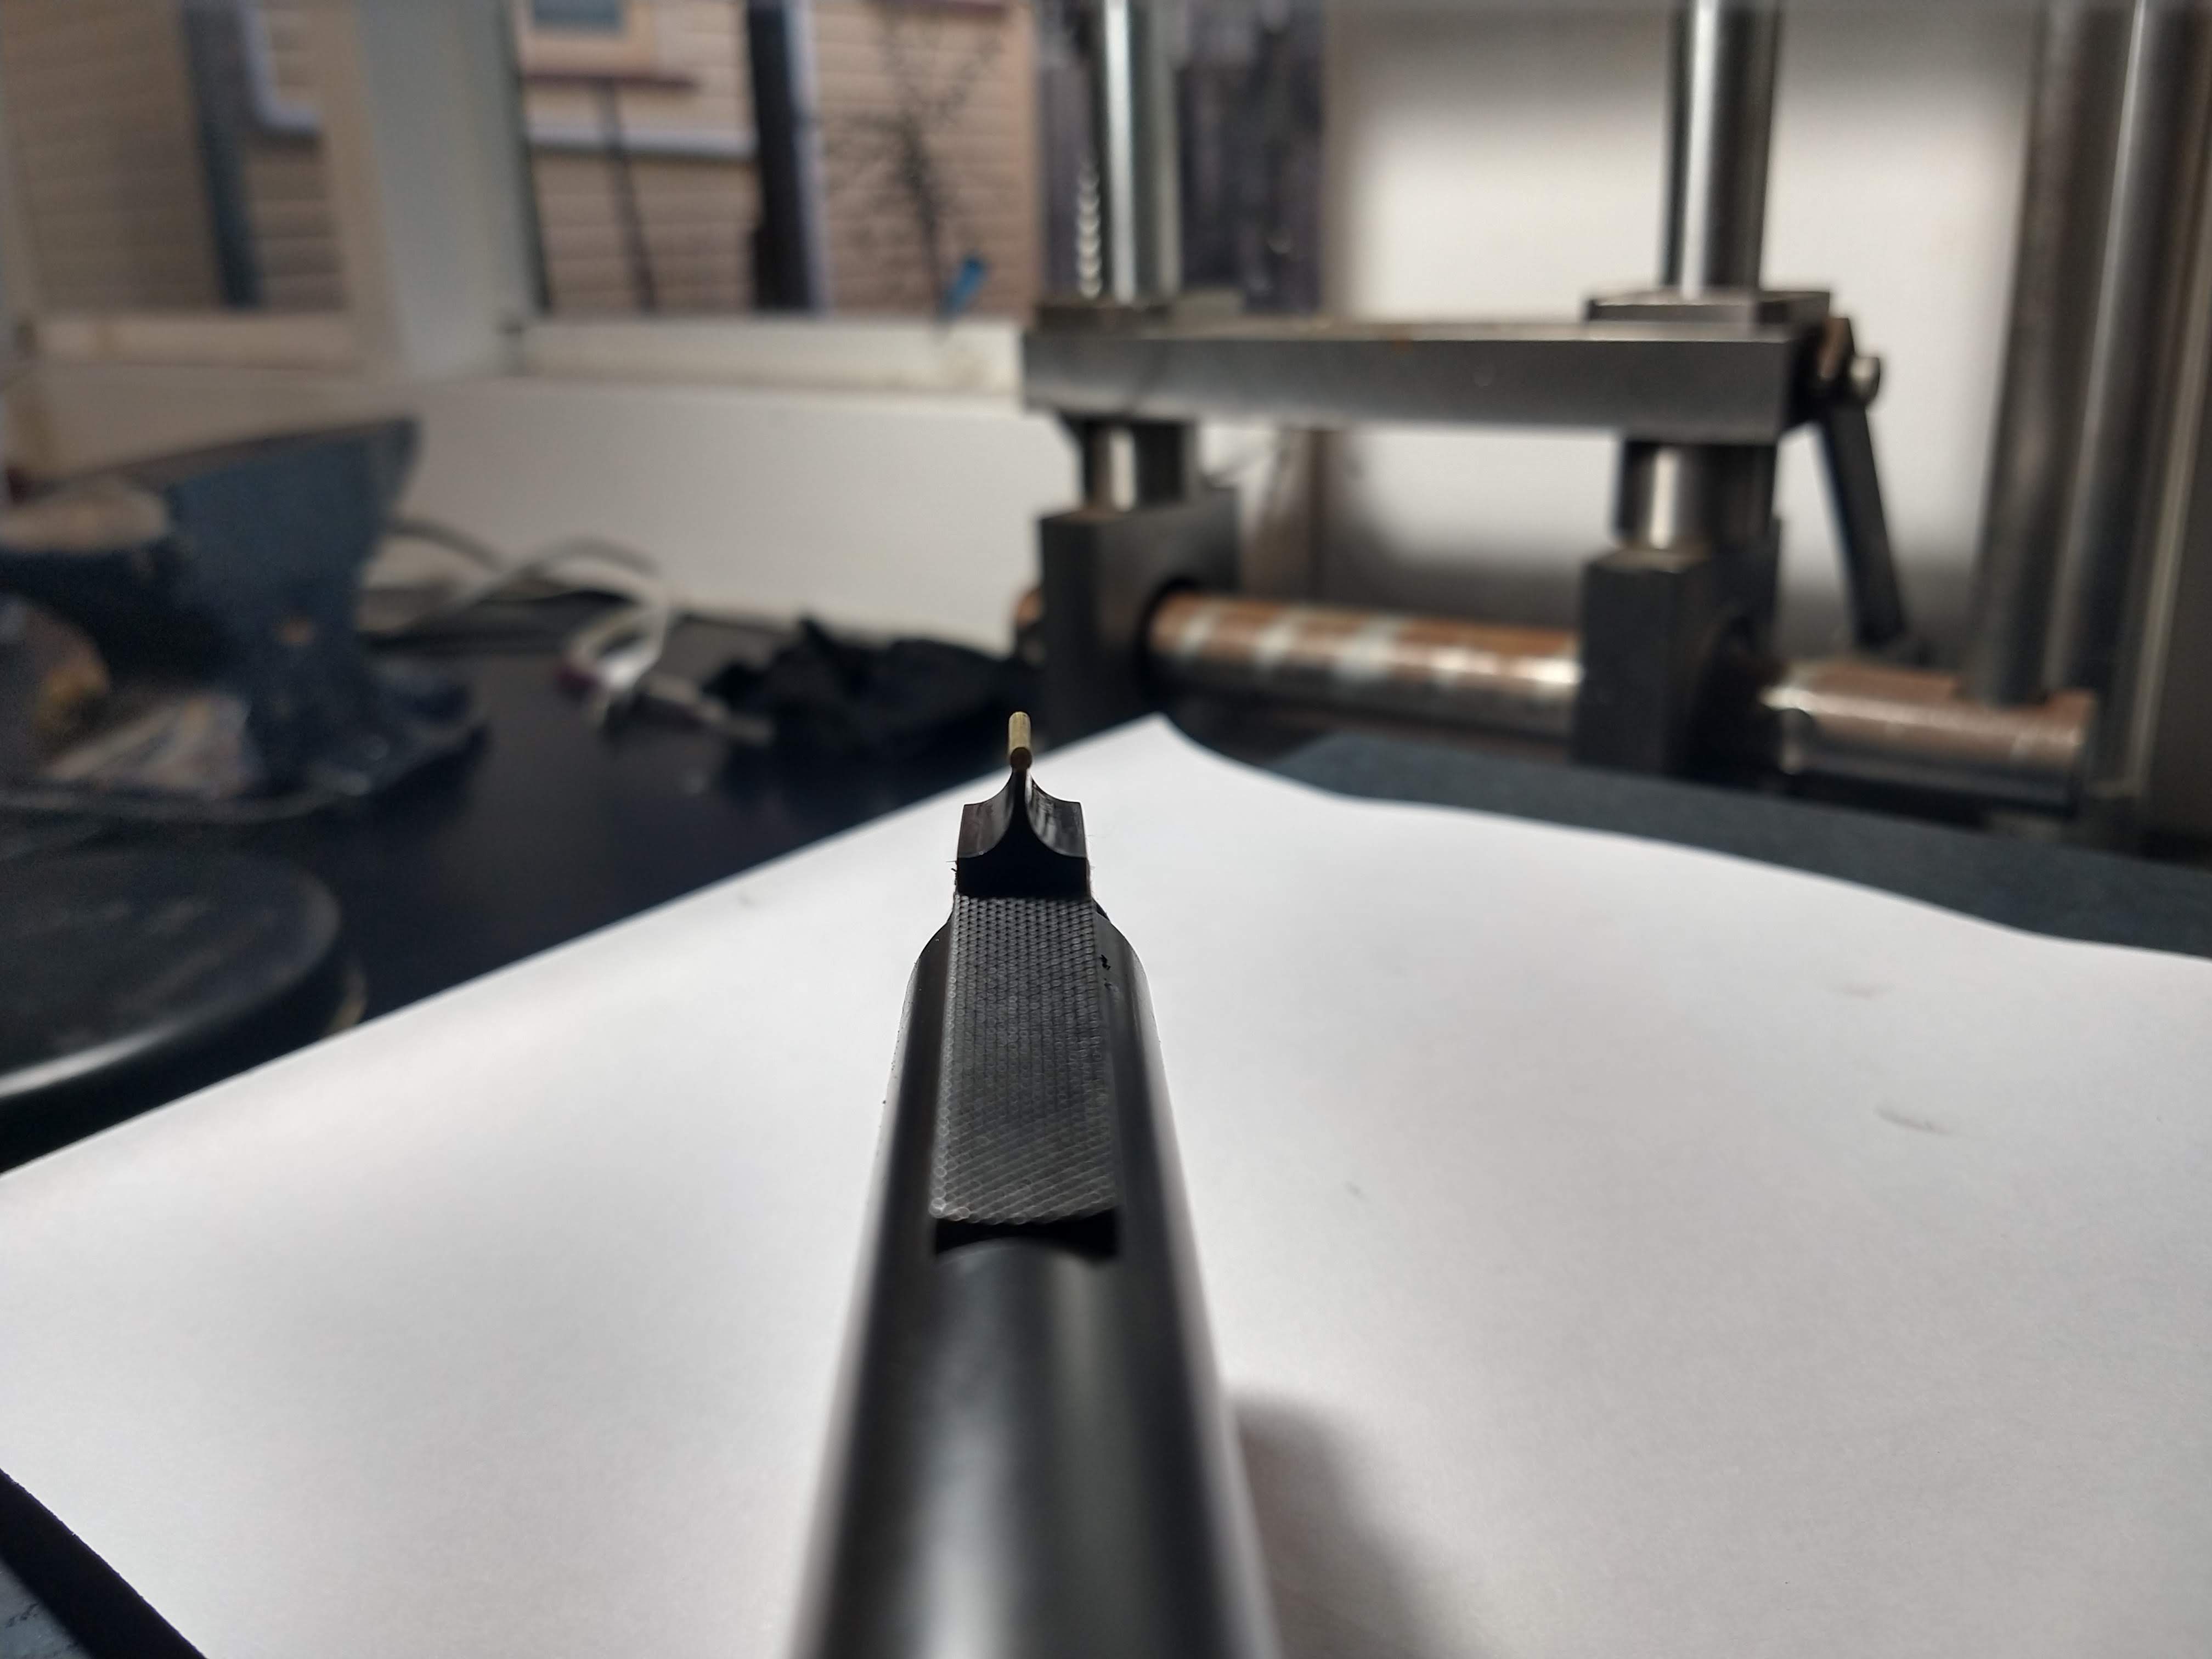
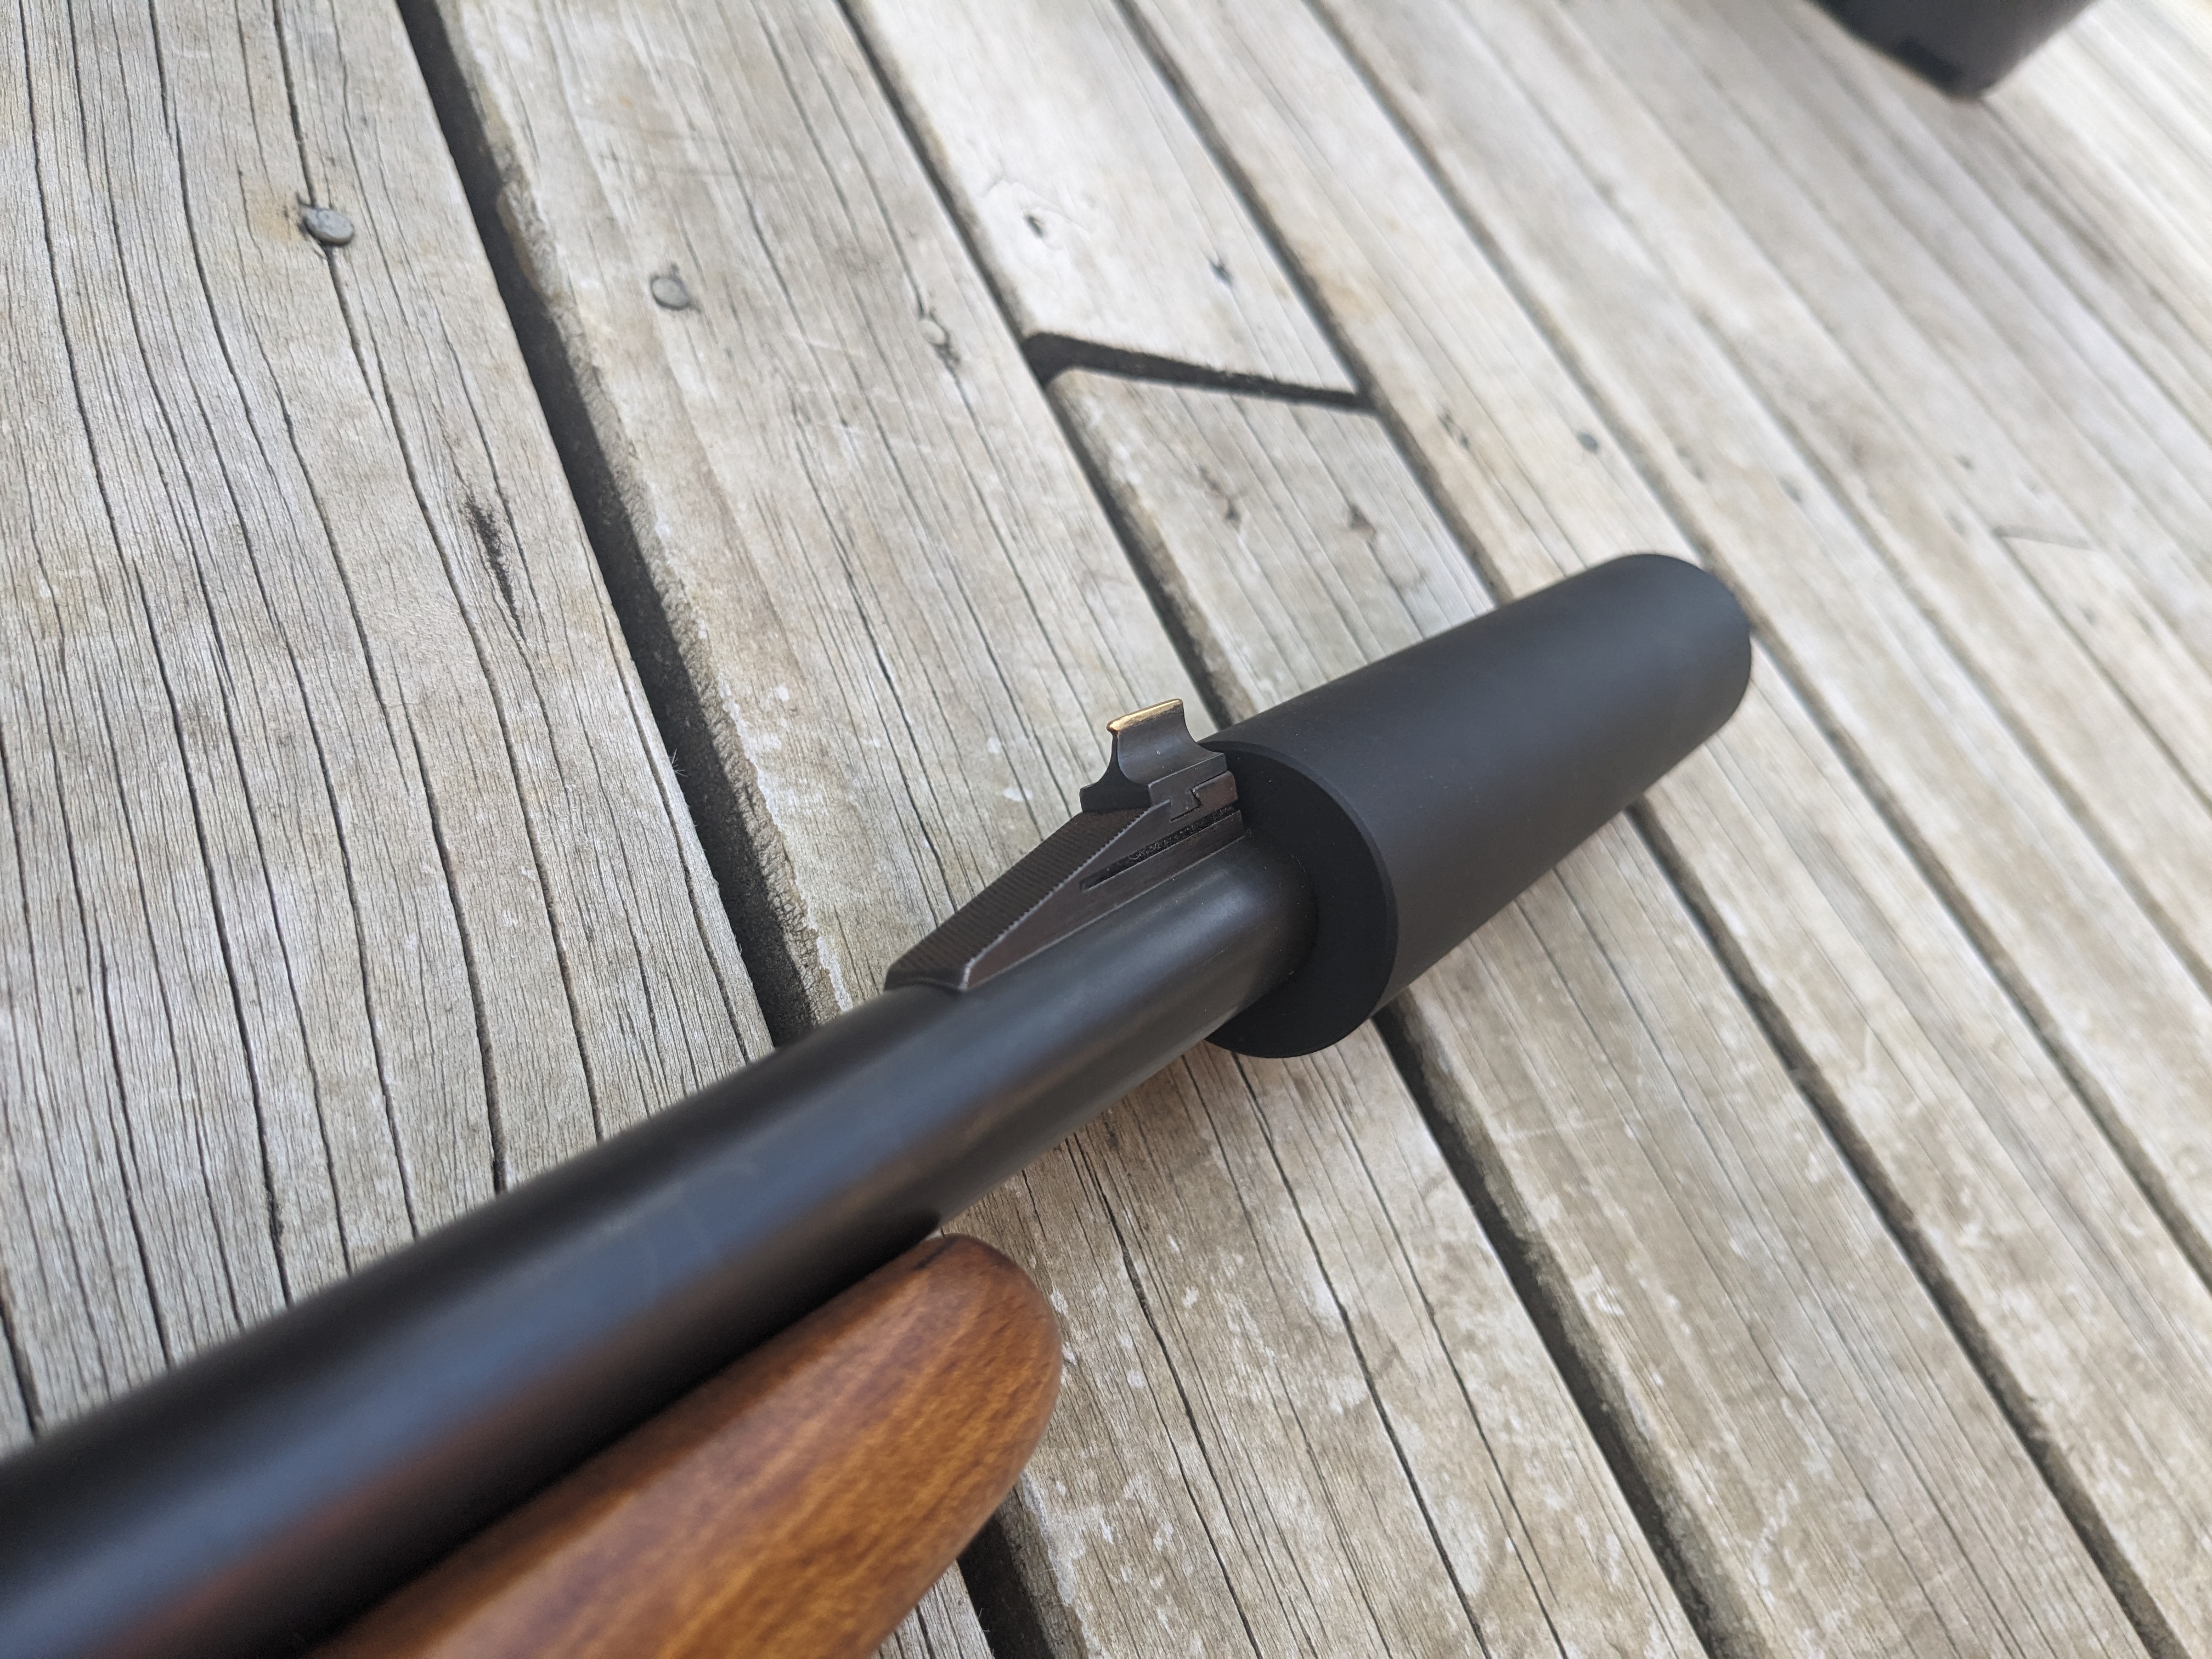
With the sight block dovetail finished, I could start on the front sight itself. I milled this from a block of O1 tool steel as the post is only 1mm wide and I wanted to harden it so its not easy to damage. I got lucky and got the dovetail fit perfect with only a couple of passes. Its a good firm fit that needs to be tapped into place with a punch, but doesn't need bashing. Once I had the dovetail cut, I removed it from the rest of the block and milled the post to size. I left it long initially and once it was on the rifle, I carefully measured the final required height and cut it down, I also milled a very small v into the top of the post to help align the bead.
After I hardened and colt blued the front sight I added a brass bead to the top. I have some fiber optic rod on the way, but this will do for now. The brass is about 1.4mm diameter and seems about right, maybe a touch too large.
Attachment 175818
Attachment 175819
Attachment 175820
Attachment 175821
I have been working on the leather buttstock cover today. Once its finished, I will post some more photos.
Its a softies 45/70 if its not chucking 500 grains out the barrel!:ORLY:Quote:
Originally Posted by mimms2
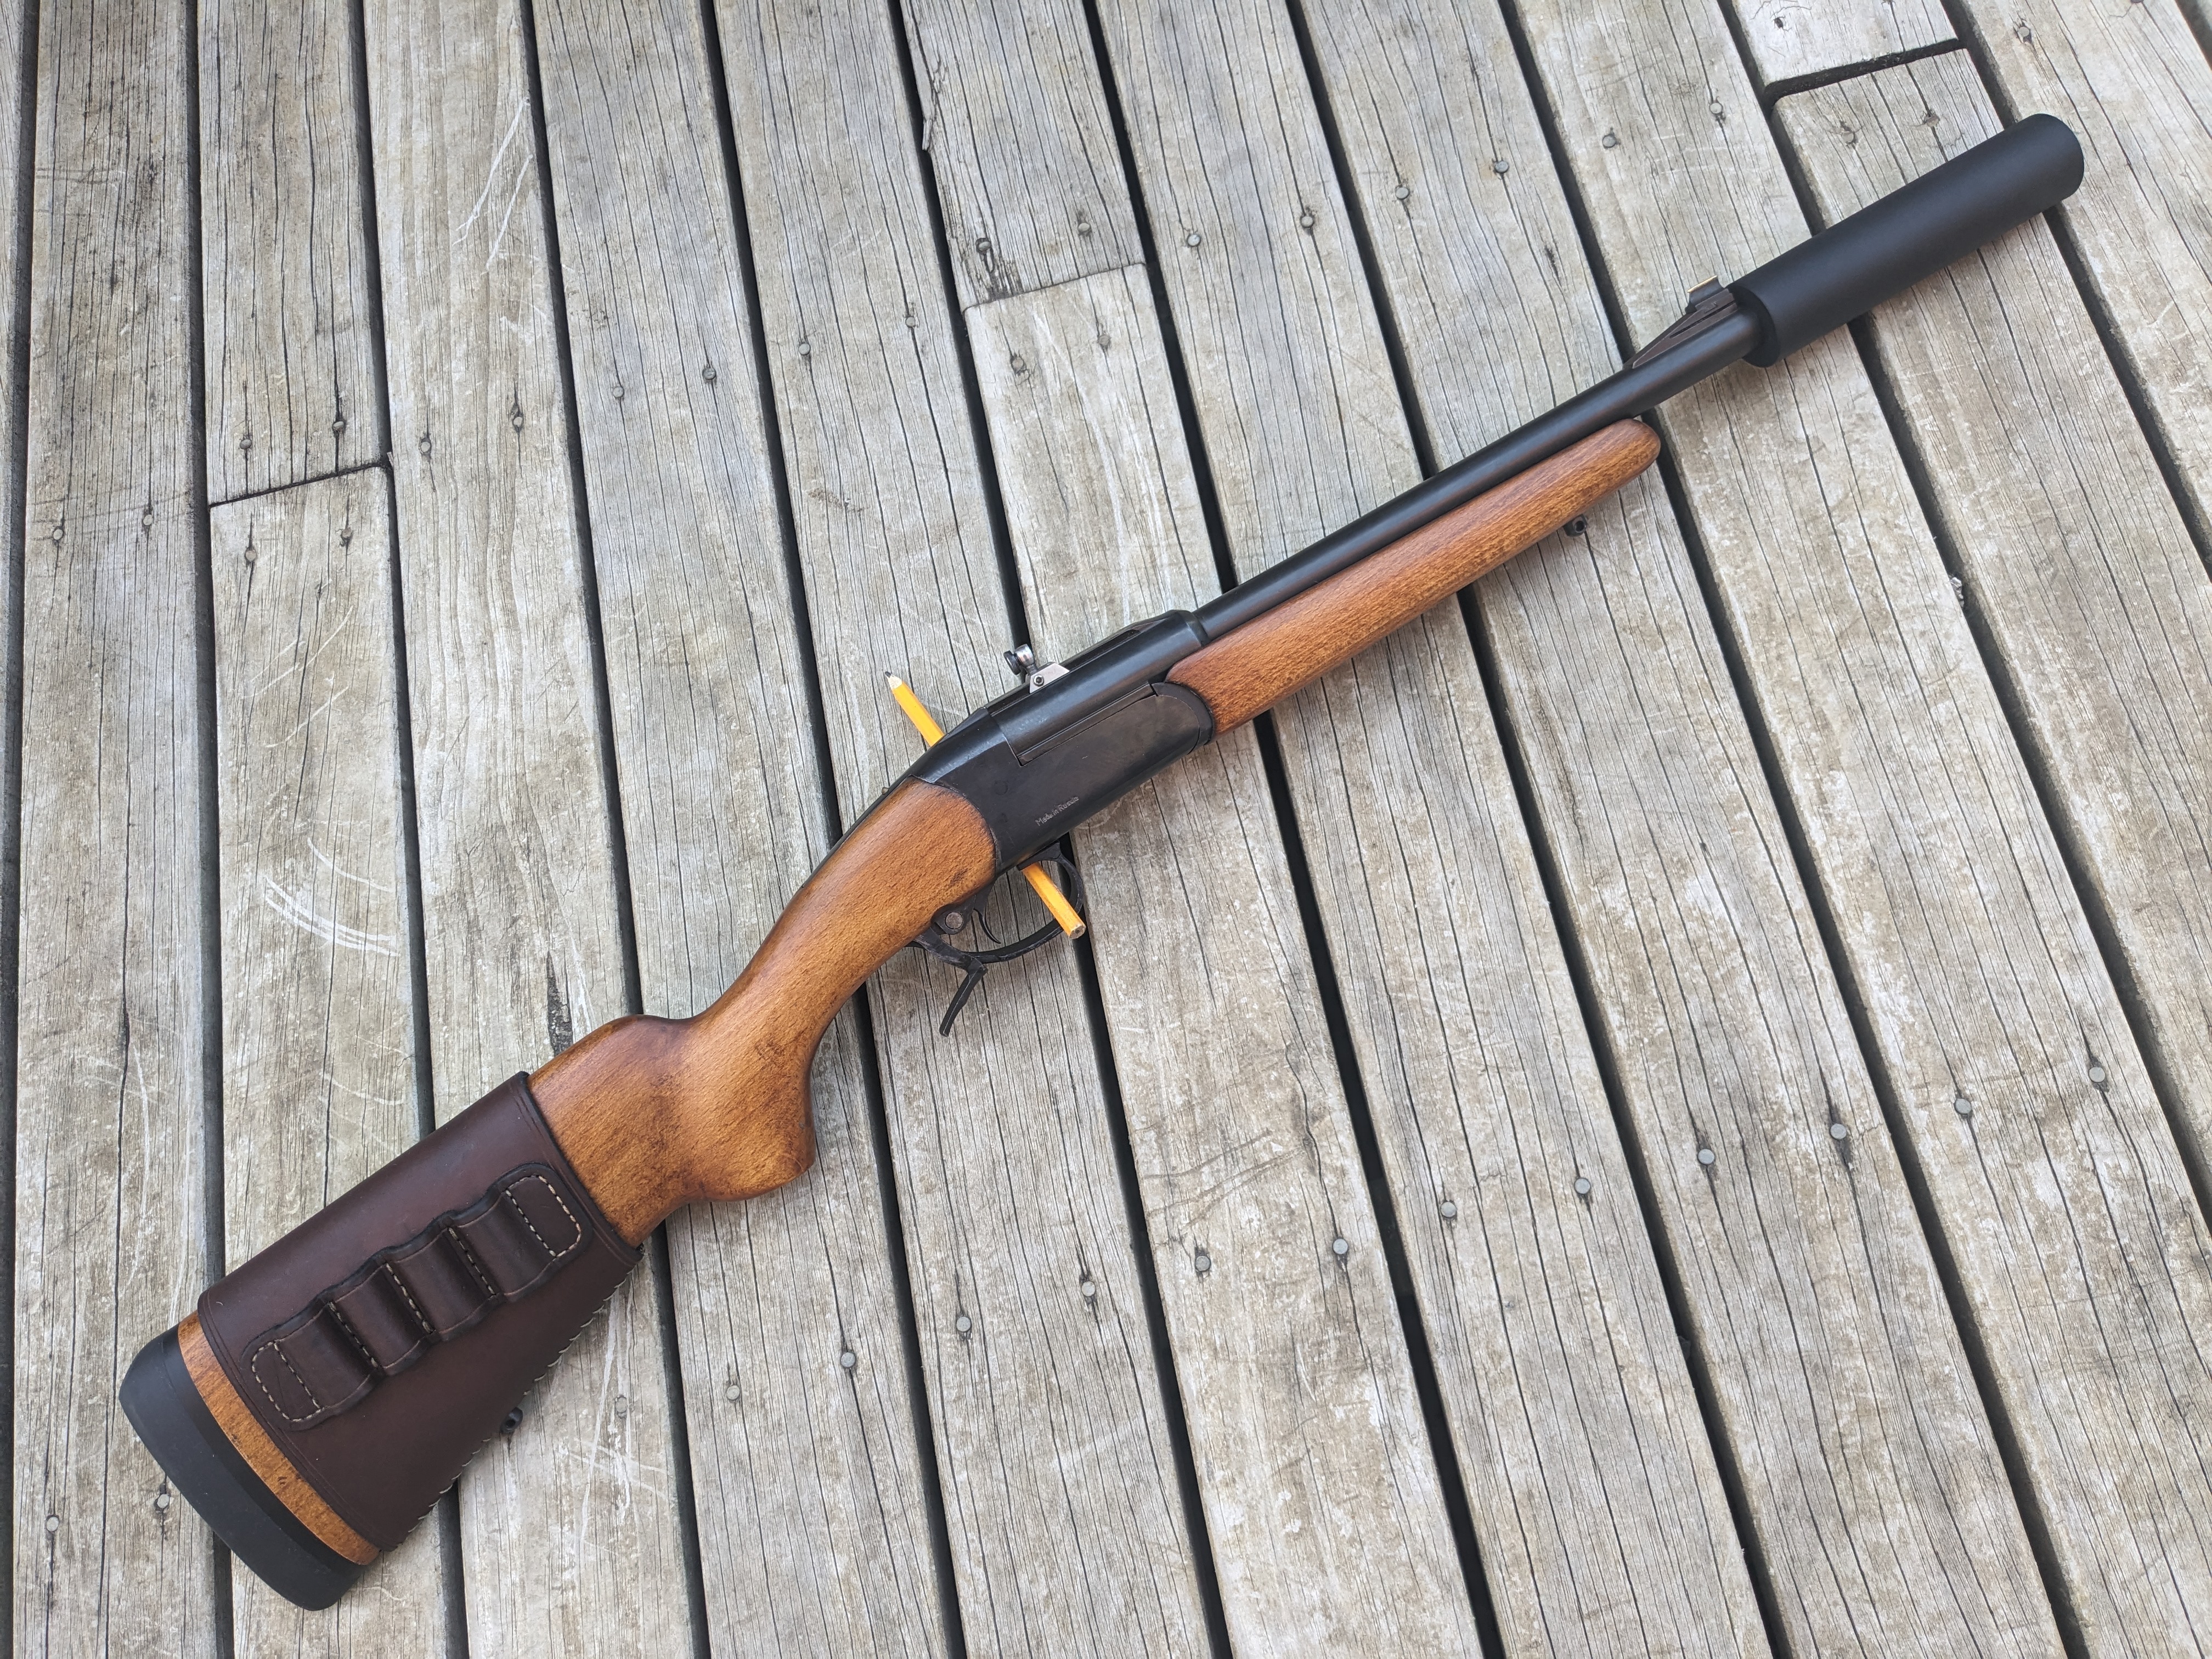
I have finally finished this "quick side project" more or less. I just need make a thread protector and to get a load that shoots ok. Bit hard at the moment being stuck in the middle of the suburbs. I will also make a suppressor for it at some point, but I have other things I need to work on for the moment.
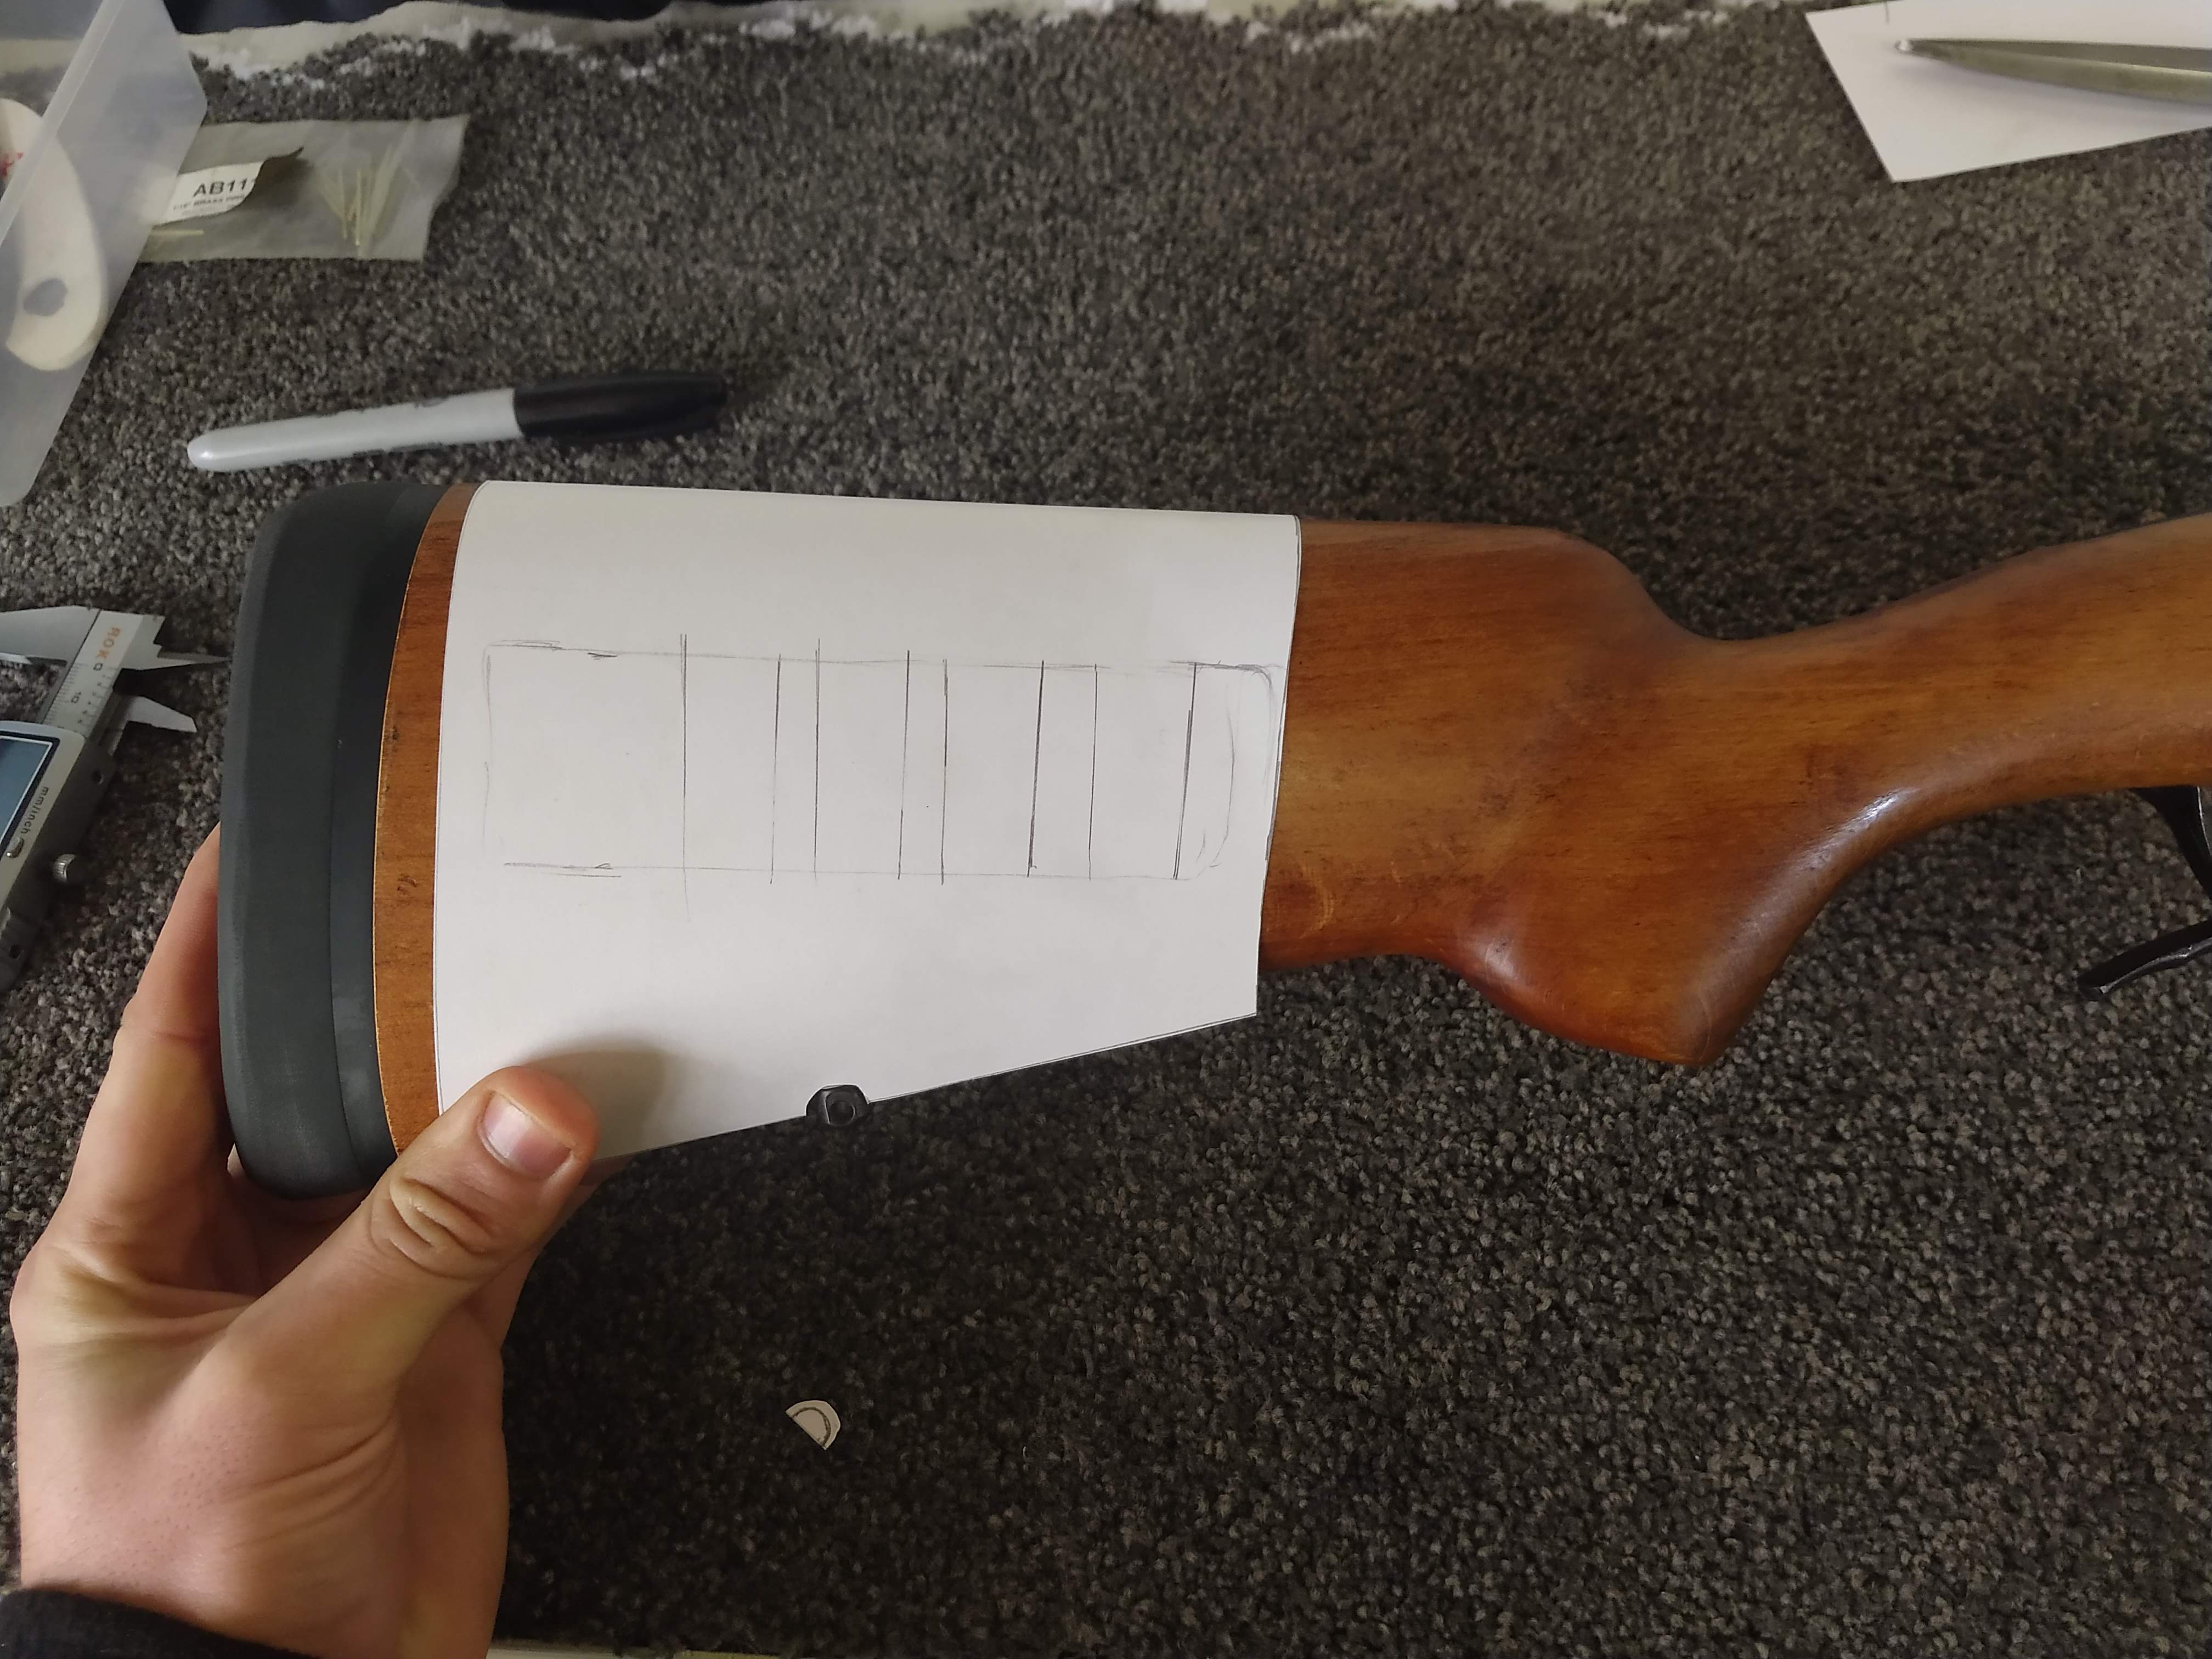
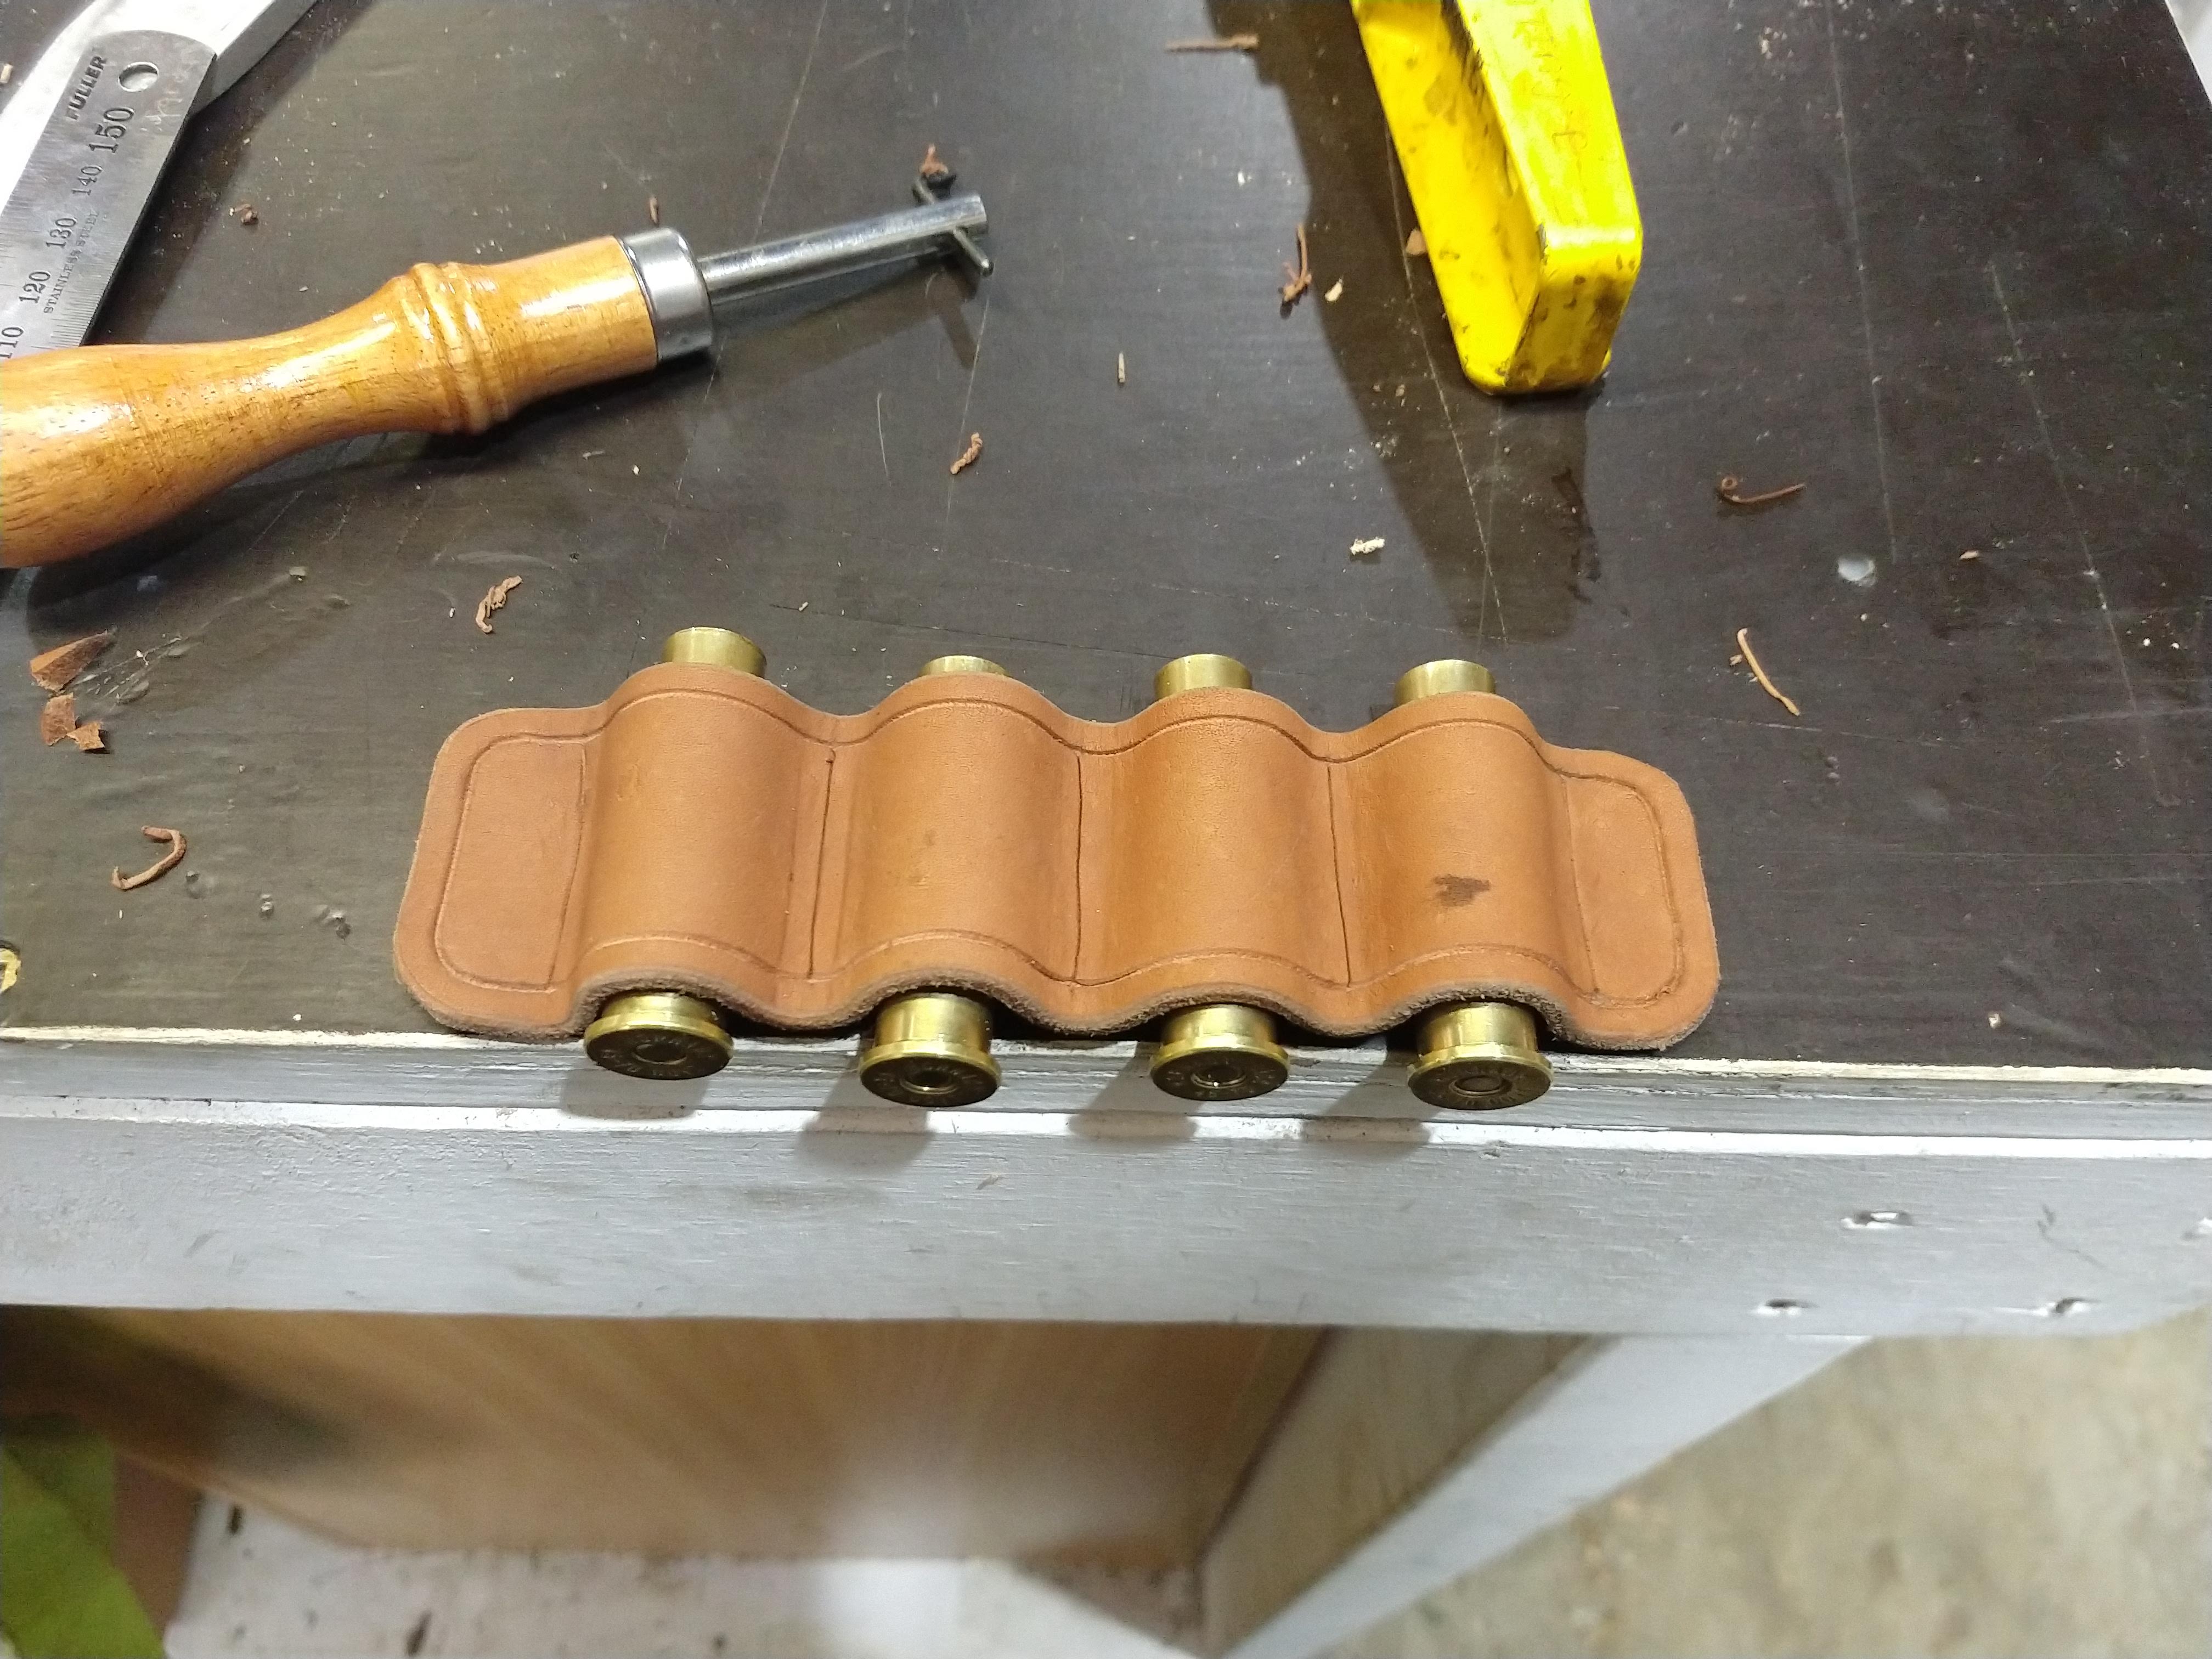
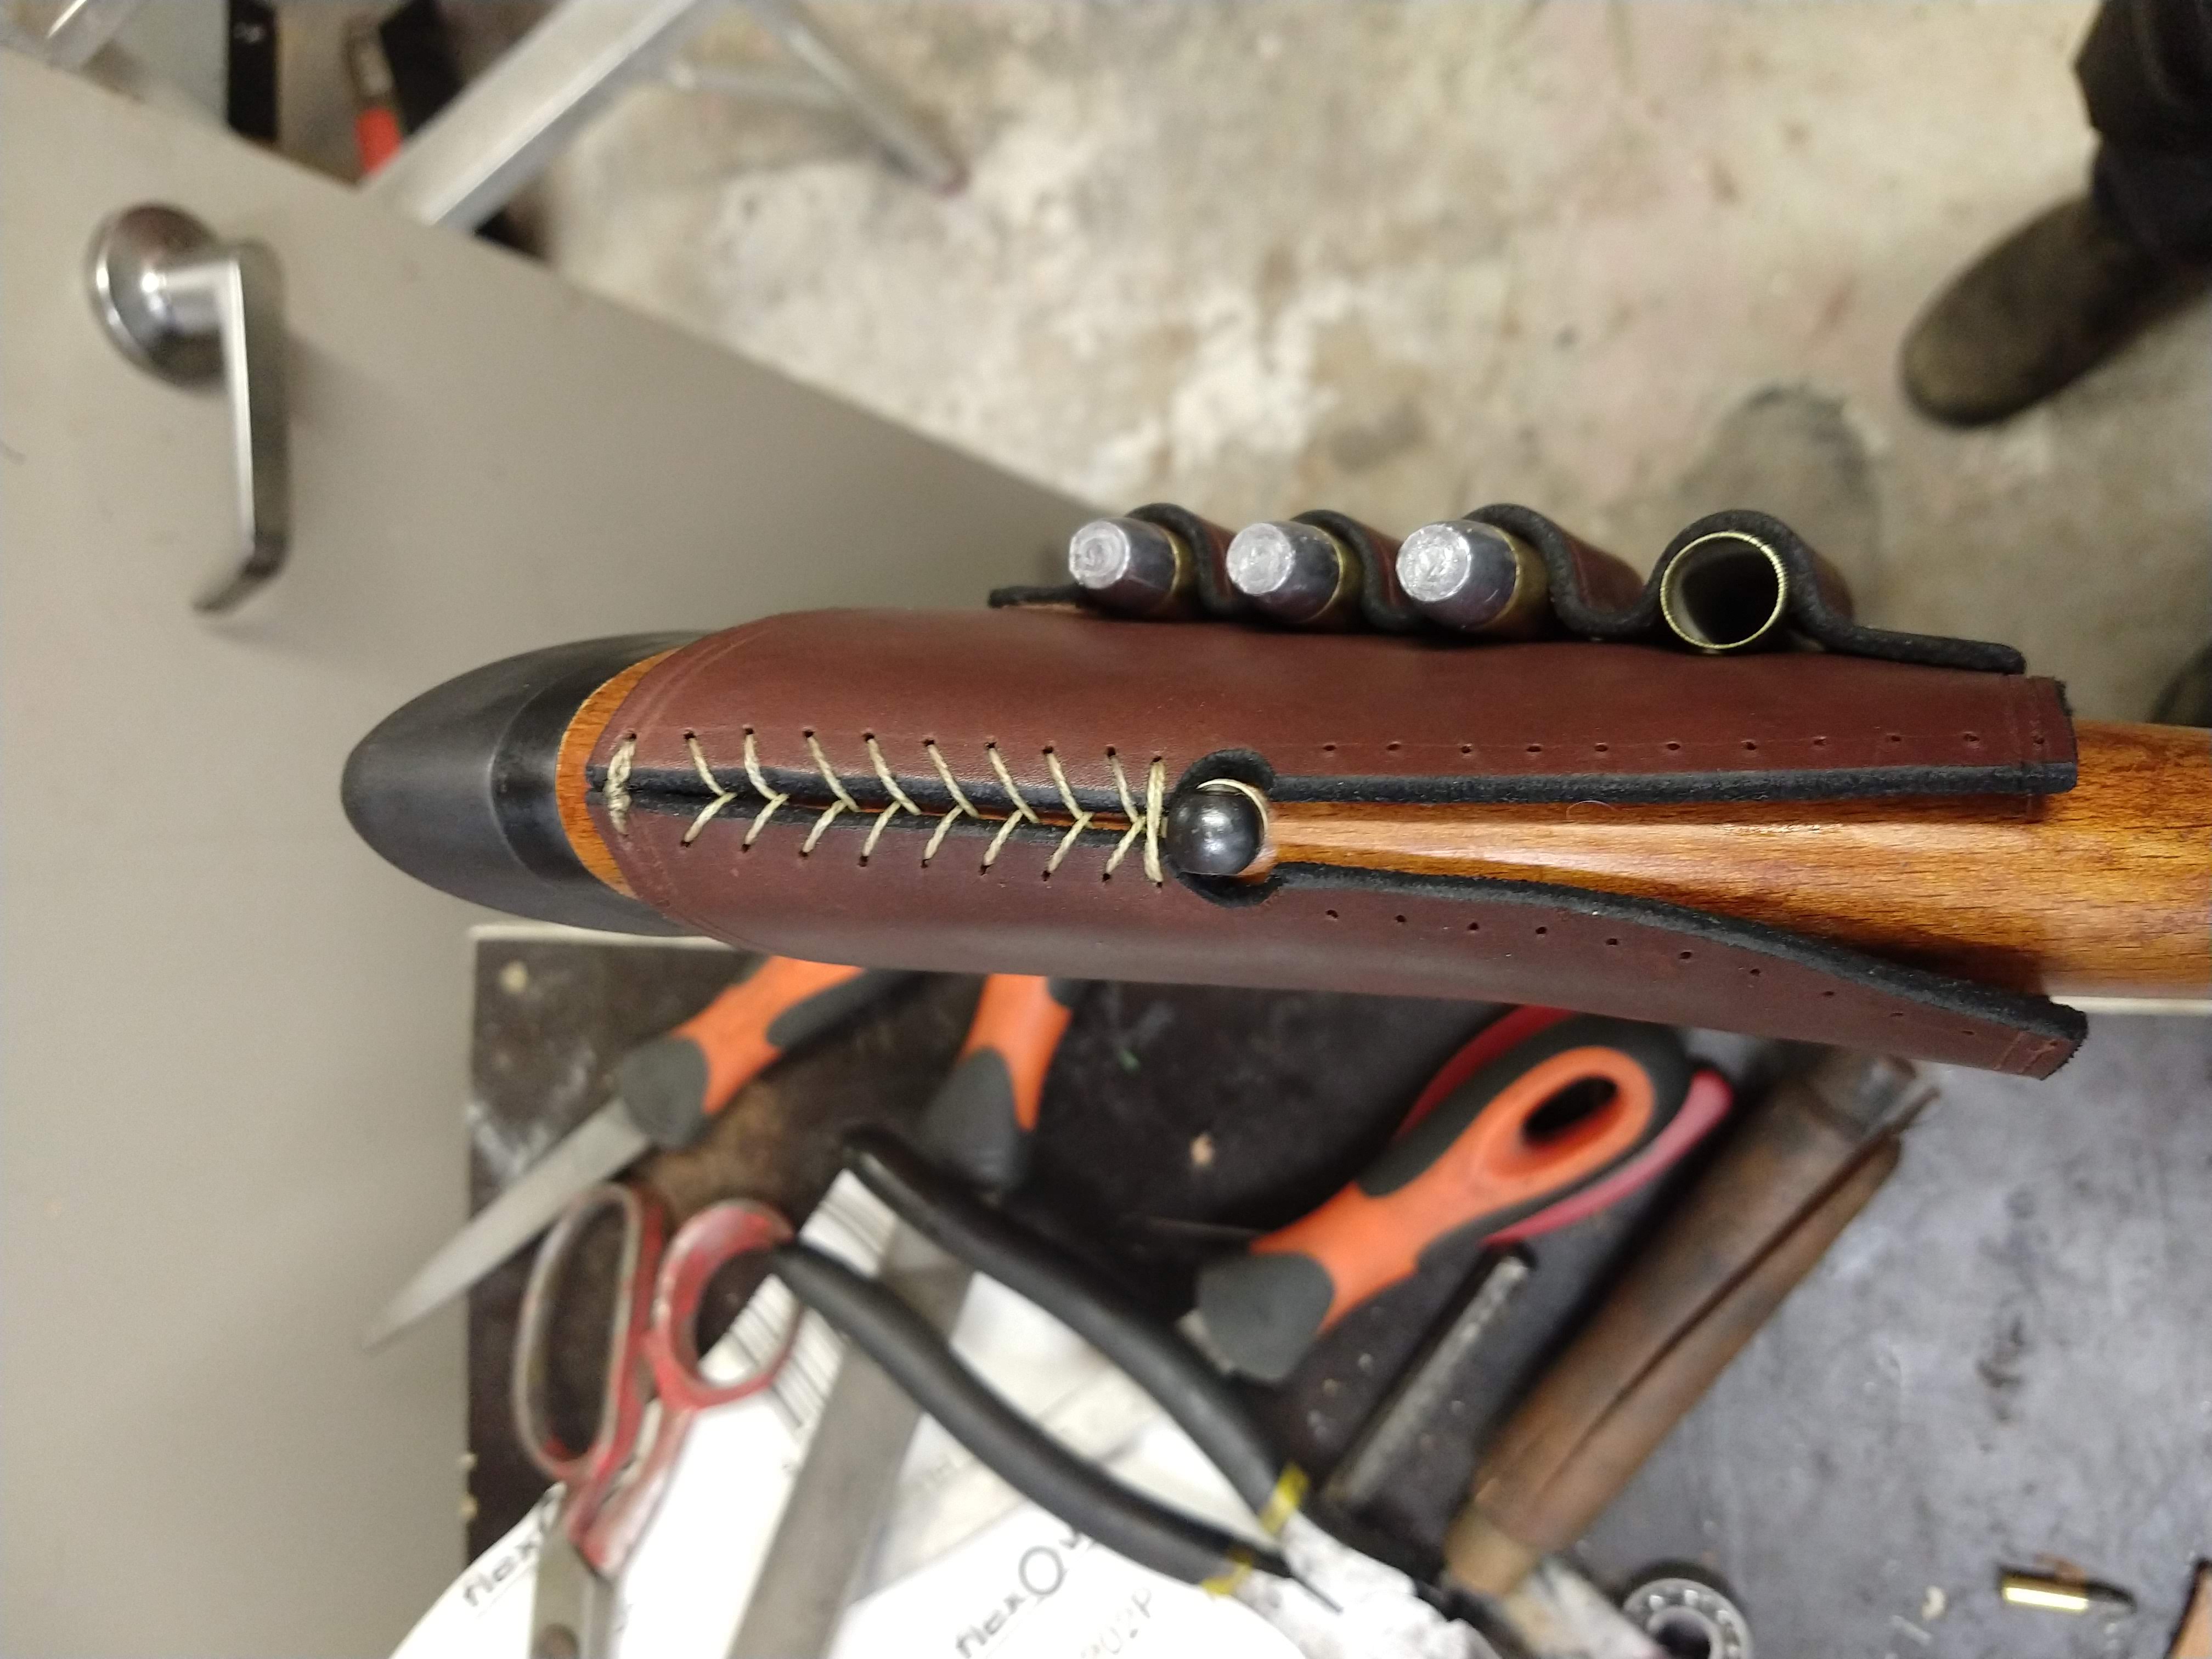
I decided to make a leather buttstock cover and cartridge holder. I am no leather worker, I picked up a bit of the skill making knife sheaths for the knives I was making and selling, but I was never that interested in it and never got very good. Saying that, im pretty happy with how it came out.
I made a quick pattern from paper to get the overall profile and then cut that and made a strip for the cartridges that I soaked in hot water and formed around some cases.
I left this to dry overnight, then glued and stitched it to the body.
After that, I added some edge black and soaked the whole thing in neatsfoot oil.
I then attached it to the rifle using a baseball stitch. easy to get off, just cut the stitching, but a pain to put back on, so I added a reasonable amount of stock wax underneath the leather to hopefully delay the need to remove it.
Attachment 176539
Attachment 176541
Attachment 176542
Attachment 176543
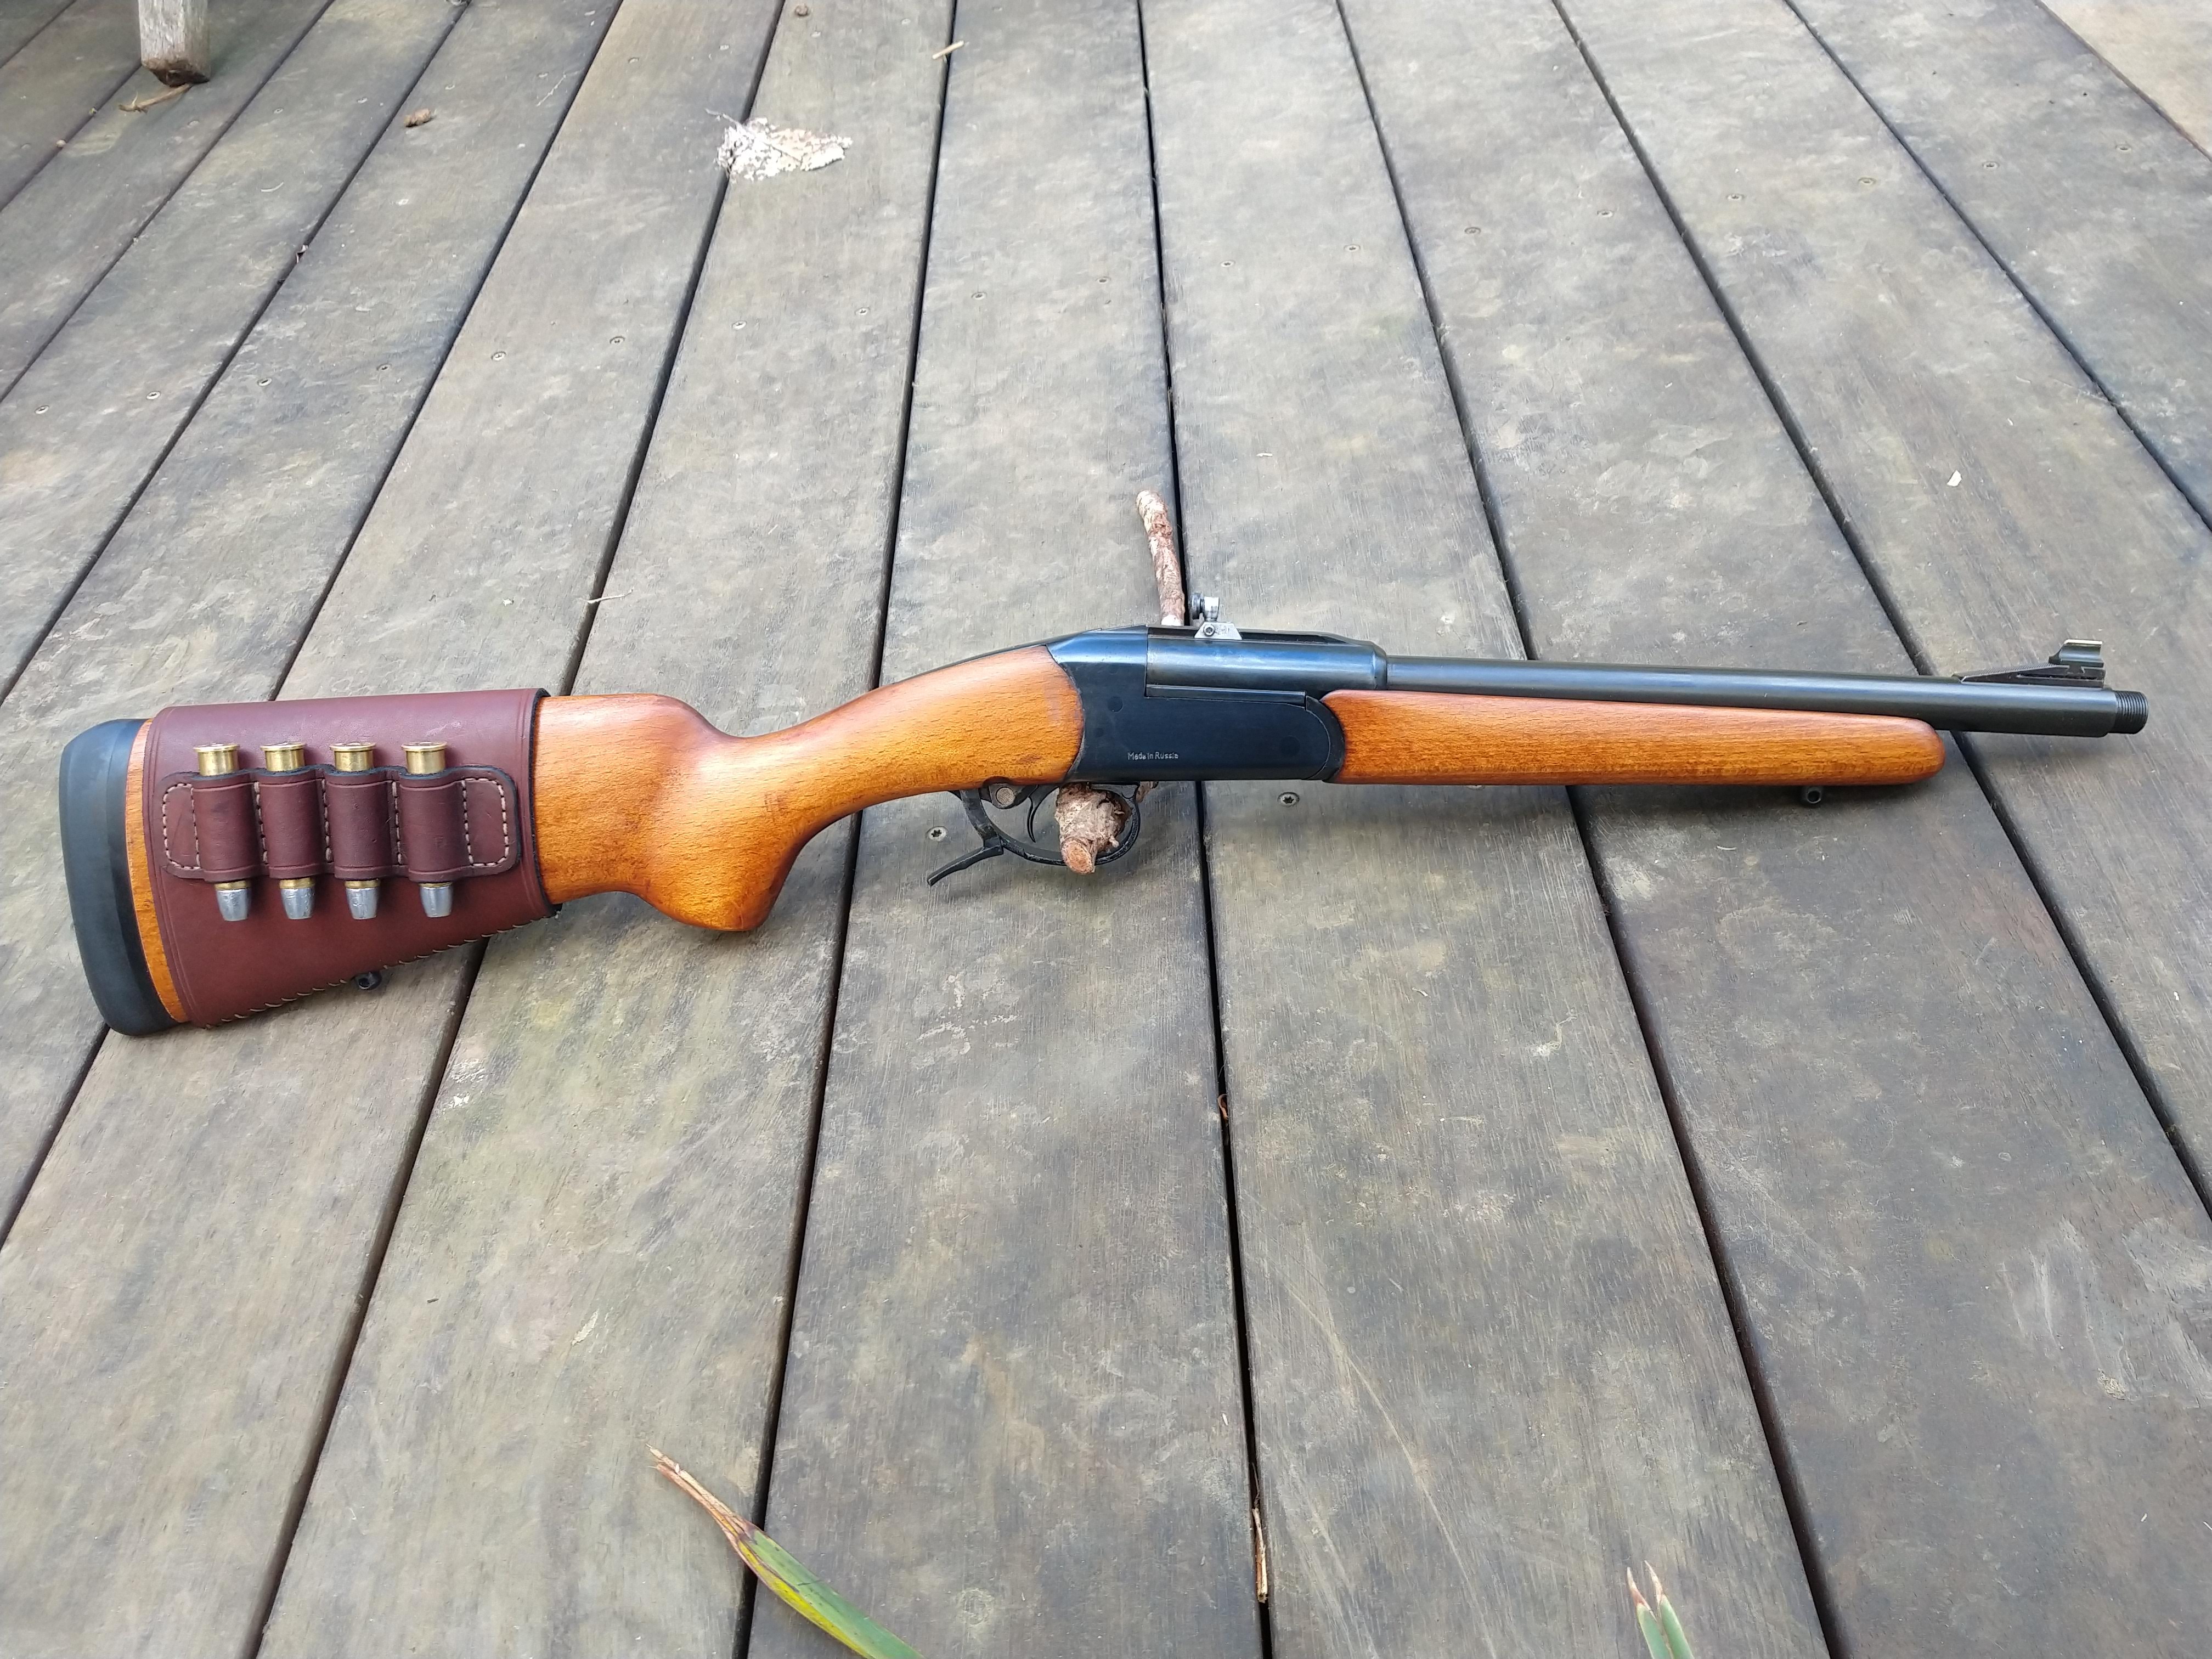
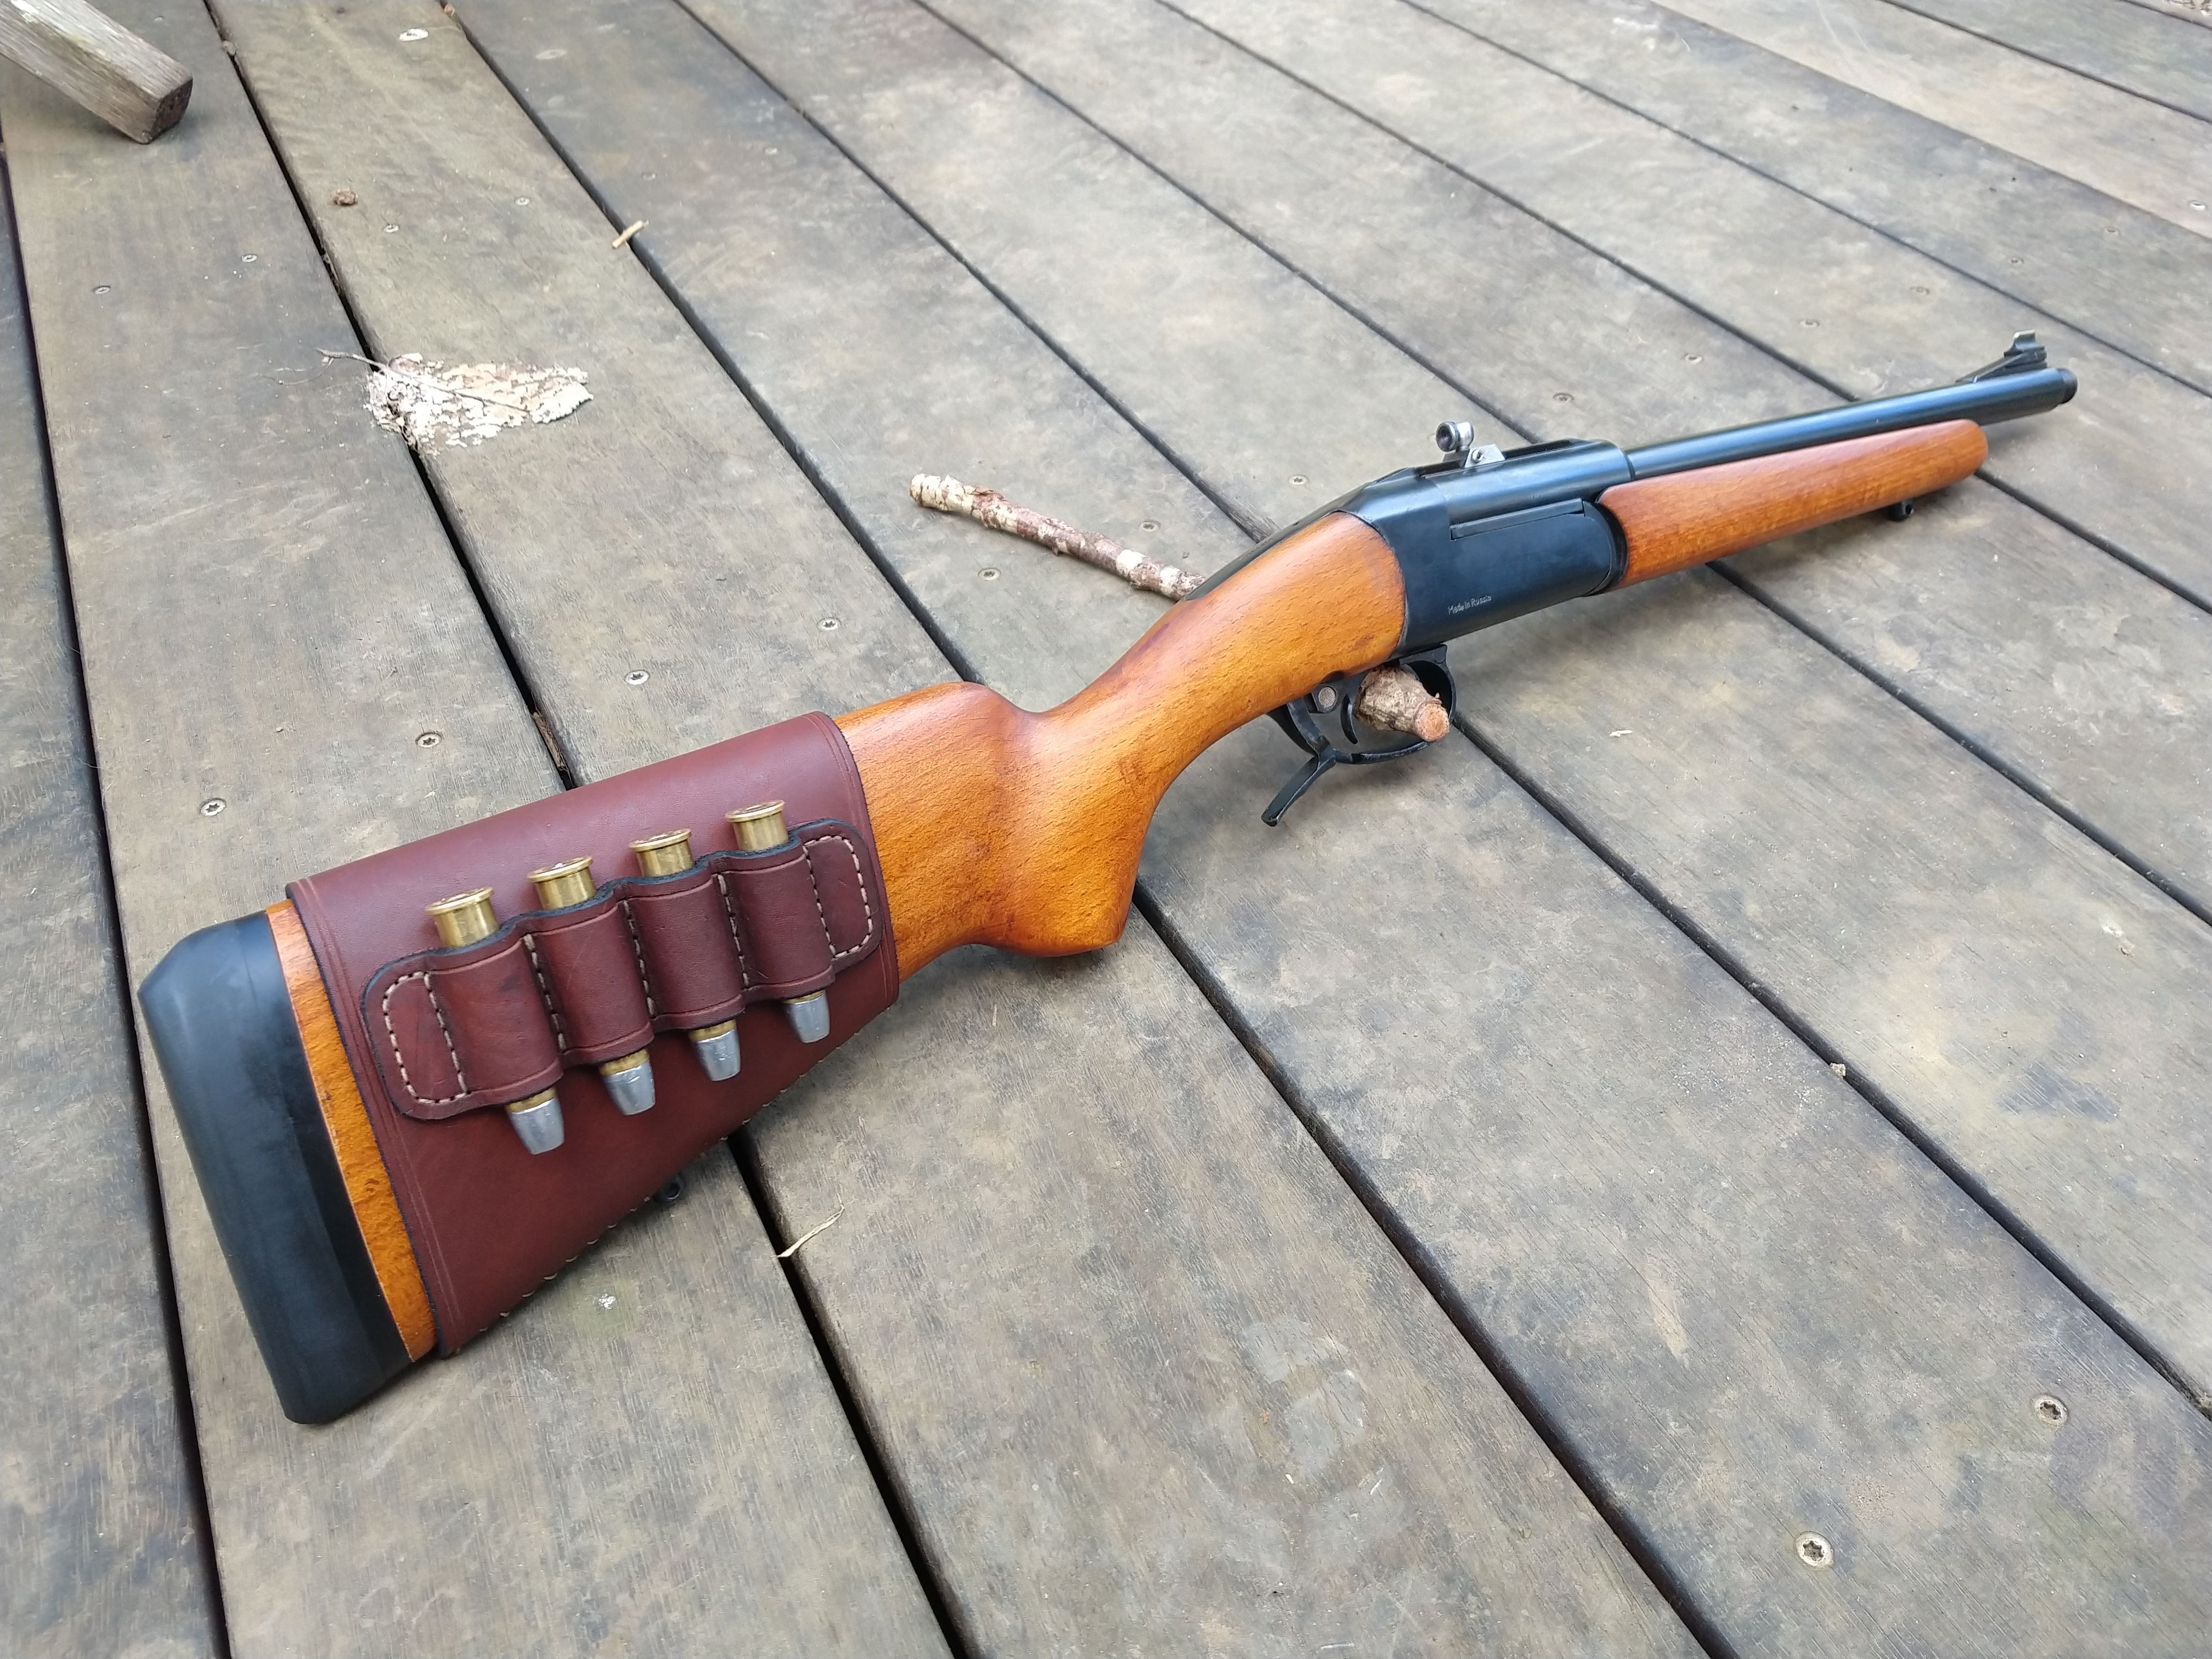
And this is the final product. Bang on 3kg with 4 cartridges. Hopefully it shoots well enough to hit something within 80m.
Attachment 176544
Attachment 176545
Thanks for looking.
ok...range report is still missing...time for an update LOL
if I havent said it before...that is a plurry neat job you have done.......
It will be a thumper to shoot!
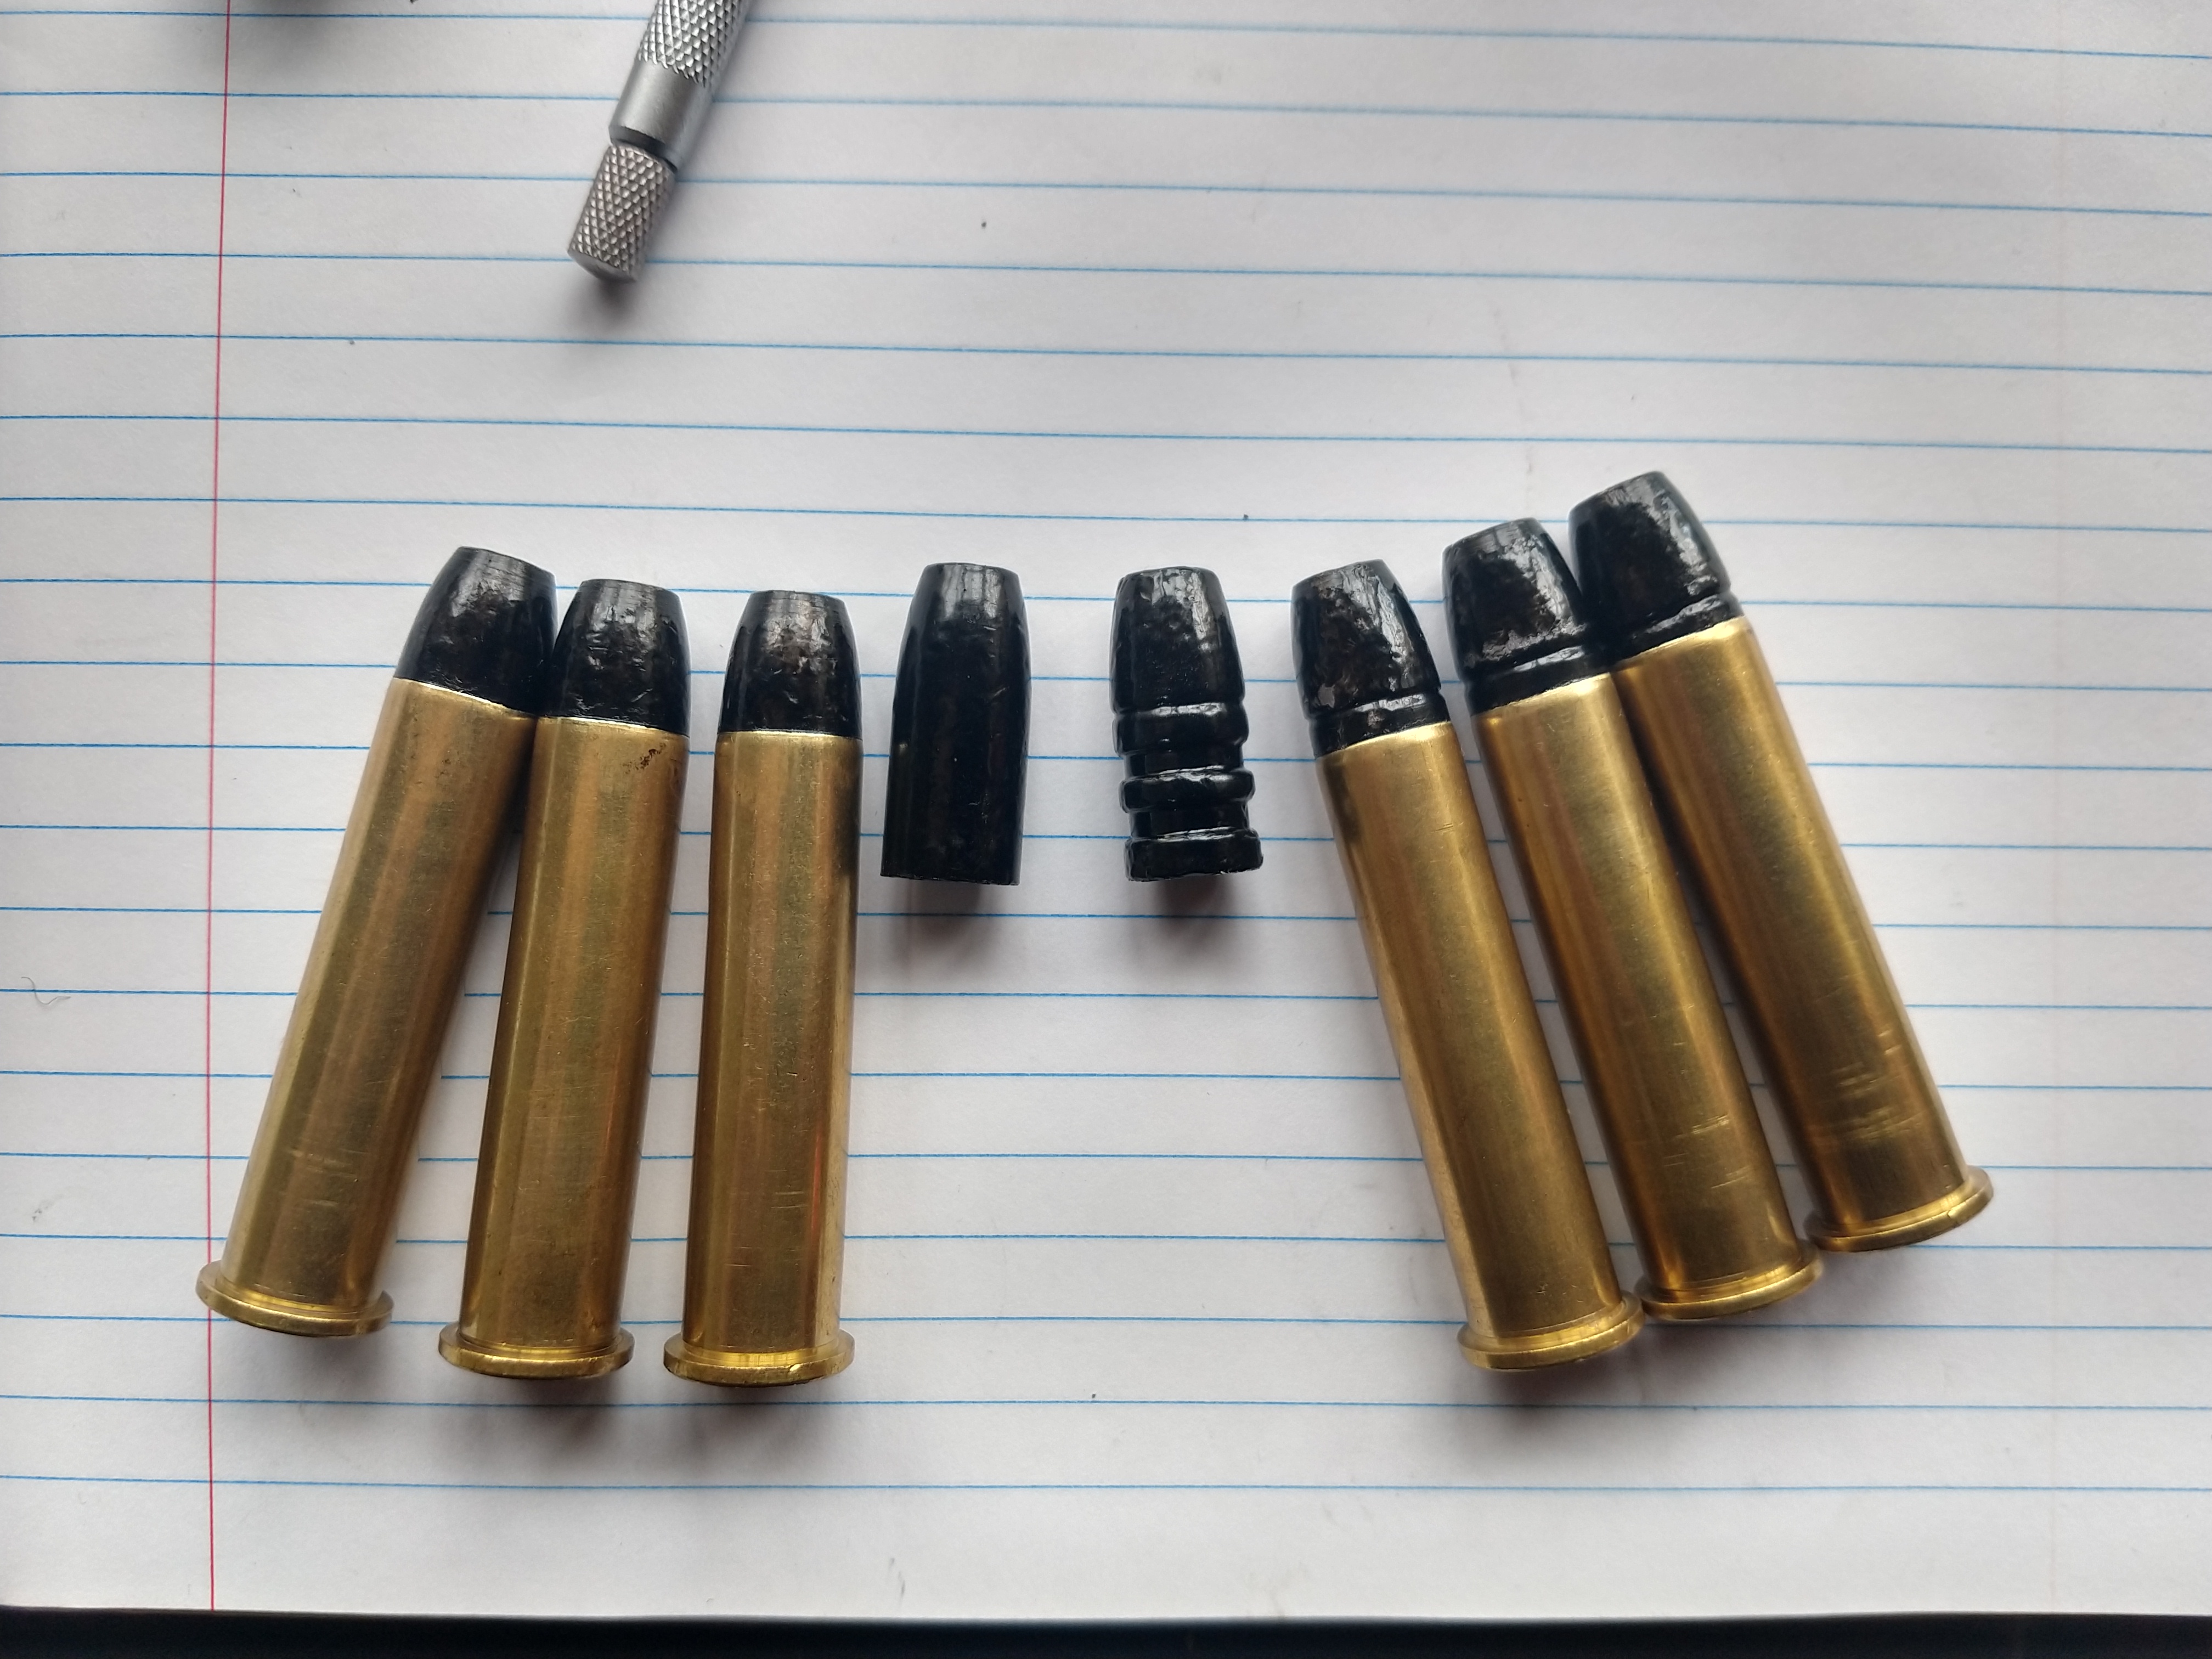
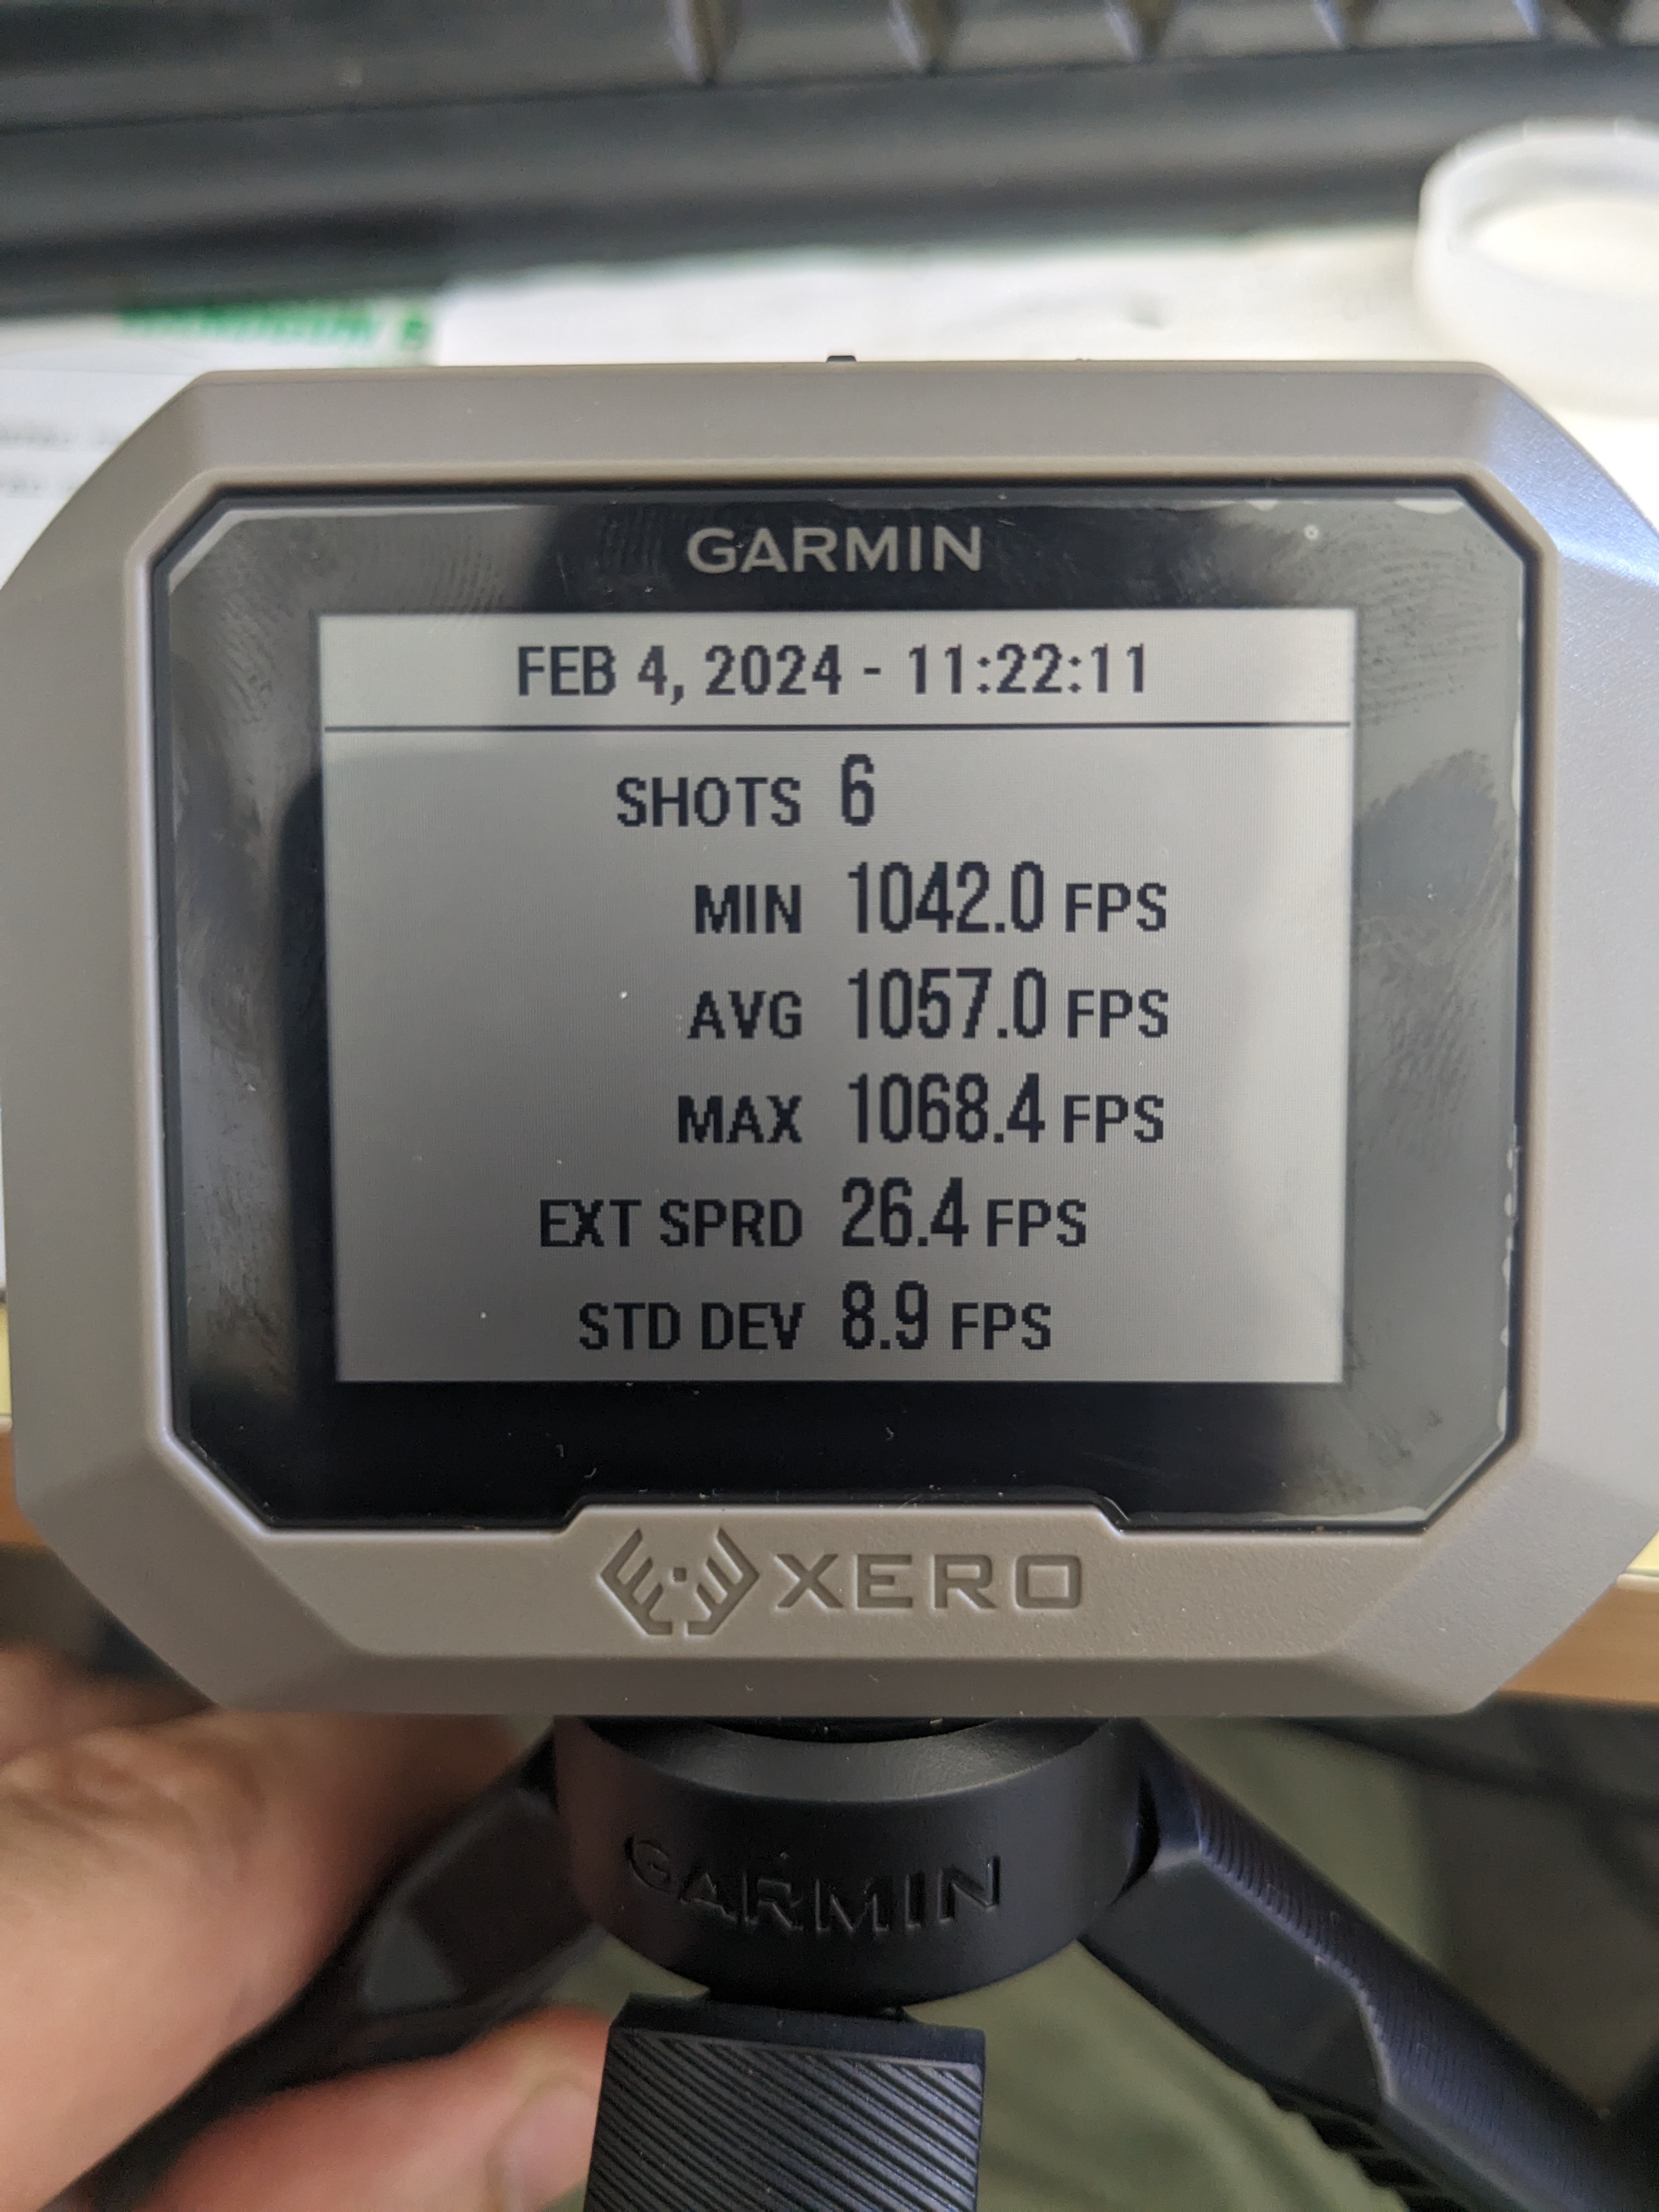
I had a chance to put 3 rounds through this a few weeks ago. I did not have a chronograph and it was only 3 rounds as I was not expecting to have an opportunity to shoot it given the location.
The loads were a combination of 410gr projectiles I purchased from ShooterNZ here on the forum and 450gr projectiles that I am making myself.
Attachment 186592
The load for both was 15-16gr of ADI AP100 with about 0.8gr Dacron filler. I have been learning all about case mouth flaring and expander mandrels, as to this point all my loading has been for boat tail jacketed projectiles, so a bit of a learning curve to deal with cast bullets well. Quickload estimates this load to be right on 1000fps.
Recoil was stout but not obnoxious. I would liken it to my lightweight and short 308 hunting rifle shooting hot loads. With full house 45-70 rounds I think it would be extremely unpleasant to un-shootable. It is only 3kg after all.
To my surprise, my efforts seemed to pay off in drawing the projectile path and barrel/barrel block in CAD to work out exactly how high my front sight and rear sight needed to be. It was shooting approx 2.5" high at 25m and good windage, which is close to what it should be to give a zero of about 80m and then around 3.5" - 4" drop at 100m.
I have been playing around with making a mold for casting my own 450gr projectiles. It took a few goes to get one that would fill out and eject the bullet properly. It is not a split mold and is along the lines of paper patch bullet molds since it does not need lube grooves as I am powder coating. I need to remake the sprue plate and make a decent handle for it, but I managed to cast enough for testing.
I have 20rds loaded up ready for some proper testing once I find somewhere to shoot. I lost access to my last spot about 6 months ago as the property was sold
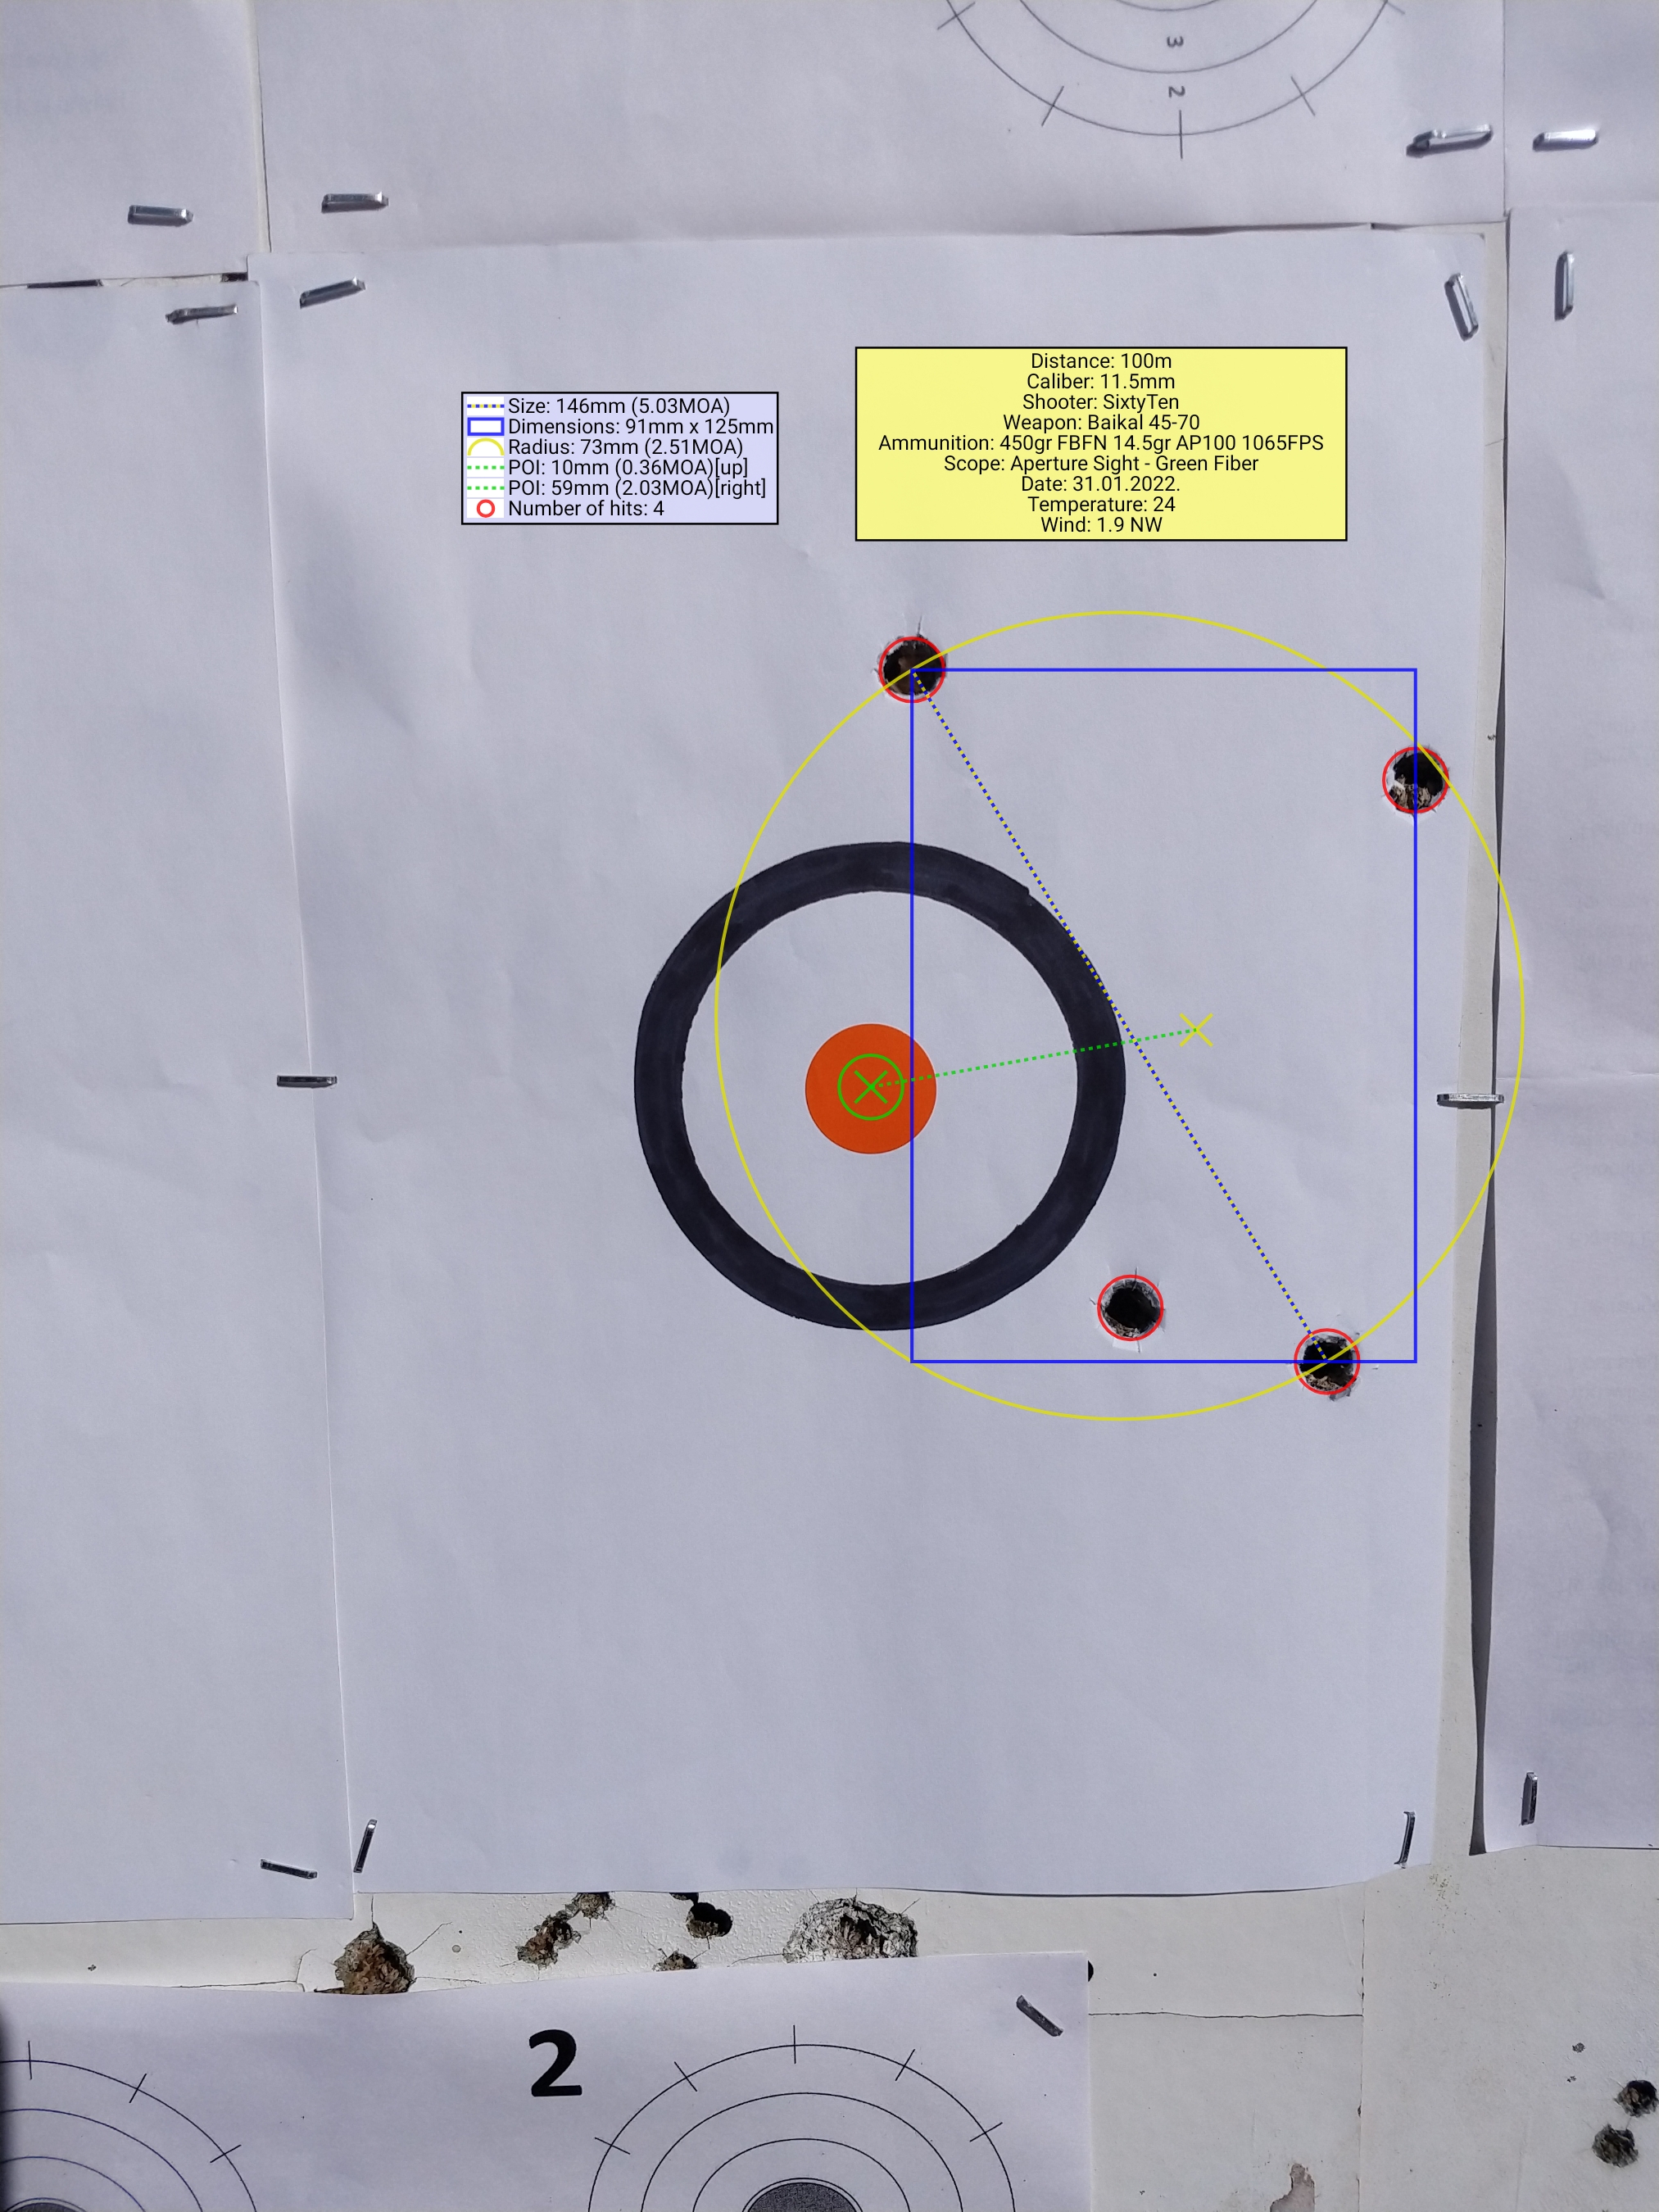
I had an opportunity to shoot this properly today. Unfortunately, only at 100m, which is not ideal for a rifle like this, with sights like this and eyes like mine. Saying that, I shot at a 10" gong for the first round and smacked it good, much to my surprise. I then moved to paper and shot 4 rounds of my 450gr projectiles and got a "group" of around 5moa, which I am very happy with. I could only barely make out the target ring as the sun was heading down and directly on the target. The sights seem to be pretty close at 100m, more than good enough for a rifle like this, which I don't intend to shoot further than 80m or so. Velocity averaged around 1060fps, so I might drop 0.2gr to keep it consistently subsonic.
Attachment 189156
Load was;
Hornady brass trimmed to around 1mm shorter than standard
Custom 450gr projectile, powder coated and sized to 0.463
14.5gr AP100
1.0gr Dacron Fill
Random primers from the bottom of my reloading drawers.
The next stage for this rifle is to make a suppressor for it. I can go to around 40-41mm before it starts getting in the way of the sight picture and I will keep it fairly short at 160mm or so, it will likely be aluminium tube and baffles and I will probably glue it together rather than threading to keep the weight and complexity to a minimum. The goal of this is not to have a mouse fart gun, but something that can be shot without hearing protection and not have the far-reaching sonic crack of high velocity cartridges so it can be used in less than rural areas when less noise is needed.
I am moving my house and workshop over the next couple of weeks, so nothing will be done for a while.
I had good intentions and THOUGHT my bush shots would be 25-50 yards...but the other day I got 3 oppertunities and none were less than 75yards...2 clean misses at 100ish yards 2-3 hours apart....yeah nah.....have bodgied up a scope attachment...will see how we get on when its cured....
have you tried this again???
Same with me, my last "bush" shot opportunity was 310m. Luckily I was carrying a mates 6.5CM with a range finder and drop indicator built into the scope. About the easiest possible way to shoot 300m.
I haven't had an opportunity to shoot this again between moving house, organizing my workshop and now the cops are dragging the chain on my renewal and I have no license or firearms at the moment. I applied over 7 months ago.
well I cannot "like that"......... hopefully it will come through soon for you.
at least you got your deer with the right tools at hand.
Im pretty sure if you made up some more wee apertures that fit onto dovetails...both sizes and could keep the cost down,they would be rather popular and sell like hot cakes...
Greeting @Micky Duck.
A lot of continental rifles have a 12mm approx dovetail including some of the early Brno .22 rifles. I have heard of some making up an adaptor to take an aperture sight intended for 3/8" dovetails.
GPM.
The problem is in keeping the cost down. Aperture sights (even very simple ones) are fiddly things to make. I would have to charge in the region of $150 for them to be worth my time, and even then I would not be making much, if anything. Unfortunately that's just the reality of manual machines and small scale.Quote:
Originally Posted by Micky Duck
For Baikal's in particular, you would need much higher than standard front sights as well if the aperture was sitting on top of the dovetail.
Its a good idea, and there are bound to be people interested in the product, but probably not for the price tag that would be necessary.
Why not make a clamp type front sight with a 15>20mm high blade that you can cut down to suit as there a lots of old peep sites floating around that could be fitted by the average bubba .Quote:
Originally Posted by SixtyTen
If you are going to make a clamp on foresight, make it suppressor diameter and give yourself the extra sight radius. I've been thinking about something like that, with a couple of grub screws to keep it in place.
Make it DPT sized, and open your market right up. That, and a skinner sight attached to the rear base could be a very handy back up set, or full time for bush hunting in the rain.
I sized the front sight on this rifle to take a suppressor. Limited it to around 38mm though, rather than the standard 44mm to keep the front sight height reasonable when there is no suppressor attached.Quote:
Originally Posted by Ross Nolan
Again, as far as making a product to sell, front sights are even more fiddly and time consuming to make.
I made a suppressor for this a while back and have not shot it since making it. So I took it along to the range on the weekend to sort out a load for it and see how it shoots with a suppressor.
The suppressor is made so the front cap can screw off and take a replaceable wipe baffle made from neoprene or silicon sheet. I have tried both and they both only last 1 or two shots with the flat nose projectiles I'm using. It's noticeably quieter with a wipe, but still not "earmuffs off" quiet. Be fine for hunting, but not at the range. I didn't have enough ammo or wipes to establish how it changes the POI or accuracy.
Recoil is also reduced to quite a pleasant level. It's still a lively gun and has a lot of jump, but is in no way painful to shoot.
I settled on the following load:
450gr powdercoated cast flat nose
14.3gr ADI AP100
Large Pistol primer
1.0gr Dacron fill
Light crimp
One downside to the Dacron fill is the suppressor stinks of burnt plastic now.
This has resulted in a load that averages about 1060fps
Group is shot at 25m, high shot was cold bore and a bit of a flinch I think.
Now I just need to find some 4 legged stinkys to shoot with it.
Attachment 243186
Attachment 243187
Attachment 243188
Attachment 243189
looks great. must get its sister out of cabinet and shoot something myself...(sister as barrel came from same place and it sits in a rusky too.)mine is a LOT cruder than yours all the same.
Stunning build and excellent workmanship!
Nice work & cool fun, you need that suppressor to be two to three times bigger & you will get Mouse Farts but big whacking sound of slug hitting animal or object !
I used 12.5gr of AP90, pinch of dacron & 500gr slugs to kill all sorts of game, I have the 50/70 Gov & 510WSM now but still working on a few loose ends with them.
That's awesome, some top notch work! I hope mine turns out half as good as that!
Yeah, I was limited in size for this one because of the front sight. I'm tossing up putting a red dot or small scope on it as my eyes are not the best. If I did that, I would likely remove the front sight all together and do a much larger over barrel suppressor.Quote:
Originally Posted by Scout
Wow! I remember finding this thread when I got my baikal about a year ago, I vaguely remember being frustrated that you hadn't finished, but wowee what an awesome project! I am incredibly envious of your abilities and your time!