Itís been a couple of years since 7mmSaum and NZFUBZ presented details of their Target Camera systems:
https://www.nzhuntingandshooting.co....get-cam-20703/
https://www.nzhuntingandshooting.co....-camera-26651/
With the ever-increasing variety of 5.8GHz FPV drone gear available I thought Iíd also have a bit of a play with a few options for each of the key parts of a TargetCam system just to see what could be put together while keeping the cost as low as possible. Rather than describing a complete system, here are details of some of the parts tried that I quite liked for one reason or another. In the main these are also parts that offer a slightly different approach to those used in the above systems, so there may be something of interest here to consider for forum members thinking about assembling their own TargetCam.
For my own application I was after confirmation when shooting at 1km that the first couple of shots were centred on the target - without having to make a 20 minute round trip on foot. I wasnít sure that 640 x 480 resolution would be sufficient to see all bullet holes in the target, otherwise I would have just bought one of the complete FPV Camera+Tx+Rx+LCDdisplay sets that NZFUBZ linked to, but I also didnít know if I needed to go full 1080p, plus it seemed a good excuse to have a play with a whole lot of cool FPV gear.
The prices quoted are all indicative-only, given that AliExpress and Banggood are constantly varying their price discounts. The links will all work at the time the thread is posted. Before there are the usual complaints; no, there arenít any photos here because all the links provided already picture each of the products from as many angles as you could possibly want.
Camera
This one is a new product, inexpensive, and has the resolution to do the job.
Eachine 1000TVL 1/3 CCD 110 Degree 2.8mm Lens Wide Voltage 5-20V Mini FPV Camera NTSC PAL Switchable
Banggood Product ID: 1053340
NZ$16
https://www.banggood.com/Eachine-100...r_warehouse=CN
The camera comes with the expected FPV fixed and low focal length / wide angle lens on a standard M12x0.5 thread. This is best replaced with a narrow-angle longer distance lens so the camera can be positioned clear of the line of fire, while still being reasonably front-on to the target. Lately Iíve been using a target board that is 1000mm wide by 700mm. With a 16mm focal length replacement lens this fills the image when the camera is 3.5 metres away and a 25mm lens increases this distance to 6 metres, something like the items linked to below, either work:
Yumiki 5.0Megpixel M12 MTV 16mm 5MP HD CCTV Camera Lens IR HD Security Camera Lens Fixed Iris
Product ID: 32792318846
NZ$7
https://www.aliexpress.com/item/Yumi...792318846.html
Witrue M12 5 Megapixel 25mm CCTV lens for HD IP camera F2.0 fixed iris
Product ID: 32652121758
NZ$11
https://www.aliexpress.com/item/VIVE...652121758.html
Displays
Stepping the resolution up a little from 640x480 while still being cheaper than fully packaged items are combination loose LCD display and driver boards described as for use in Raspberry Pi projects. These have HDMI, VGA, and AV (RCA socket) inputs. I purchased both of the items listed below to try them out. The LCD screens lack brightness for outside - they are going to need a sunshade for outdoor viewing, and with these loose items this will need to be a DIY job. Match the aspect ratio (4:3 or 16:9) to that of the the camera being used to avoid distorting the image.
Skylarpu 7Ē 1024*600 (16:9) IPS Screen Display LCD TFT Monitor EJ070NA-01J with Remote Driver Control Board 2AV HDMI VGA for Raspberry Pi
AliExpress Product ID: 32709495542
Price: NZ$36
https://www.aliexpress.com/item/7-In...709495542.html
HDMI/VGA/AV Control Driver Board + 8"inch HJ080IA-01E 1024*768 (4:3) IPS high-definition LCD Display For Raspberry Pi
AliExpress Product ID: 32325924891
NZ$52
https://www.aliexpress.com/item/HDMI...325924891.html
Receiver for use with phone or tablet
The receiver linked to below allows connection to, and runs off, a smart phone, tablet, or Laptop. So no separate LCD display required, and no separate battery either at the receive end. It is supplied with a short USB cable for this - too short really when you want to get the receiver/antenna well above ground level where the display will likely be. One limitation to date is that the smart phone must be Android. There are descriptions for setting this up with a phone elsewhere online Ė what app to use etc. For PC viewing I used the free version of NCH Debut. The resolution from this receiver is 640x480. The receiver tunes to the strongest available signal following a scan of the band in 2MHz steps. For PC viewing I used the free version of NCH Debut.
Eachine ROTG01 UVC OTG 5.8G 150CH Full Channel FPV Receiver For Android Mobile Phone Tablet Smartphone
Banggood Product ID: 1147692
NZ$23
https://www.banggood.com/Eachine-ROT...r_warehouse=CN
Small patch antenna for more range
Our application is a bit different from using the gear for FPV in that being fixed point-to-point we donít need omni-directional antennas and can align polarisation to match at both ends. This means we can go directional to increase system gain for more range.
FPV 5.8G 5.8Ghz 14dBi High Gain Panel Antenna for Fixed-wing/Multicopter
Price: NZ $7
AliExpress Product ID: 32808722856
https://www.aliexpress.com/item/FPV-...808722856.html
With all this FPV gear it is necessary to keep track of whether an SMA or Reverse-Polarity SMA antenna connector is used in each case. Although advertised as having an SMA connection, this patch antenna also comes as RP-SMA , selected via what is normally the product colour option:
Properties: Color Bore (RP SMA)
Properties: Color Needle (SMA)
Welcome guest, is this your first visit? Create Account now to join.
Welcome to the NZ Hunting and Shooting Forums.
Search Forums
User Tag List
+ Reply to Thread
Results 1 to 15 of 18
Thread: Target Camera Revisited
-
30-04-2018, 10:44 PM #1
Target Camera Revisited
-
-
30-04-2018, 10:53 PM #2
I included the product details in case the links fail, then maybe the items can still be found from the descriptions.
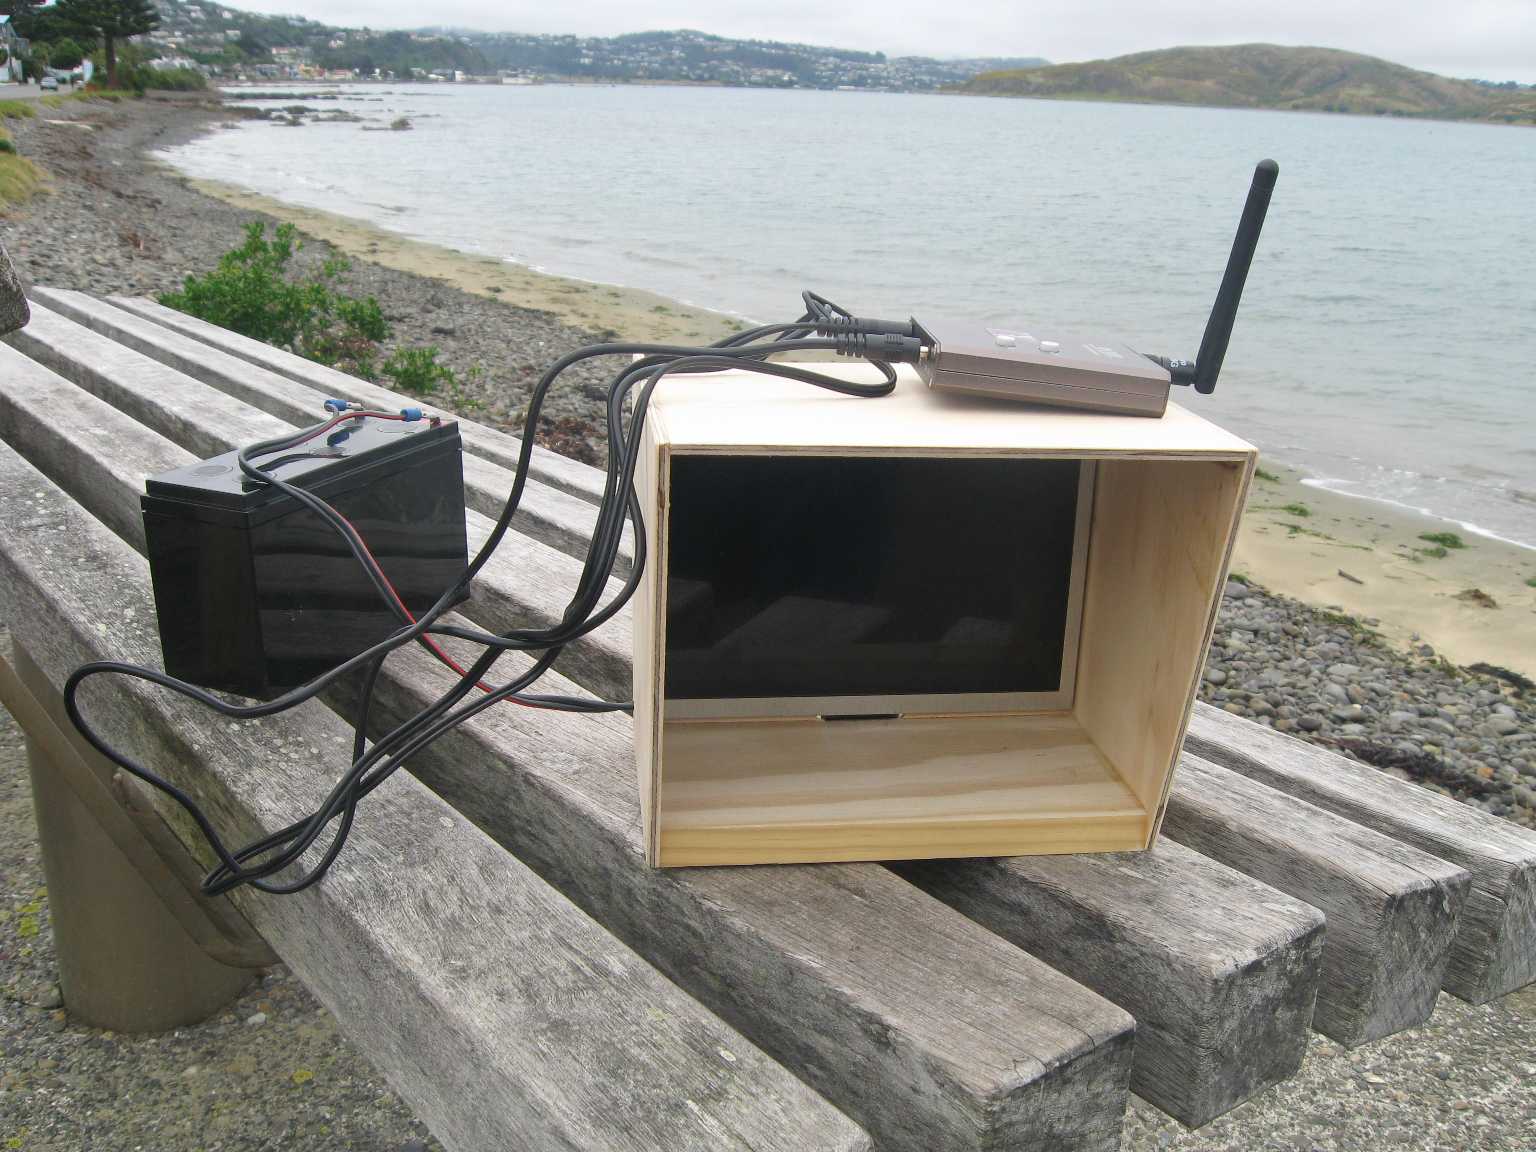
Here is a homemade LCD housing. Trying for a 1km path across water here with the rubber duck antenna... not a reliable level of signal and really needs the extra gain from the patch antennas.

Last edited by Puffin; 30-04-2018 at 10:59 PM.
-
01-05-2018, 01:06 AM #3Member

- Join Date
- Jul 2012
- Location
- Napier, Hawkes Bay
- Posts
- 4,460
Thanks for posting up all of that, very cool. Looks like one could piece together a neat little setup for bugger all.
I like the option using a tablet to view.
-
01-05-2018, 08:06 AM #4
Yes, very little. The receiver for phone option could keep things down to around $60 depending on the day - excluding any additional cost of a battery and tripod at the target end. The combination below for example should work out to 300 metres. Add a patch antenna for 1000m and still only $70.
Camera, NZ$16
https://www.banggood.com/Eachine-100...r_warehouse=CN
Replacement zoom lens, NZ$6
https://www.banggood.com/16MM-M12-12...r_warehouse=CN
Transmitter, NZ$17
https://www.banggood.com/Eachine-TX5...r_warehouse=CN
Receiver for phone, NZ$23
https://www.banggood.com/Eachine-ROT...r_warehouse=CN
-
01-05-2018, 10:38 AM #5Member

- Join Date
- Nov 2016
- Location
- Orewa
- Posts
- 86
Thanks for the write up. Been thinking about doing something like this....
Cheers.
-
02-05-2018, 06:39 PM #6
Nice work
Sent from my SM-G950F using Tapatalk"Does the brain control you or are you controlling the brain? I don't know if I'm in charge of mine." - Karl Pilkington
-
22-05-2018, 10:11 AM #7
Update: the particular patch antennas linked to earlier have turned out to be duds. Best to try something else to push the range out to 1km. Maybe look online to see with what models of antenna the FPV community are having success, remembering that circular polarisation is not required for this application. All the other parts are working out well.
-
30-05-2018, 10:44 AM #8
Further update: the supplied "rubber duck" antennas (as pictured in the earlier photo) at each end will give a video link that runs reliably over 200-300m. For 1-2km where having a video link starts to add real value, then some sort of gain antenna is needed. It is likely that there only needs to be a higher gain antenna at one end, though this will depend on how much gain the antenna is providing. I'd recommend leaving the omni-directional rubber duck at the camera/transmitter end, then the directional antenna can be adjusted easily when back at the shooting position for best picture quality.
I still think patch antennas should be a good off-the-shelf choice, just not any of the ones that look like the items referred to in the previous post. It might pay to buy in a pair just to be certain of reaching the required distance.
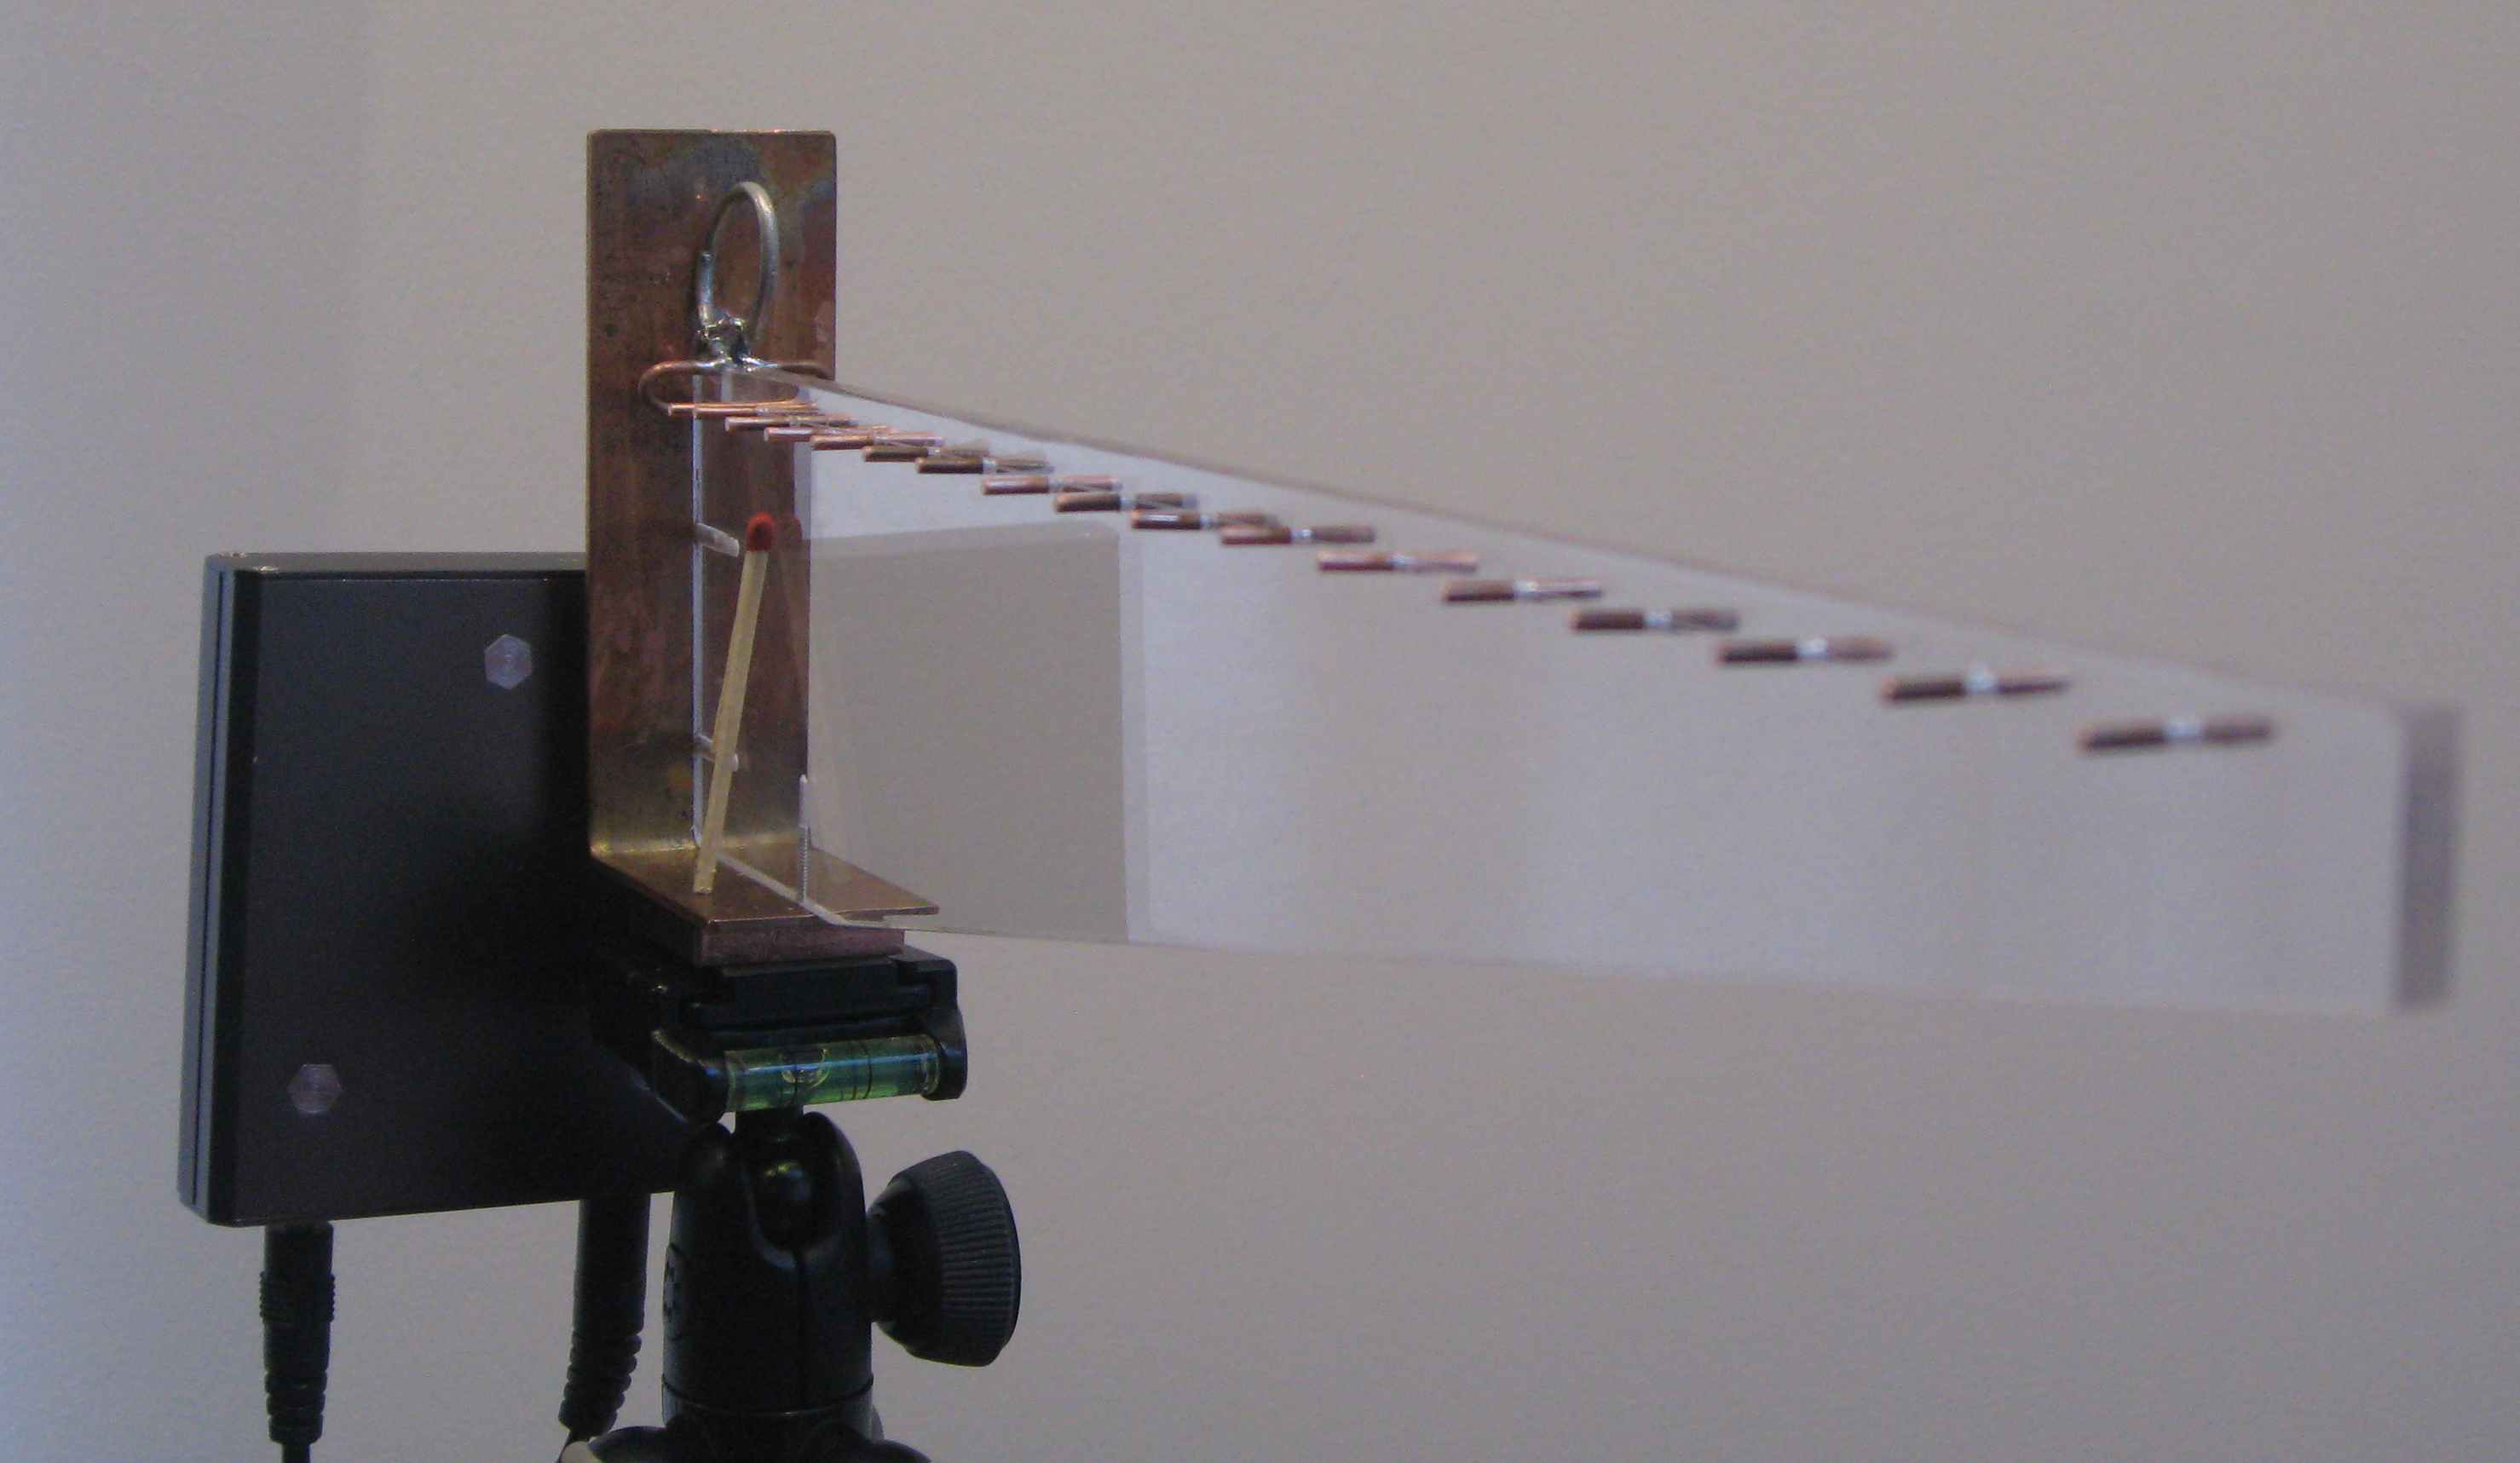
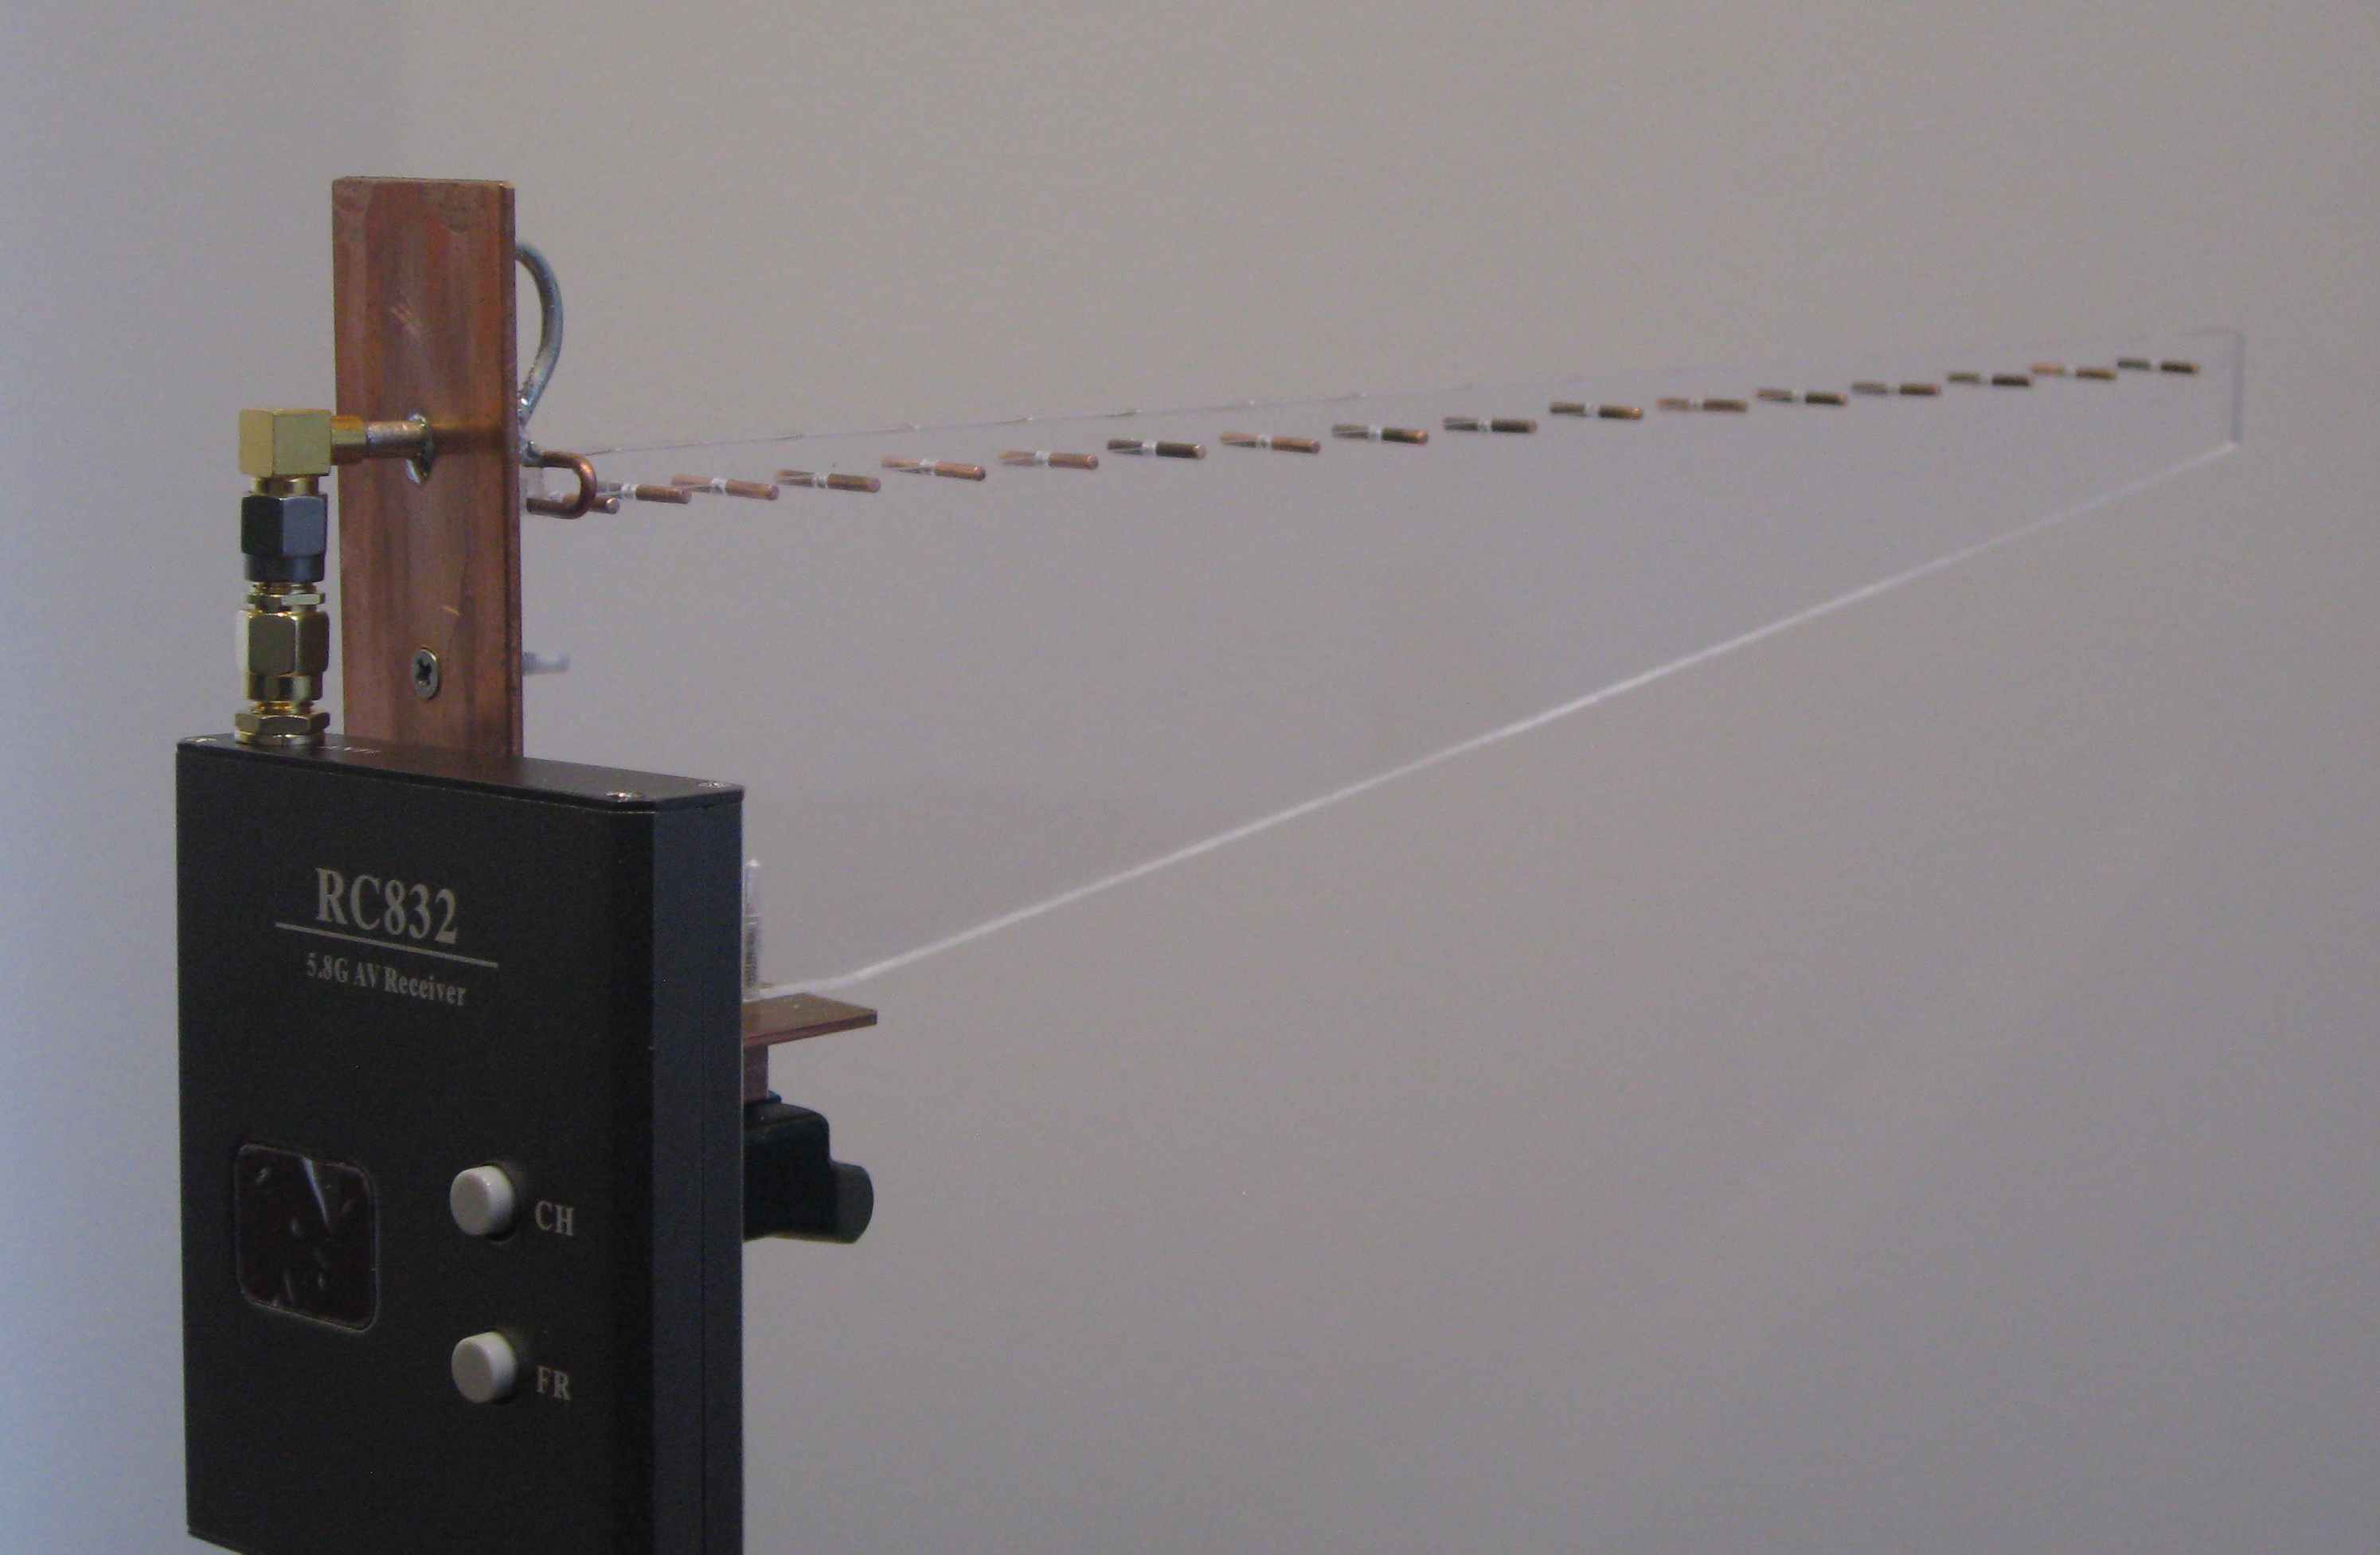
I did have a play myself and tried something different, ending up building a 19-element yagi. Rock-solid picture over 1km with the transmitter backed off to just 50 milliwatts


-
30-05-2018, 11:10 AM #9
There are some very talented and clever people on this forum.
-
30-05-2018, 11:34 AM #10Member

- Join Date
- Nov 2016
- Location
- Orewa
- Posts
- 86
Very nice @<u><a href="https://www.nzhuntingandshooting.co.nz/member.php?u=699" target="_blank">Puffin</a></u>. I was just looking at Yagi ideas the other day and found this guys vid.
https://youtu.be/UyTaqD3qO4g
-
30-05-2018, 06:56 PM #11
It's not a yogi unless it's made out of a Pringles can

-
30-05-2018, 09:22 PM #12
That looks like a design that forum members could have a go at replicating. The driven element is a full-wave loop with unbalanced feed, directors all the same length, I wonder if the designer has quantified the electrical behaviour ? Without building one and testing, it is not so easy to predict, though it looks about right for maybe 9-10dBi forward gain... worth trying.
The reason I'm harping on a bit about the antennas is that all the other hardware parts have performance that is fixed; the components are purchased in from Banggood or AliExpress, hooked up, and a picture received. It is the choice of antennas when assembling a TargetCam that has the largest influence on whether the system works well - or does not - across the distance required.
A problem if using the "vertical" antennas supplied with the FPV transmitters and receivers, and one that might not be obvious, is that while the system gain over the distance between the shooter and target may in theory deliver a good picture, these omni-directional "rubber duck" or stick antennae are prone to picking up a multitude of reflected signals that result in the dreaded multi-path interference. Very small changes in the position of the receiver or things close to the receiver (think you or the rifle etc) can cause the video to repeatedly drop out. A directional antenna at the receiving end is a good thing not just because it provides some forward gain but because it suppresses (for want of a better term) the pick up of signals from directions other than from the target, and makes the quality of the link more robust. If using the supplied stick antennas, having your shooting position with the TargetCam receiving antenna out in the open and clear of the ground will be better than near structures, particular metal ones.
-
30-05-2018, 09:40 PM #13
I built a target cam using 2 of these, (currently disassembled as I need the camera for something else) but it worked well to 1600m and I could control (zoom) the camera in.
Could see the image on my Cell but was a bit of fannying about to get working and really was more of a permanent installation. Going to reassemble it with a solar panel and controller and leave it in position eventuallyTrust the dog.........................................ALWAYS Trust the dog!!
-
31-05-2018, 11:13 AM #14
Just thinking about lighter, integrated solutions.
How far out would a DSLR (fully zoomed and mounted on a steady low tripod) be useful for paper target spotting using its preview screen?An itch ... is ... a desire to scratch
-
31-05-2018, 11:21 AM #15
@Puffin
Most beautiful Yagi I've seen! Thanks for adding the match to show the size.
NB, at higher frequencies, RF runs primarily at the surface of copper elements, so surface oxidation can become an issue over time. I'd suggest complete the Yagi by polishing the copper and doing an overspray/brush with protective topcoat.
Would you be happy posting an image of the schematics for your Yagi?An itch ... is ... a desire to scratch
Similar Threads
-
Target Camera
By nzfubz in forum Projects and Home BuildsReplies: 16Last Post: 21-06-2023, 09:42 AM -
Bearing length revisited
By r87mm in forum Reloading and BallisticsReplies: 0Last Post: 25-11-2017, 01:59 PM -
TargetVision LR-2 Target Camera
By Dermastor in forum Firearms, Optics and AccessoriesReplies: 7Last Post: 18-04-2017, 07:19 PM -
Spot X revisited
By Chris in forum FishingReplies: 10Last Post: 22-03-2015, 09:29 PM
Tags for this Thread
Welcome to NZ Hunting and Shooting Forums! We see you're new here, or arn't logged in. Create an account, and Login for full access including our FREE BUY and SELL section Register NOW!!


 13Likes
 LinkBack URL
 About LinkBacks


 Reply With Quote


Bookmarks